How to Draw the Mandalorian
In this tutorial you will learn how to draw the Mandalorian from Star Wars. Here you will also find two even more simplified versions.
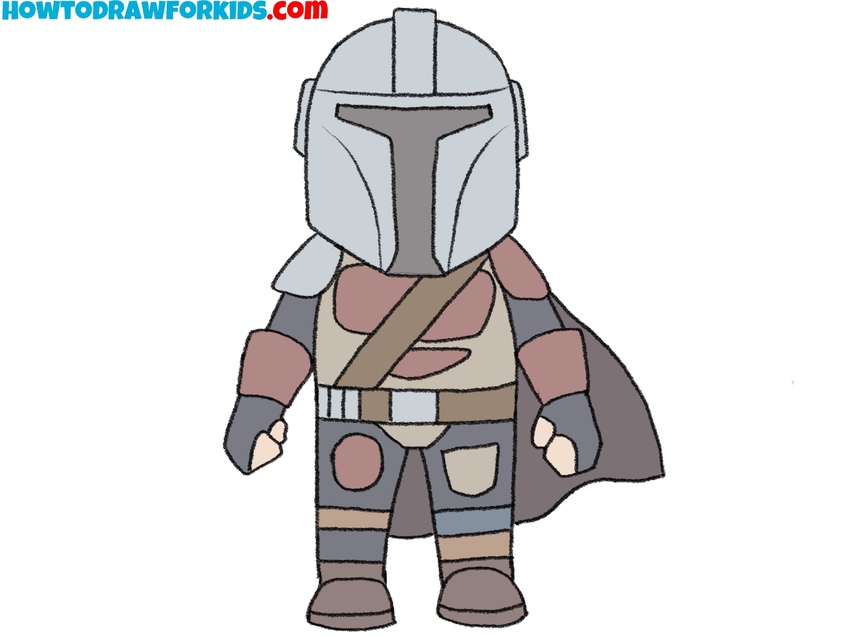

How to Draw the Mandalorian: Introduction
In this tutorial, you will draw a character from a popular space western series. This character is from a well-known TV series that is part of the Star Wars franchise. In this tutorial, you will learn how to draw the Mandalorian. First I will demonstrate to you the basic method, then I will introduce you to two additional, and no less interesting methods.
The Mandalorian is a skilled warrior and a member of a nomadic group. These people have their own customs and traditions. The Mandalorian has the appearance of a seasoned fighter, featuring an iron helmet, durable armor, and powerful weapons. This character has participated in various military conflicts.
Any beginner can draw this character by carefully following each step. In this Mandalorian drawing tutorial, it is important to replicate the lines accurately and maintain the proportions. Work carefully and precisely. Follow the prompts provided, and you will be able to complete this drawing successfully.
In this tutorial, we will draw the Mandalorian in a simplified, almost cartoon-like style. This approach involves intentionally reducing complex details and focusing on the most essential features to make the drawing process as simple as possible while keeping the character recognizable.
Mandalorian Drawing Tutorial
Materials
- Pencil
- Paper
- Eraser
- Coloring supplies
Time needed: 45 minutes
How to Draw the Mandalorian
- Sketch the basic forms.
Sketch an oval shape for the head, creating the helmet of the Mandalorian. Beneath this, draw another rounded shape that resembles a slightly flattened oval for the torso. This body shape should be smaller in width than the head to create a cartoonish, simplified look.

- Detail the helmet.
Next, start detailing the helmet, focusing on the T-shaped visor. Make sure the visor covers a large part of the helmet’s face, as this is one of the Mandalorian’s most recognizable features. Add small side panels on each side and a strip on the forehead of the helmet to complete the basic helmet shape.

- Add the arms and shoulder pads.
Draw small, rectangular shapes on top of each shoulder to represent the Mandalorian’s shoulder armor. Then, draw two elongated shapes extending downward, with each arm positioned slightly away from the body. For the hands, draw small, rounded shapes at the end of each arm to represent fists.

- Illustrate the legs of the character.
Add the legs beneath the torso, keeping them short and simple. Begin by sketching two vertical shapes that extend downward from the bottom of the torso. Each leg should be equal in width and length, with rounded feet at the bottom to complete the legs.

- Draw the belts and gloves of the Mandalorian.
Next, draw a diagonal stripe across the chest, representing the Mandalorian’s chest armor strap. This strap should angle from the top of one shoulder to the opposite side of the torso. Then, draw the belt on the waist and gloves on the hands.

- Draw the cape and knee armors.
Begin at one shoulder and draw a slightly curved line that flows down the side of the body, representing the edge of the cape. Then, draw the knee armors and detail the pants. The Mandalorian’s costume is very complex and consists of many parts, but we’ll only draw the most noticeable and important ones.

- Detail the torso and belt.
Refine the chest armor by adding rectangular or diagonal panels across the torso. Next, add more details to the belt by sketching additional small rectangles or pouches, which represent storage or gear components. Finally, move down to the boots and add horizontal lines around each boot, creating the soles.

- Finish the sketch.
Make sure each part of the Mandalorian drawing, including the helmet, chest armor, belt, and boots, has clear, polished lines that will make coloring easier. Erase any unnecessary guidelines or overlapping lines to create a tidy outline.

- Color the Mandalorian.
Use a light gray or silver for the helmet and primary armor pieces. For the chest strap and belt, choose shades of brown to differentiate these elements. Color the cape in a darker shade, such as black or dark gray. Use a few different shades of gray, brown, and dark colors on various parts.

How to Draw the Mandalorian: Additional Tutorials
Now that you have completed the main Mandalorian drawing tutorial, you can try additional tutorials to further develop your skills. These related guides offer simplified approaches and variations, allowing you to practice drawing Mandalorian in different styles. Reviewing these additional tutorials will help reinforce the techniques you’ve learned and provide new methods for drawing similar characters.
Simple Manipulation Drawing Technique
This Mandalorian drawing tutorial differs from the first by focusing on a more simplified body structure, with fewer detailed armor pieces and a larger focusing on basic shapes. The Mandalorian’s body is more rounded, and the design uses simpler, bolder lines for a cleaner, less detailed appearance. The helmet and armor are represented with minimal detailing, and the figure is drawn in a more chibi style, with even more exaggerated proportions that make the head appear larger in relation to the body.
To draw the Mandalorian in this simple style, begin by sketching a rounded shape for the head and a smaller oval below it for the torso. Draw the legs extending from the torso, with short, rounded feet. Next, add the arms on each side, keeping them close to the body. Outline the Mandalorian’s helmet by adding the T-shaped visor design, creating large, clear lines for simplicity.
Draw minimal details on the arms, legs, and chest to represent the armor without complexity. Add a diagonal strap across the torso and a simple belt shape to finish the design. Finally, add color to the Mandalorian, using gray for the helmet and armor, brown for the clothing, and darker shades for the belt and gloves, giving the figure a recognizable but simplified appearance.

Easy Mandalorian Sketching Technique
This easy Mandalorian drawing tutorial offers another simpler, more chibi-like design compared to the first. The proportions are also exaggerated, with a much larger head relative to the body, giving it a highly stylized and cute appearance. The details on the armor, helmet, and body are minimized, focusing only on the most essential shapes. This tutorial avoids complex elements, creating a very easy drawing for beginners.
To draw the Mandalorian in this easy way, start with a large, rounded shape for the head. Add a small trapezoid below for the torso. Then, draw a narrow rectangle for the belt. Draw short, wide legs with rounded feet beneath the torso, keeping the proportions small and simple. Next, add rounded arms to each side of the torso, making them appear almost as extensions of the body. Draw the helmet details with a simplified T-shaped visor, using only a few lines to illustrate its recognizable structure. Add minimal chest details, such as a simple belt and strap across the torso. Finish by coloring, using shades of gray for the helmet and brown for the clothing, to complete this simplified Mandalorian drawing.

Conclusion
In this tutorial, you learned how to draw the Mandalorian. This tutorial aimed to be informative and useful. Now you understand how easy it is to draw a warrior wearing a helmet and armor, and you can apply the skills you’ve gained as needed. You can create drawings of any warrior or knight using the elements described in this guide.
But to consolidate your knowledge in drawing various warriors from different eras, not only from the distant future, but also from the past, I advise you to read my lessons on how to draw a knight and instructions on how to draw a samurai.
Also, I recommend checking out the baby baby Yoda drawing tutorial on my website. Moreover, by drawing these two characters together, you can recreate a scene from Star Wars.


This is a great tutorial for kids! I love how easy it is to follow and the results look great.