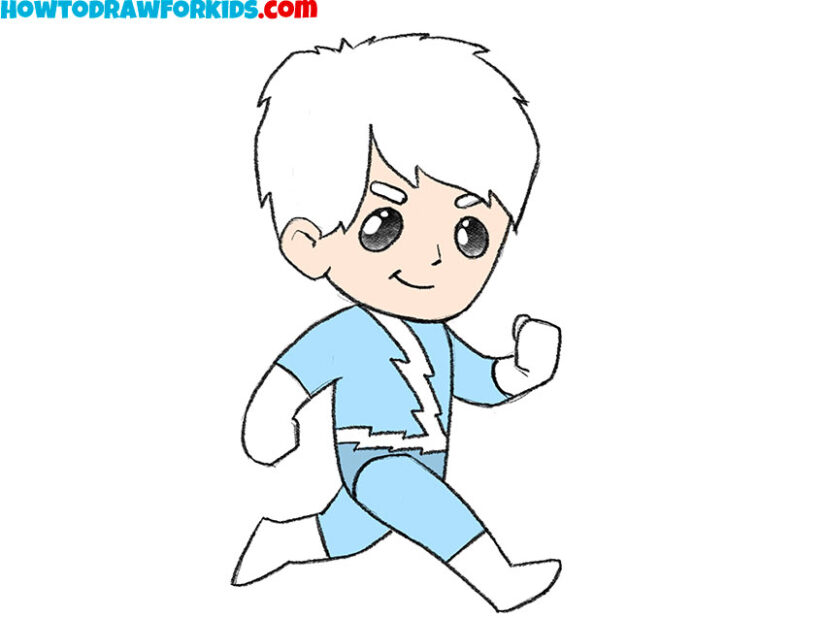
How to Draw Quicksilver
Now, I will present a simple method on how to draw Quicksilver, a character from the X-Men comics and a member of Magneto’s team.

How to Draw Quicksilver: Basic Information
Drawing comics is a complex skill, but in this tutorial on how to draw Quicksilver, I will show you the simplest method while ensuring the character remains recognizable.
Character recognition is very important in the final drawing. To make the character recognizable in this simple style, avoid focusing on small details. Instead, illustrate the distinctive features, such as hairstyle, suit shape, and lightning pattern.
Attention to details, such as his windswept hair and running stance, also will be very important. I have simplified the process into 9 really easy steps, ensuring his movement is represented in a static form and simple style.
You can apply the skills learned in this Quicksilver drawing tutorial to draw other comic book characters, such as Flash, who has similar abilities but appears in DC Comics.
Quicksilver Drawing Tutorial
Materials
- Pencil
- Paper
- Eraser
- Coloring supplies
Time needed: 35 minutes
How to Draw Quicksilver
- Sketch the head and torso of Quicksilver.
First, sloth an oval shape for Quicksilver’s head. Below the head, add a narrow rectangle for the body. When drawing comics, artists often use basic shapes to map out proportions before refining. This approach helps you not to make mistakes. Keep your lines light so you can easily adjust or erase them.

- Detail the face of Pietro Maximoff.
Draw two circles for the eyes. Below the eyes, draw the nose as a short and simple line. Then add a small curve for a simple smile. Above the eyes of Quicksilver, draw the eyebrow using two small oval shapes. In comic drawing, facial features are often kept simple, as subtle features can be enough to convey emotion.

- Sketch the hairstyle.
Quicksilver’s hairstyle is very important for character recognition. Use large, curved shapes to outline his hair rather than focusing on individual strands. After that, draw the ear with a couple of short lines. Since Quicksilver is known for his speed, you can draw the hair as if it’s windswept.

- Add the arms and clenched fists.
Now, draw Quicksilver’s arms in a running position. Begin with the left arm bent and extended forward, then draw the right arm angled slightly backward. The arms should be simple and rounded without detailed muscles. At the end of each arm draw the fists as simple shapes.

- Draw the legs of the character.
Draw Quicksilver’s legs in a running stance, with one leg stretched forward and the other slightly back. Start at the body and extend the lines outward to form each leg, finishing with small, rounded feet. In comic art, exaggerated leg positioning can help show action, even in a simplified form.

- Define the gloves and boots.
Add simple lines around Quicksilver’s wrists and ankles to indicate where his gloves and boots begin. These lines serve as subtle costume details that make the character more recognizable. In comics, small additions like glove and boot lines can help differentiate costume parts without making the design too complicated.

- Add the lightning bolt patterns.
Start from the shoulder area and angle it down to the waist, keeping the lines sharp and angular. Then, draw a lightning bold on the waist. The lightning bolt is a key part of Quicksilver’s costume, that makes him instantly identifiable. Comic artists use iconic patterns like this to reinforce character identity.

- Finalize the Quicksilver sketch.
This step makes the lines cleaner and prepares the Quicksilver drawing for coloring. In comic art, clear, polished outlines are very important for creating cool and interesting characters, especially in simplified styles. By carefully refining the lines, you make the drawing look neat and complete.

- Color the drawing.
Use a light blue shade for his suit, white for the lightning bolt, and a light skin tone for his face and hands. Quicksilver’s hair must be white, as this is one of the character’s distinguishing features. In comics, color schemes are important because they help readers quickly distinguish between characters.

How to Draw Quicksilver: Professional Tips
As we finish our tutorial on drawing Quicksilver, let’s look at some technical details that can improve your artwork. Mastering these details can turn a good drawing into a great one.
In simplified art, getting the proportion balance right is important. Quicksilver’s head should be slightly larger than his body to achieve the intended effect.
To illustrate his speed, you can use smooth, curved lines that imitate the flow of wind and movement around him.
For simplified characters, facial features are often placed lower on the face to create a more cute look. Adding small reflections in the eyes can make the character even more cute, with white spots suggesting light sources.
An artist’s skill lies in using these technical details effectively. These small but impactful techniques add the final touches that make the Quicksilver drawing even cooler.
Conclusion
After completing the simplified Quicksilver drawing, your artistic progress doesn’t end here. Visit other sections and corners of my site for various tutorials, like my Spider-Man drawing tutorial or the basic lesson on how to draw a person. These lessons are created to boost your drawing skills and refine your technique.
To stay updated with the latest tutorials, consider following me on social media. Your feedback is important, helping shape future tutorials and other content. Feel free to leave requests or suggestions below this lesson, and let’s continue developing your drawing skills.