How to Draw a Cactus
This is a really easy step-by-step drawing tutorial on how to draw a cactus – a plant that adorns deserts and the homes of many people.

How to Draw a Cactus: Introduction
In this tutorial, I will provide a guide on how to draw a cactus in its natural environment. If you would prefer to depict the cactus in a vase, simply omit the stones beneath the cactus and draw a vase instead. Additionally, a separate tutorial on drawing a cactus in a vase is available at the end of this guide.
The style used for the cactus is kept simple, while still maintaining a resemblance to a real cactus. To achieve this effect in your own cactus drawing, focus on illustrating only the main features of the plant, avoiding extra details.
This tutorial, like others, serves as a basic instruction. To personalize your cactus sketch, you can modify the shape and number of the branches, and add or remove flowers at the ends of the branches as desired.
You may also integrate your drawing of a cactus into different environments to add more variation to your sketch. Finally, additional cactus drawing tutorials are included at the end of this guide. These will allow you to practice further and increase your confidence in this drawing technique.
Cactus Drawing Tutorial
Materials
- Pencil
- Paper
- Eraser
- Coloring supplies
Time needed: 20 minutes
How to Draw a Cactus
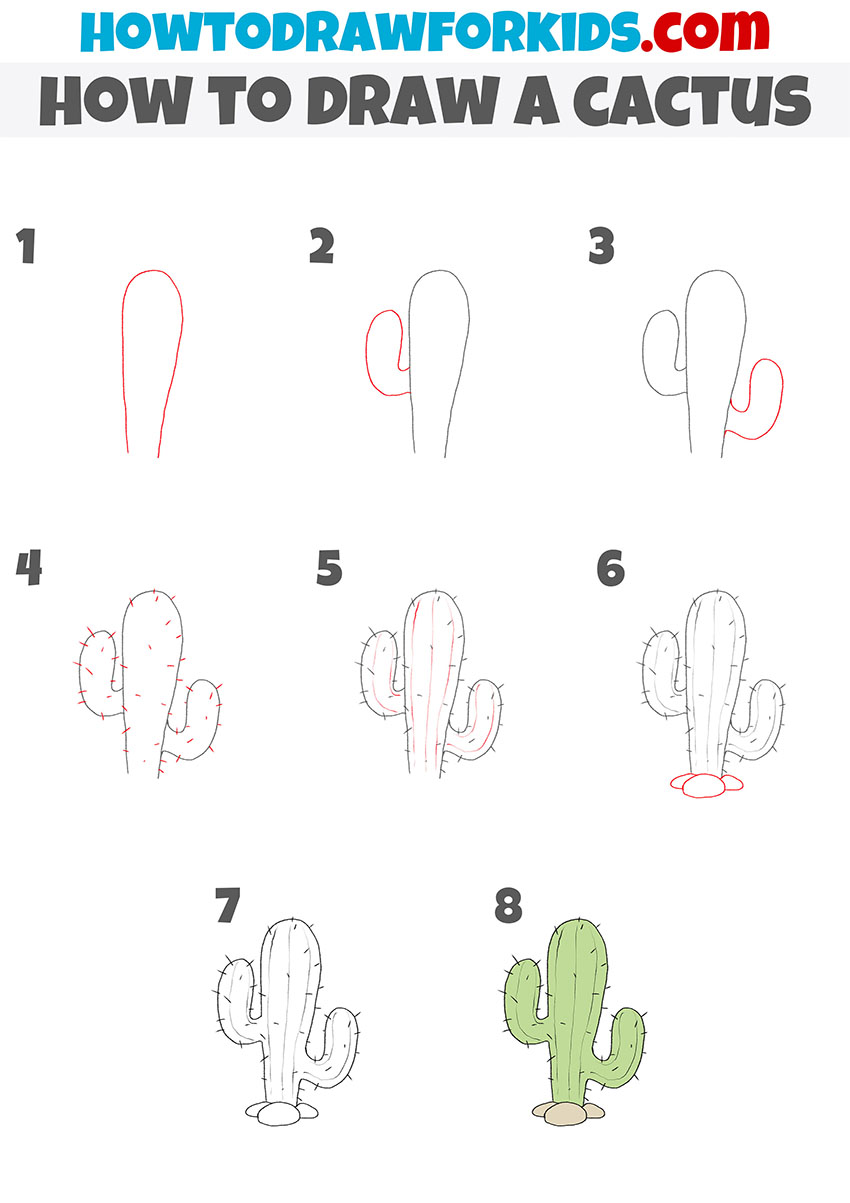
- Draw the main shape of the cactus.
In the first step, sketch the central part of the cactus. Create a long, vertical oval shape that slightly tapers towards the bottom. This will serve as the base of the cactus and the tallest part of the plant. The top of the oval should be rounded, and the bottom should connect to the ground later on.

- Add the first branch.
In this step, you will add one of the side branches of the cactus. Draw a smaller oval shape coming out from the left side of the main body. The shape should be similar to the one you drew in step 1, but smaller and attached at a slight angle. This will form the first arm of the cactus.

- Draw the second branch.
This branch of the cactus should be similar in size and shape to the one you drew in step 2. Position it on the opposite side of the first arm and slightly lower. The second branch should also have a curved, oval shape, attached to the central cactus in the same way.

- Add small spikes to the cactus.
In this step, start adding small details to make the cactus look more realistic. Draw short, straight lines along the outer edges of the cactus branches and the main body. These lines will represent the cactus’s spikes. You can add as many or as few spikes as you like, depending on the level of detail you want to include.

- Add the ribs to the plant.
These are the vertical lines that run along the surface of the cactus, giving it its recognizable appearance. Start by drawing several slightly curved vertical lines along the main body of the cactus, following its shape. Continue adding similar lines to the arms of the cactus.

- Add the ground and stones.
Draw an oval shape for a small stone at the bottom of the cactus, slightly overlapping the base of the main body. Next, add some smaller, round stones around the base of the cactus. The stones should be drawn as irregular, round shapes of different sizes. This will give the cactus a natural environment.

- Finalize the lines.
In this step, focus on refining and darkening the lines of the cactus drawing. Go over the main shapes and the spikes you have drawn, making the outlines clearer and more finished. By finalizing the lines, the cactus will appear more polished and ready for the final step of coloring.

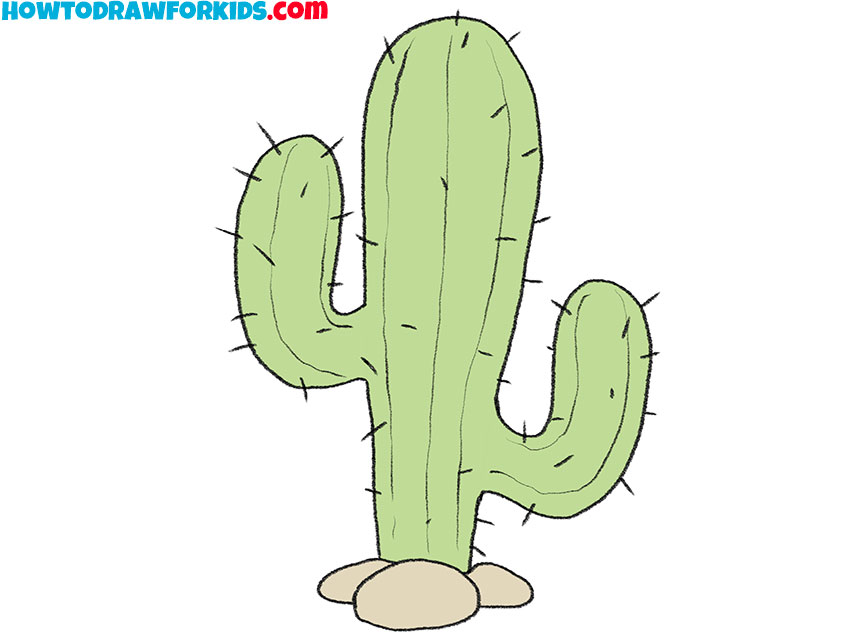
- Color the cactus.
You can use light or medium green for the main body and branches, as this is the natural color of a cactus. Color the small stones beneath the cactus with a light brown or beige color to represent desert sand or dry soil. You can also add some light shading to give the cactus a more three-dimensional appearance.
Additional Content
Remember to download the PDF version of this tutorial. In the PDF, you will find the steps shown above along with some useful additional materials, including a coloring page, a tracing worksheet, and a grid drawing worksheet.
How to Draw a Cactus: Additional Tutorials
How to Draw a Cactus for Preschoolers
Cacti come in many different types. In this lesson for kindergarten, you will learn how to draw this unusual and cool plant in the simplest way. It won’t be difficult at all.
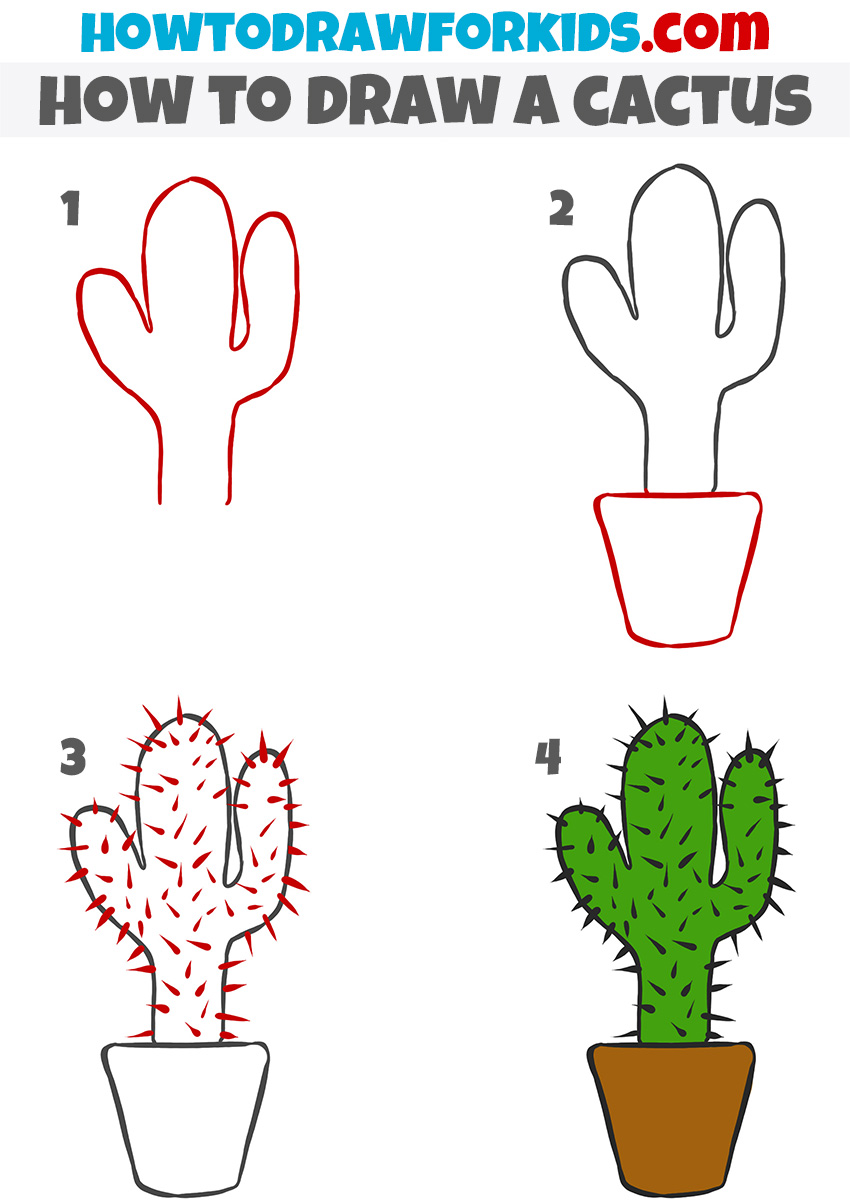
Draw a simple trapezoid shape to represent the pot. Ensure the bottom of the trapezoid is smaller than the top to give the pot a realistic appearance. Next, draw the outline of the cactus by sketching a large oval shape extending upward from the pot.
Add a smaller oval on the right side to represent the cactus’s arm. Afterward, add spikes by drawing short, straight lines across the surface of the cactus. These lines should radiate outward from the cactus’s main body and arm.
Once the spikes are complete, you can start finalizing the lines of the pot and the cactus, making sure everything looks clean and smooth. Lastly, add color to the drawing. Use a green color for the cactus and a light brown or tan color for the pot. You have now completed the drawing of a cactus in a simple, clear style.

Alternative Cactus Drawing Method
In the picture, there is a cactus with a main stem and two branches on the sides, just as in the main tutorial. But as you can see, here we draw a pot instead of stones and ground. Freehand lines are acceptable in this tutorial, and the shape of the branches may vary slightly from the example shown.
The main thing is to remember the steps in sequence so that you can easily draw such a cactus if necessary. So, get all your art supplies ready and get started with this fun tutorial.
Begin by drawing the outline of the cactus, creating a simple form with a main stem and two arms on either side. Keep the lines smooth and freehand to create a natural look. Once the cactus shape is complete, add a pot at the bottom by drawing a trapezoid shape, ensuring the base of the cactus sits inside the pot.
After completing the outline, add small spikes across the surface of the cactus. These spikes should be short and pointed, placed along the edges and middle areas of the cactus body and arms. Continue filling in the cactus with spikes until the drawing has enough texture. Finally, color the cactus with a green shade, and use a brown color for the pot. You can add some darker tones to the spikes if desired. This completes the simple cactus drawing in a pot.
Conclusion
I hope this cactus drawing guide was helpful to you. Feel free to share your thoughts in the comments section below this article. To further develop your skills, visit my tutorials on how to draw a rose and other plants in the Still-Life and Plants categories. You can also mention what drawing lessons you would like to see on the pages of Howtodrawforkids.com. Additionally, you can follow me on social media platforms such as Pinterest or YouTube.