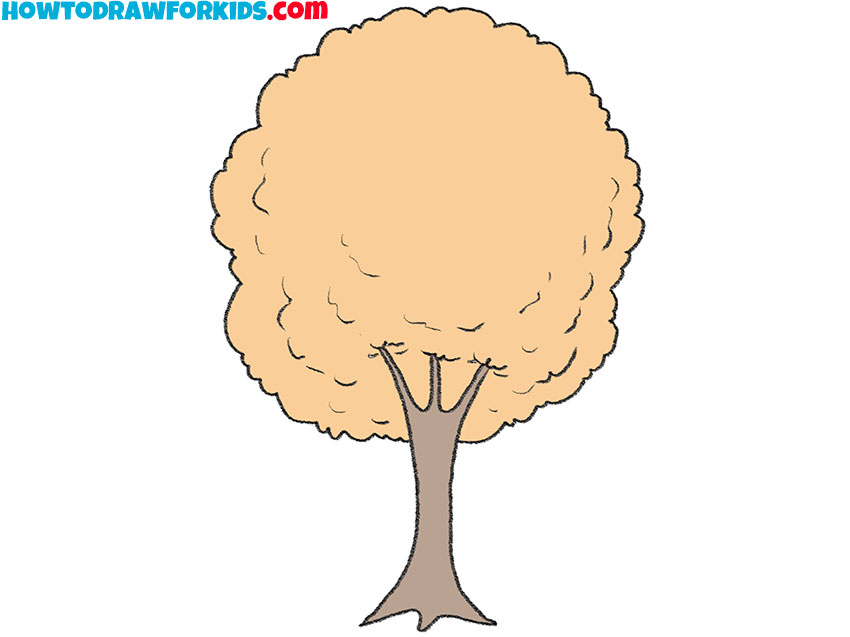
How to Draw a Fall Tree
Three easy methods will teach you how to draw a fall tree and how to create stunning autumn landscapes with orange and yellow trees.
How to Draw a Fall Tree: Introduction
There are many different types of trees in the world, and they all have distinct appearances. Additionally, the appearance of trees changes with the seasons. To draw trees in a more diverse and accurate way, it is important to know how to depict them in various forms.
In this lesson, I will demonstrate how to draw a fall tree using several distinct methods. Each method provides a unique approach with different steps and details, allowing you to explore the process of drawing autumn trees in a variety of styles.
This lesson will also help you better understand the structure and details involved in drawing trees in general. By following these steps, you can improve your ability to create accurate and detailed tree drawings.
Furthermore, this lesson will be particularly useful if you are interested in learning how to draw autumn landscapes. Knowing how to draw trees in their fall form is an essential skill for illustrating the characteristic look of the season.
Fall Tree Drawing Tutorial
Materials
- Pencil
- Paper
- Eraser
- Coloring supplies
Time needed: 35 minutes
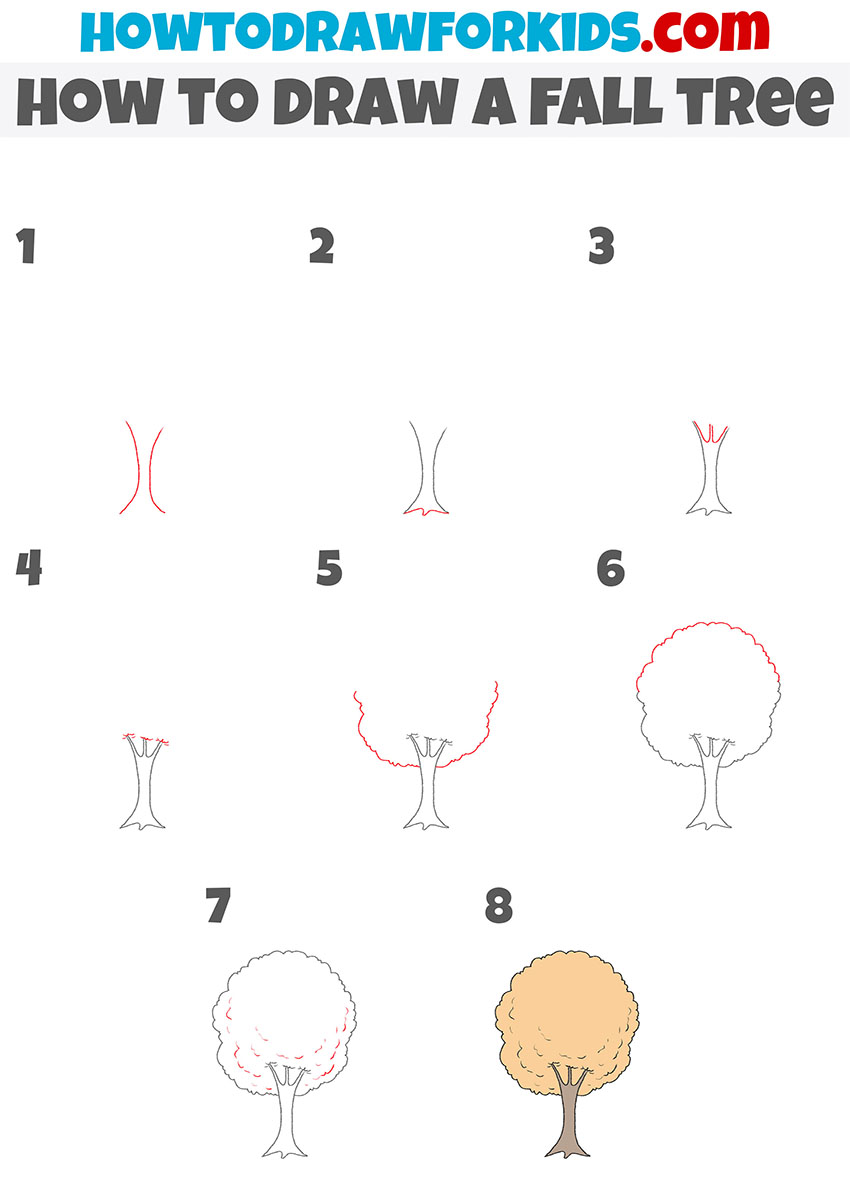
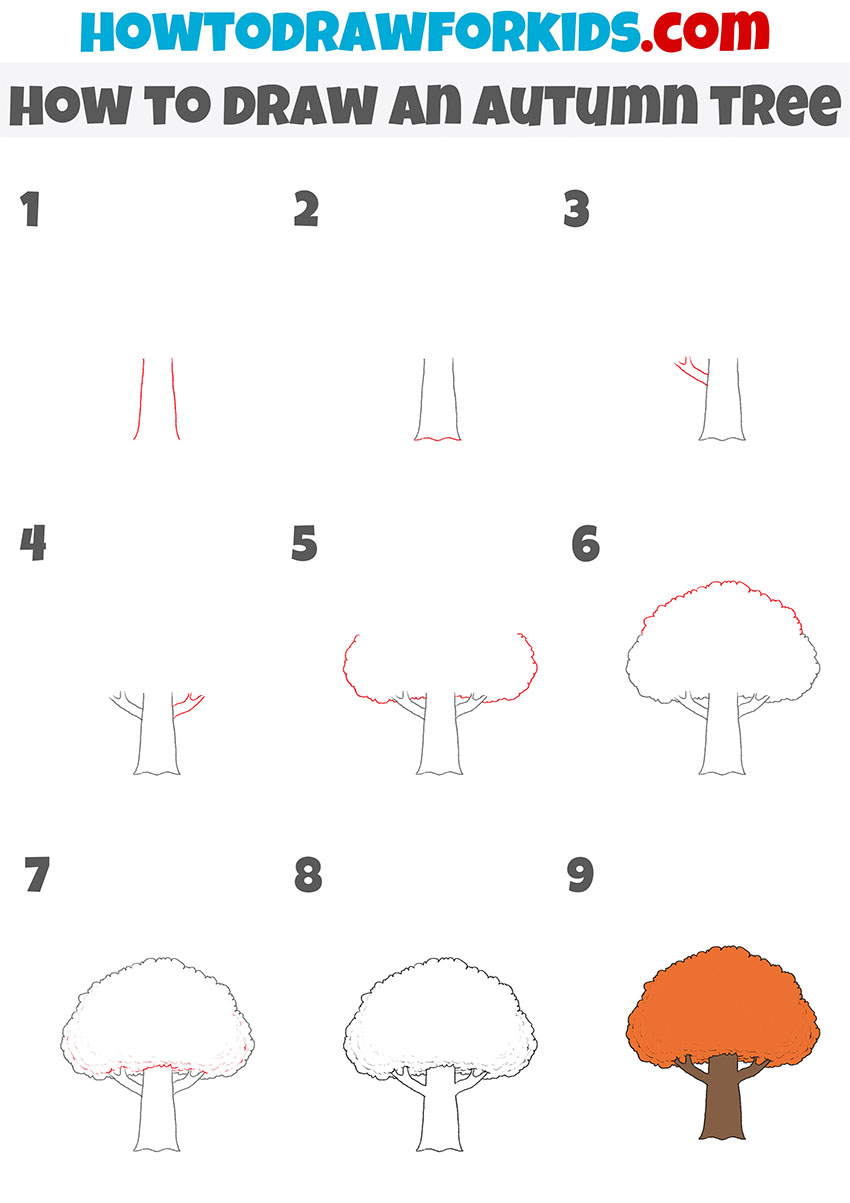
How to Draw a Fall Tree
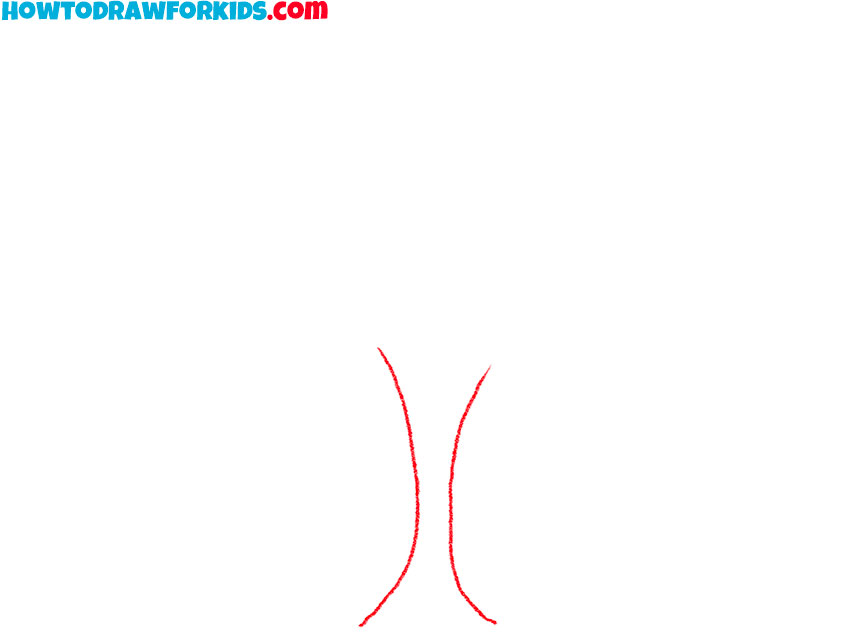
- Draw the basic trunk outline.
Begin by sketching the basic structure of the fall tree trunk. Sketch two slightly curved vertical lines to form the sides of the trunk. The width at the base should be slightly wider than the top, resembling how real trees are sturdier near the roots. Use light strokes with your pencil to ensure you can adjust as needed.
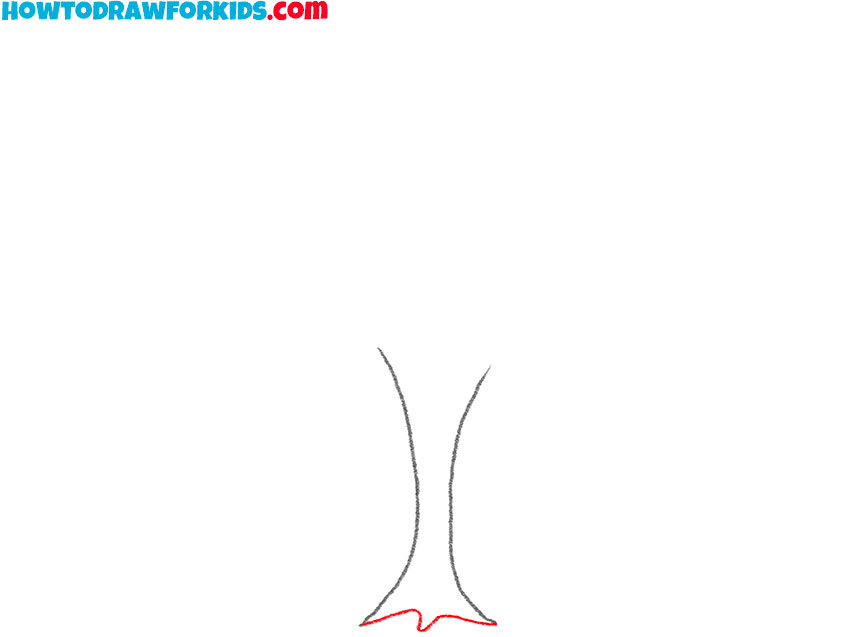
- Draw the roots of the fall tree.
To draw the roots of the fall tree, outline small and simple curves at the base where the trunk meets the ground. Roots usually spread outward slightly, so draw a few short, pointed arches along the bottom. The roots don’t have to be perfectly even, as trees in nature often grow irregularly.
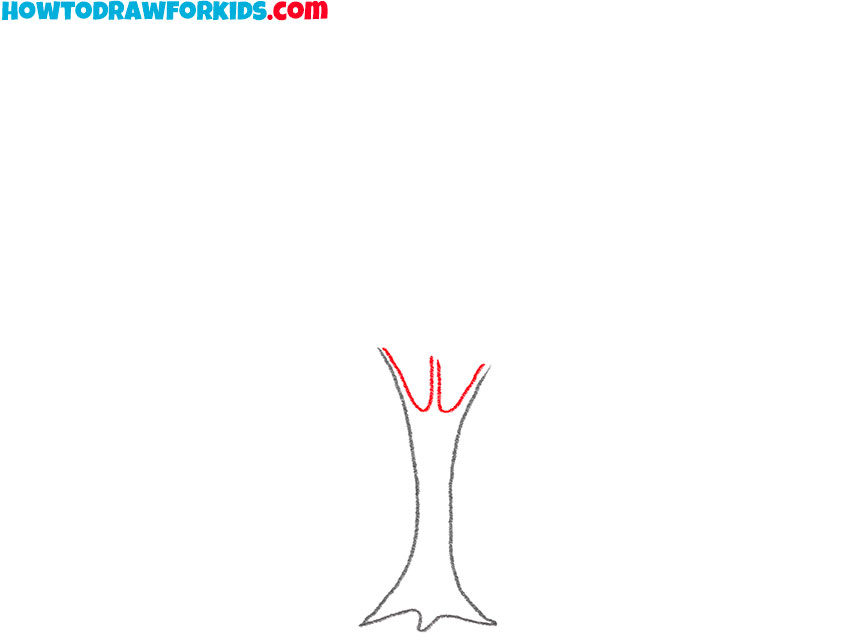
- Draw the branches of the fall tree.
Use smooth and irregular lines to draw these branches. Keep the lines smooth and narrow, tapering off at the ends for a natural look. These branches don’t need to be symmetrical, but they should feel balanced in size relative to the trunk.
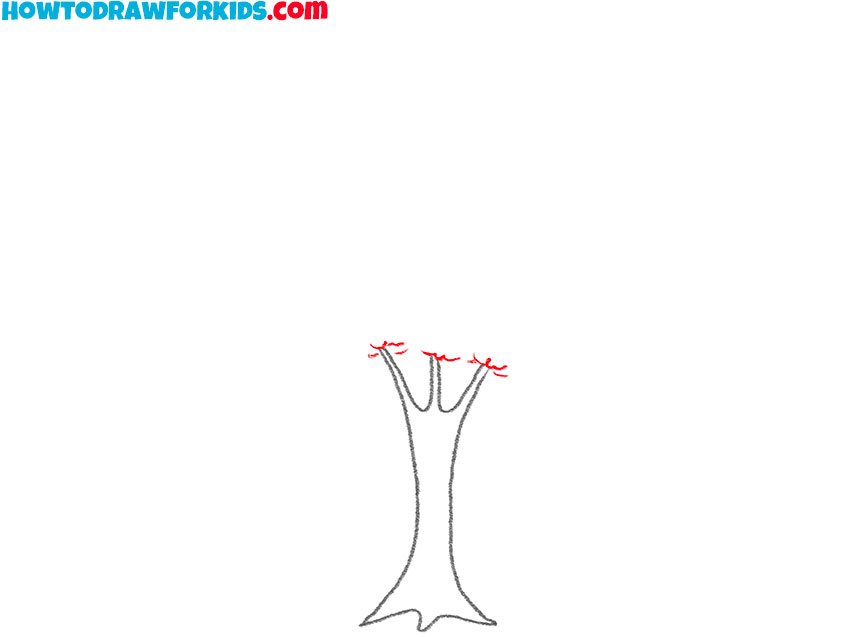
- Sketch the lower border of the foliage.
Once the tree trunk, roots and branches have been drawn, it’s time to start drawing the tree’s crown. Start by drawing short, uneven lines at the end of the branches from the previous step to indicate where the crown meets the trunk. You can make them short and slightly jagged to keep the drawing organic.
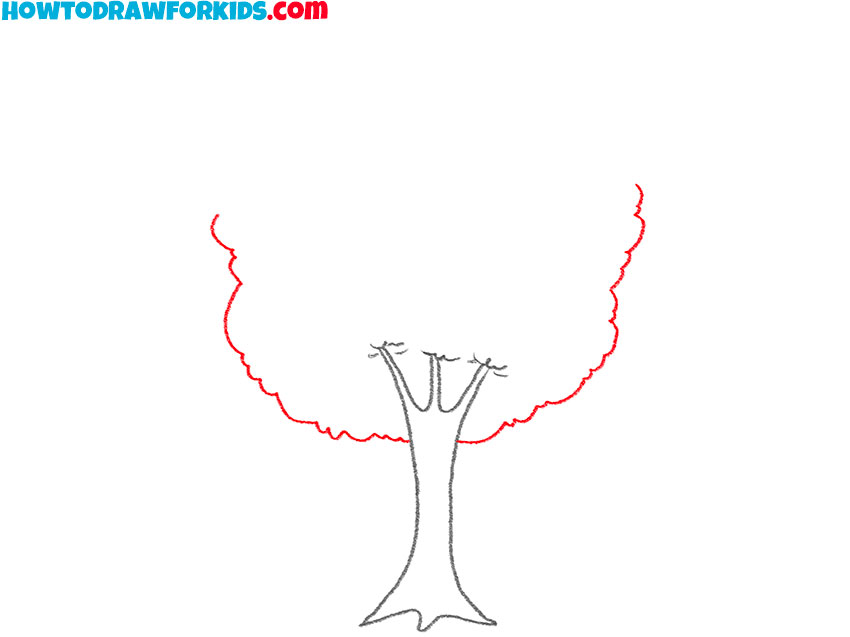
- Start drawing the canopy of the fall tree.
Create cloud-like lines to form the bottom of the foliage. These curved, uneven lines should surround the branches, giving the impression of a large, fluffy tree crown. The foliage shape should be roughly circular or oval, but don’t worry about making it perfect – trees have irregular shapes.
- Complete the outline of the canopy.
With the bottom of the canopy in place, refine the tree’s foliage by adding the top part to complete its volume. Continue adding smaller curves and edges to finish the outline of the leaf canopy, creating a large cloud-like shape. The fall tree outline should now look almost finished.

- Add details to the canopy.
Go over the foliage outline to finalize its shape, adding more smaller curves or edges where needed to illustrate the clusters of leaves. If you drew construction lines earlier, erase them to keep your final lines clean and clear. Double-check the proportions between the trunk, branches, and canopy.

- Add color to the fall tree.
Start by coloring the trunk of the fall tree and branches with a medium or dark brown to represent the bark. For the canopy, use shades of yellow, orange, and red to reflect the signature look of fall leaves. You can add some shadows to make your fall tree drawing look more natural.

Additional Content
For your convenience, I’ve put together a free PDF file that includes a summarized version of my lesson. It’s designed for easy downloading, allowing you to enjoy learning and practicing how to draw autumn trees even when you’re not connected to the internet. In addition to the step-by-step instructions, the file also includes a fall tree-themed coloring page, a tracing worksheet to help you refine your strokes, and a grid drawing worksheet to practice proportions accurately.
Alternative Drawing Techniques
Once you have completed the basic tutorial on how to draw a fall tree, you can further develop your skills by exploring additional tutorials that offer different approaches and styles. Each tutorial introduces unique methods to draw fall trees, allowing you to boost your understanding of shapes, details, and variations.
How to Draw an Autumn Tree
The second method on how to draw a fall tree, while very similar to the first, features a wider tree for a fuller silhouette and includes more steps. The main difference between the two tutorials lies in the methods used to draw the branches and foliage. Additionally, this tutorial includes more defined lines for the leaves and adds finer details to the foliage.
Begin by drawing the trunk of the autumn tree using two vertical lines that are slightly curved inward. Add a wavy line at the base to form the roots. Extend slanted lines from the trunk to represent the primary branches, and add smaller lines branching outward to form secondary branches. Next, sketch a large, rounded canopy above the branches using wavy lines to outline the foliage.
Ensure the canopy covers the top and sides of the tree, leaving the branches visible at the base. Add smaller wavy lines inside the canopy to represent clusters of autumn leaves. Refine the lines to smooth the drawing and erase unnecessary construction marks. Finally, color the trunk brown and the foliage in shades of orange, yellow, or red to illustrate the autumn tree’s seasonal appearance.
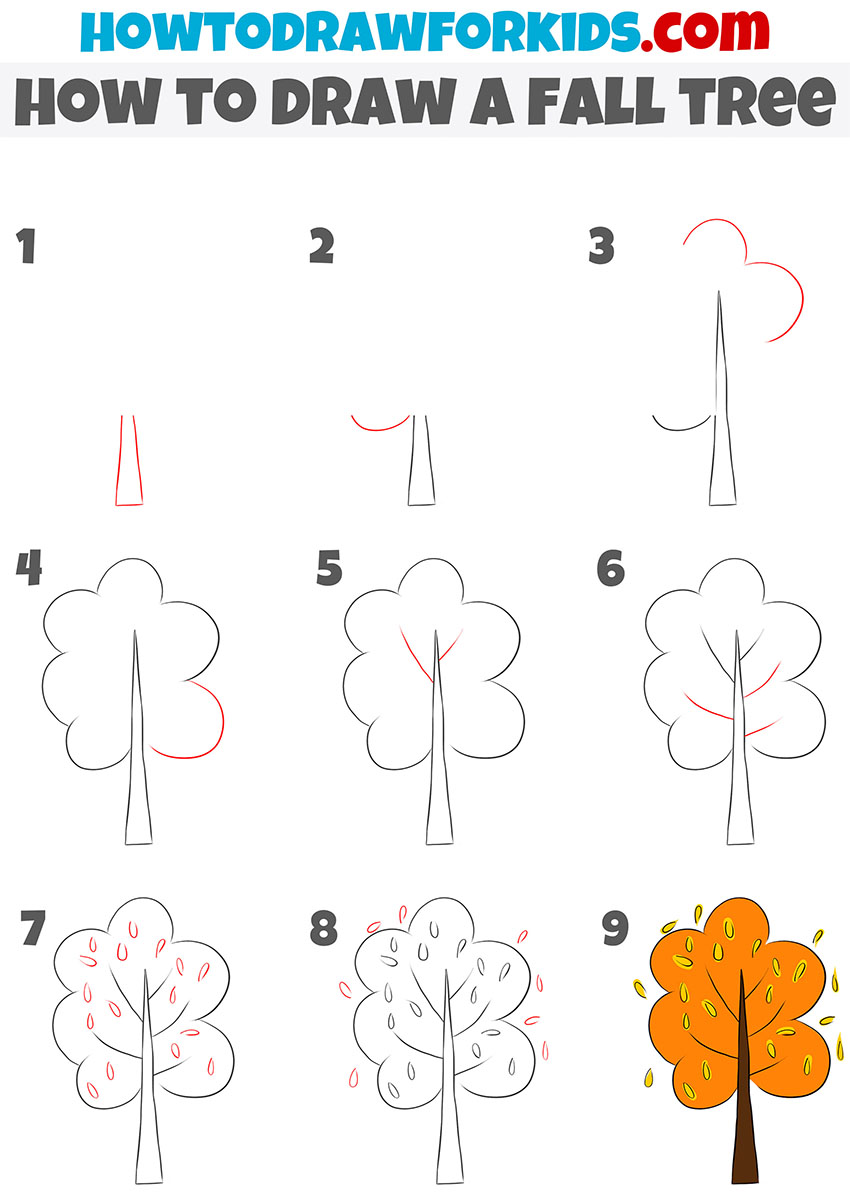
Alternative Fall Tree Drawing Tutorial
This technique uses a similar number of steps to the previous one, but shows how to draw a fall tree in more cartoon-like form. This tutorial differs from the first one in the way the tree canopy and details are created. Additionally, individual leaves are added within and around the tree canopy.
To draw a fall tree in this way, sketch a triangular trunk. Sketch a curved line extending outward from both sides of the trunk to form the start of the canopy. Add large, rounded, overlapping shapes above the trunk to complete the tree’s foliage. Inside the canopy, draw simple curved lines extending from the trunk to represent branches.
Add small oval shapes throughout the canopy and along its edges to depict individual fall leaves. Include additional leaves scattered around the tree to enhance the fall effect. Refine the outlines of the trunk and canopy to ensure smooth, clean lines. Finish the fall tree drawing by coloring the trunk brown and the leaves in shades of orange, yellow, and red.
Conclusion
This was a tutorial on how to draw a fall tree in three different ways. Each method was simple and straightforward, and it is intended to help you improve your tree-drawing skills. You can share your thoughts in the comments.
If this guide was helpful, you can check out other tutorials on my website. My guides also include lessons on how to draw a rose in several different ways. Additionally, you can try the Christmas tree drawing tutorial to practice drawing trees of different shapes.
For updates on new lessons and additional resources, you can follow me on social media. This ensures you stay informed about upcoming content. Thank you for following along, and I hope to see you in the next lesson.