How to Draw a Van
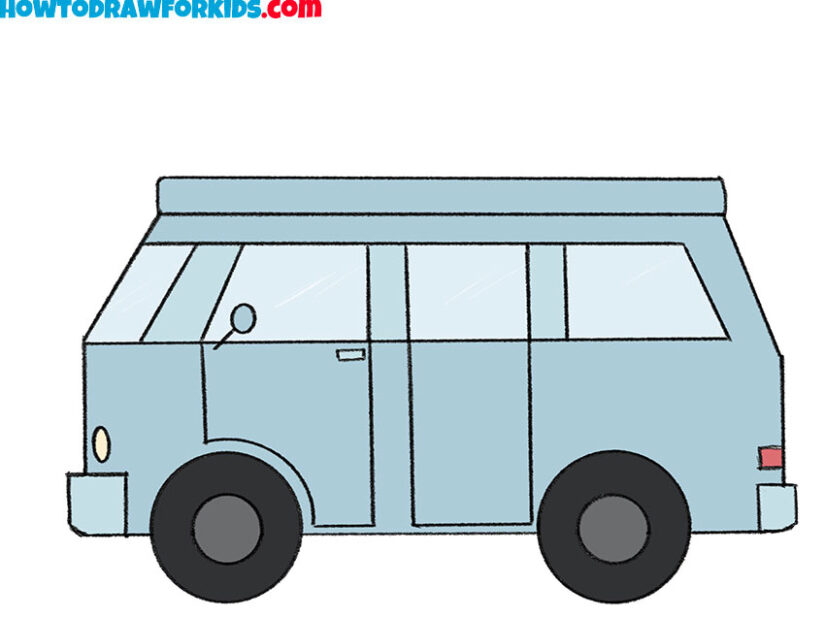
This tutorial on how to draw a van will guide you through creating the traditional silhouette of a compact yet roomy transport.
How to Draw a Van: Introduction
When will draw a van, it’s important to remember perhaps the most important rule for sketching any land vehicle: almost all of them are drawn in roughly the same way. The basic principles for drawing four-wheeled vehicles are very similar, and the differences between drawing a car and a bus are minimal.
So, if you already know how to draw a car or have learned the basics of drawing a bus, this lesson on how to draw a van should not seem difficult to you.
However, despite the similarities between these types of vehicles, there are also distinctive features that make your drawing recognizable and the object in it convincing and authentic.
In this lesson on how to draw a van, I’ll go over all the important aspects of depicting this type of vehicle and also share additional techniques, which you’ll find at the very end of this page, that will help you gain a more complete and detailed understanding of all the nuances of this subject.
Van Drawing Tutorial
Materials
- Pencil
- Paper
- Eraser
- Coloring supplies
Time needed: 30 minutes
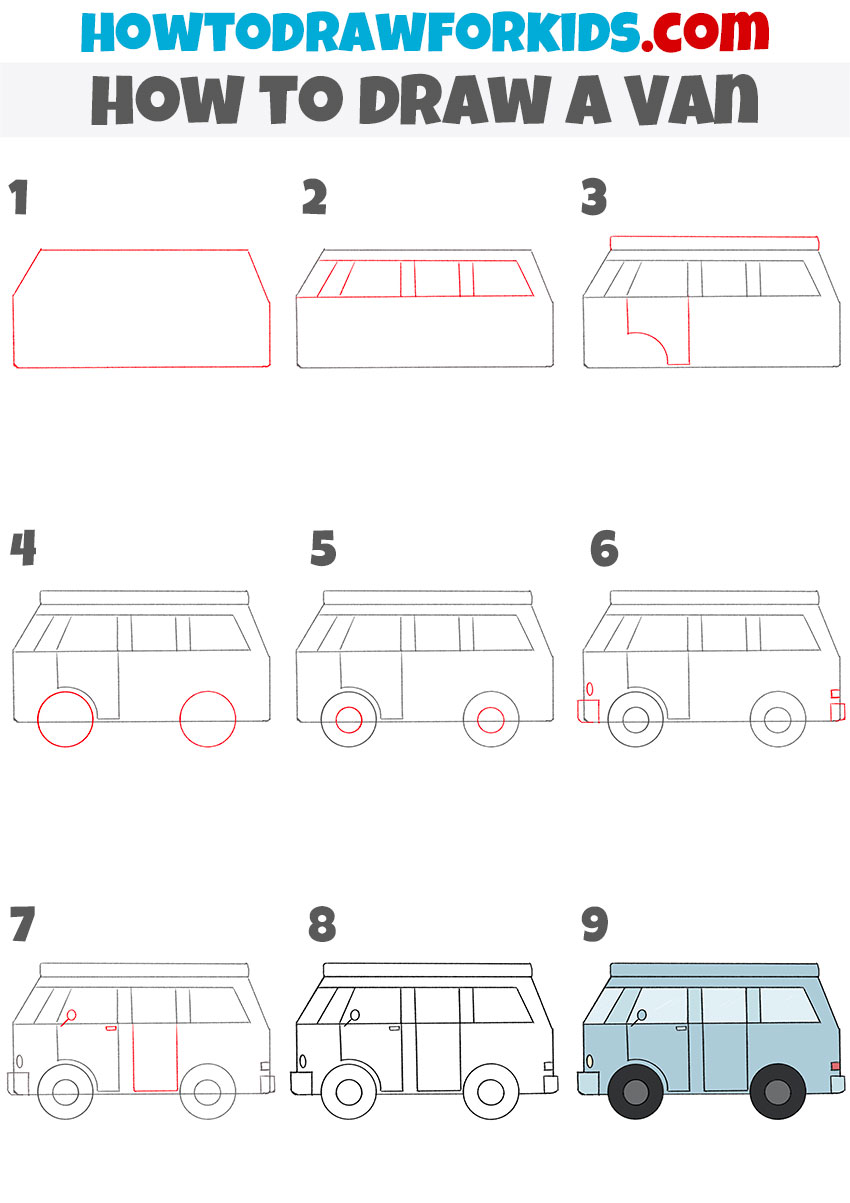
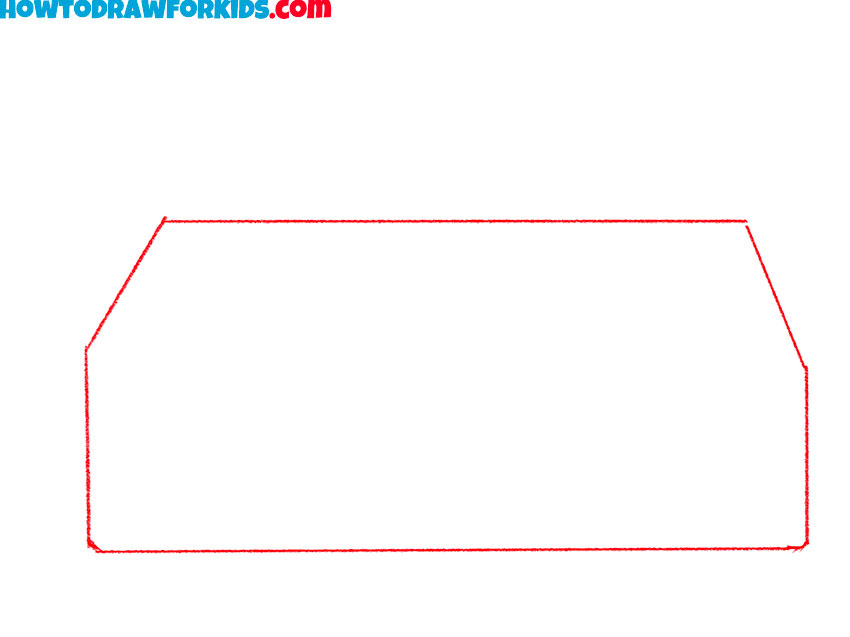
How to Draw a Van
- Illustrate the van’s outer form.
Begin your van drawing by outlining the body shape using a long rectangle with angled lines at the top front and back corners. Keep the roof line straight and the base parallel for stability. It’s easier to make small adjustments now than later when the details are in place.
- Draw the van windows.
Now sketch the window layout along the top half of the van. Begin with a long horizontal rectangle for the frame. Then add side windows separated by thin vertical dividers. Keep your lines parallel to the roof and base to maintain symmetry and proportions. You can make the windows slightly shorter.

- Sketch the top rack and front door.
On top of the van, draw a narrow, elongated rectangle for the roof rack. This small detail can make your van drawing feel more realistic, especially if you want to illustrate a camper or travel van. Below the windows, sketch the outline of the front door using a simple vertical and curved line.

- Draw the van wheels.
Under the body, sketch two large circles for the wheels. In a van drawing, the wheels should be large and symmetrical. You can use a coin or round template for perfectly smooth circles if freehand drawing is tricky. Place the front wheel just under the door area and the rear wheel toward the back.

- Illustrate the wheel rims.
Inside each wheel, draw a smaller circle to create the rim. This extra detail instantly makes the wheels in your van drawing look more finished. Keep the rims perfectly centered inside the outer wheel so the tires look even. You can also add a tiny circle in the middle to represent the hub.

- Add the heading, taillight, and bumpers.
At the front of the van, draw the headlight as a small circle or oval. Then, sketch the front bumper in the shape of a small square or rectangle. At the back of the van, sketch a small rectangle for the rear light. Below this, draw a simple horizontal shape to represent the bumper.

- Add the mirror, handle, and rear door.
Add the mirror to the front door in the shape of a small oval or rectangle. Then, draw a small rounded rectangle for the door handle, positioning it near the back of the door. After that, add the rear door using short straight lines. Keep these lines aligned with the edges of the windows.

- Make the lines clean and bold.
Finalize the outline, smooth out any uneven edges, correct small misalignments, and erase the light sketch marks underneath. I always tell my students to work slowly during this stage – a rushed outline can undo the neatness built in earlier steps. Once the outline is complete, the van should look crisp and ready for color.

- Color in all parts of the van.
A classic light blue, as shown here, works well, but you can experiment with red, yellow, or even two-tone combinations for a retro feel. Darken the tires, rims, and window dividers, and use lighter shades for the windows to create reflection.

Additional Content
This PDF is a concise version of the lesson on drawing vans, prepared for use without an Internet connection. It contains the same step-by-step structure in a compact format and can be used as a reference when practicing away from the main tutorial. The file also includes additional exercises aimed at reinforcing the drawing process and improving accuracy in shapes and proportions.
How to Draw a Van: Alternative Techniques
After completing the main van drawing tutorial, you can try several alternative methods that vary in complexity and style. These additional versions include a slightly simpler design with rounded lines and alternative method that changes the step order. Also there are the easiest preschool-level approach made entirely from basic shapes.
Alternative Van Drawing Tutorial
This alternative van drawing tutorial is a slightly simpler version of the main lesson. The body is made with rounded lines, and the details are minimal, similar to the first tutorial. The main difference is in the step order, so let’s see how to sketch the same vehicle using a different method.
Draw the main body of the van as a long rectangle with a slightly sloped front corner and a rounded back edge. As you remember, these angles in the first tutorial were straight. Then, add two large circles for the wheels, then outline the side window panel as a long horizontal shape. Complete the wheels with smaller inner circles.
Add vertical lines to divide the windows and doors, then draw the door handles and side mirror. Include small lights and simple bumper shapes at both ends. Once the outline is complete, trace the lines neatly and fill in the van with a light beige or any other color, keeping the windows in a pale blue shade and the tires dark.

How to Draw a Van for Preschoolers
So, the previous two methods were already simple, but even they might seem too difficult for someone picking up a pencil for the first time. That’s why this version is made especially for complete beginners and preschoolers. The whole van is built from straight lines and basic geometric shapes, so it’s easy to follow without worrying about curves or small details.
First, draw a large rectangle with a slightly slanted front edge to form the body of the van. Divide the upper section into windows by adding vertical lines, keeping the lower part plain for the side panel. Add a small rectangle for the back light and another for the front light.
Place two large circles for the wheels, then draw smaller circles inside them for the hubs. Keep your lines straight and even, then trace over them to make the outline clear. Finish by coloring the body in a solid tone, the windows in a light shade, and the wheels in dark colors.

Conclusion
In this lesson, we learned to draw a van and also explored two additional methods. Once you’ve practiced the method you like best, try personalizing your artwork – adjust the roof height, change the window arrangement, or add small extras like roof racks and side mirrors.
You could also experiment with different van types, such as camper vans, delivery vans, or classic retro models. If you enjoy vehicle drawing, adding backgrounds can make your composition more detailed and interesting. Try placing your van in a city street, parked in nature, or driving along a coastal road. You can draw a truck at the background to create a parking or road composition.
Share your finished drawing, compare how each method changes the final look, and challenge yourself to create a full set of transport drawings for your collection. The more variations you try, the more confident you’ll become in adapting these techniques to other subjects.