How to Draw an Anchor
If sea and ship themes interest you, learn this tutorial on how to draw an anchor, a universal and timeless nautical icon.

How to Draw an Anchor: Introduction
An anchor is one of the most recognizable symbols connected with the sea, ships, and navigation. It has been used for centuries both as a practical tool for holding vessels in place and as a symbol in art, design, and heraldry. Because of its simple and symmetricalform, the anchor is a great subject for practicing simple geometric shapes in drawing.
In this lesson on how to draw an anchor, I will show you a step-by-step way to build its structure. Even though the anchor may look complex at first glance for some kids, I’ll show you how easy it can be to reproduce.
When drawing, it is important to pay attention to symmetry, since both sides of the anchor should mirror each other. Practicing this will help you improve summary in your drawings overall.
To make the process more interesting and useful, I will also add an alternative variation, so you can choose the version that fits your idea best.
Anchor Drawing Tutorial
Materials
- Pencil
- Paper
- Eraser
- Coloring supplies
- Compass (optional)
- Ruler (optional)
Time needed: 25 minutes
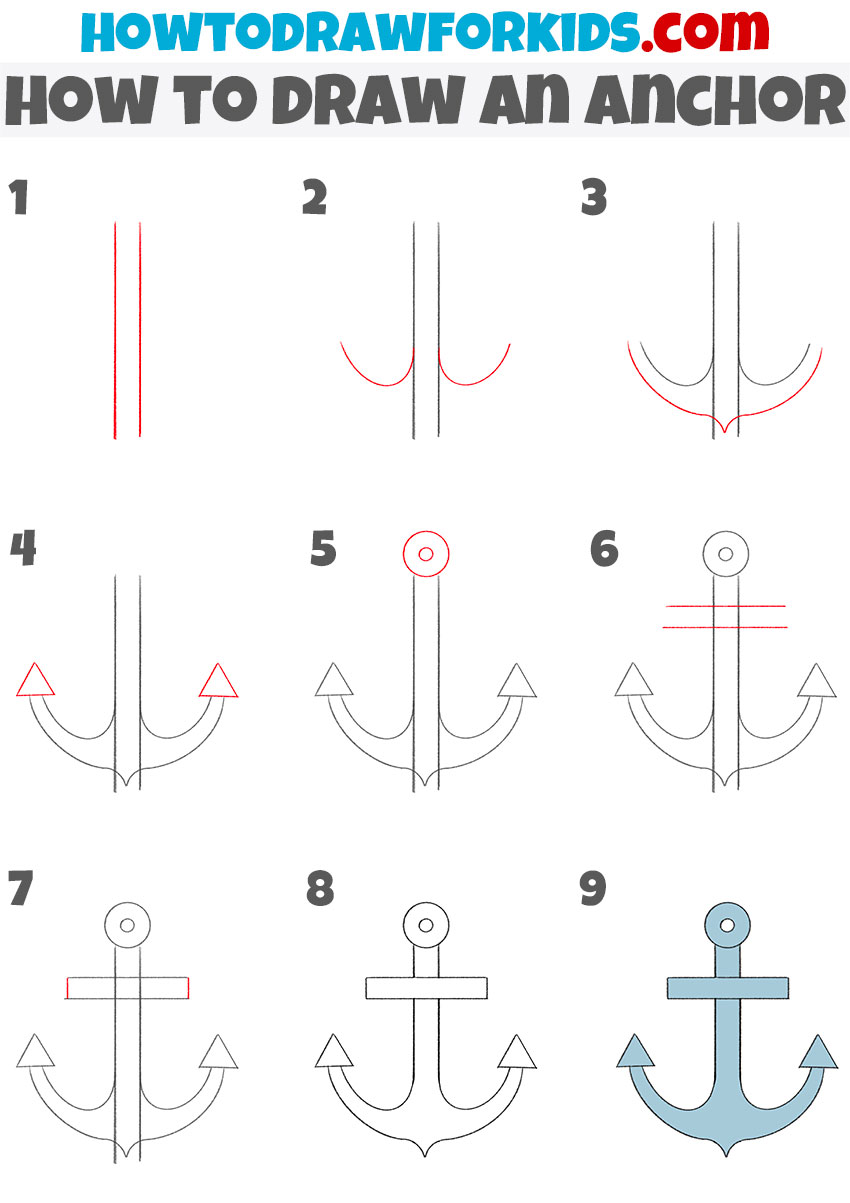
How to Draw an Anchor
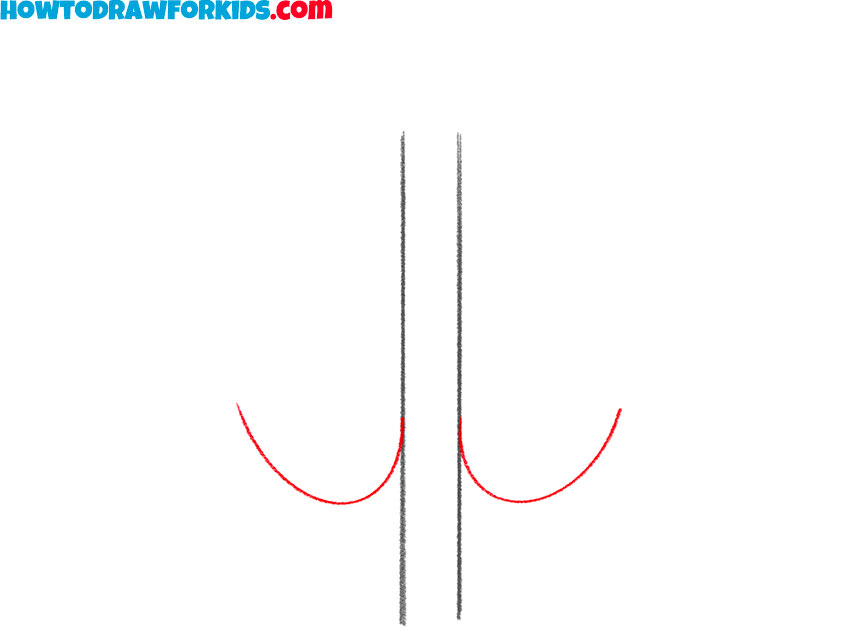
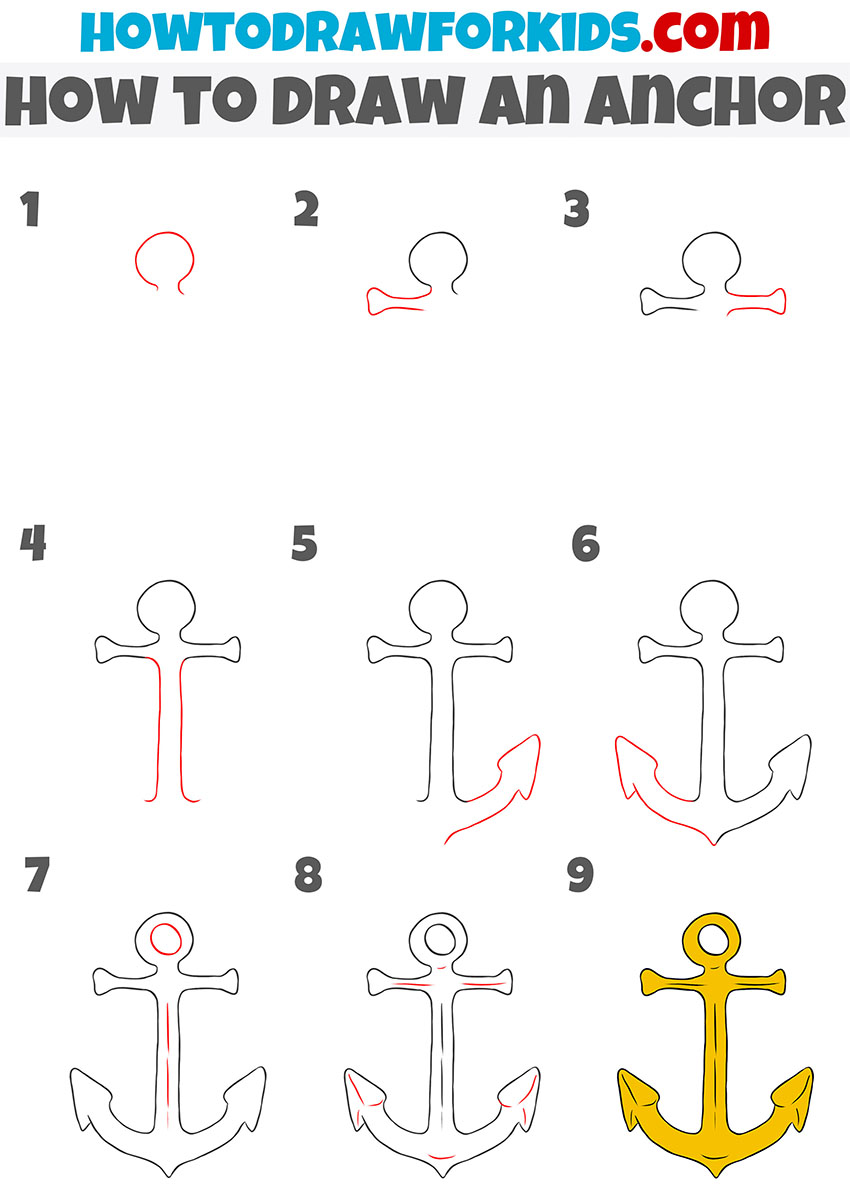
- Sketch the anchor shaft.
To begin, create two parallel vertical lines in the middle of your paper. These lines will form the central shaft of the anchor. Keep the spacing between them even and try to make them as straight as possible, since this part of the anchor should look very symmetrical. These two lines will act as the anchor’s backbone.

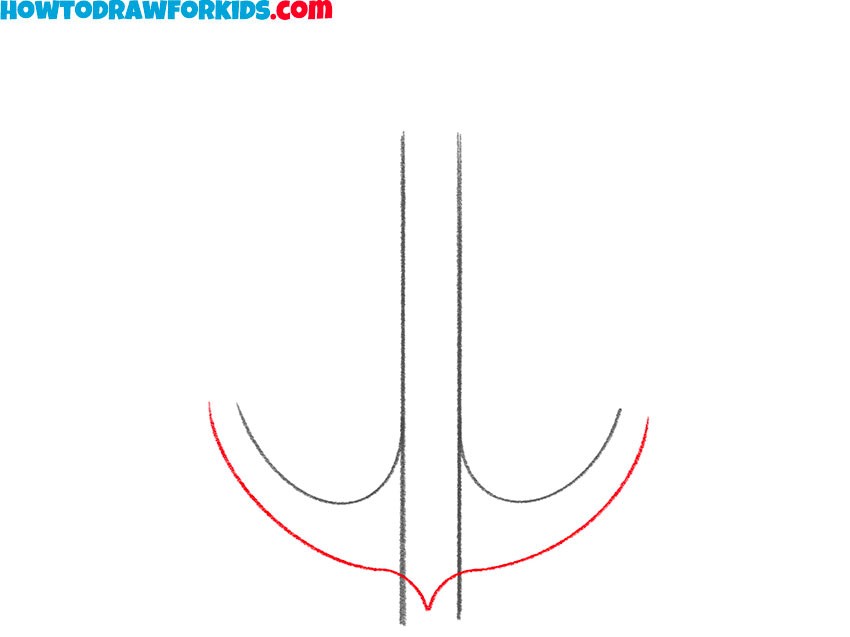
- Start sketching the anchor arms.
At the lower part of the shaft, sketch two smooth, upward-facing curves. These will later form the beginning of the anchor’s arms. Try to keep both curves equal in length and shape, as an anchor should look perfectly symmetrical. Practicing these mirrored shapes improves your overall symmetry skills.
- Complete the main curves of the arms.
Now complete the basic shapes of the arms by adding a wider curve below. This step completes the base shape of the anchor’s arms and makes the form much more recognizable. This line should smoothly approach the line from the previous step as it nears the end.
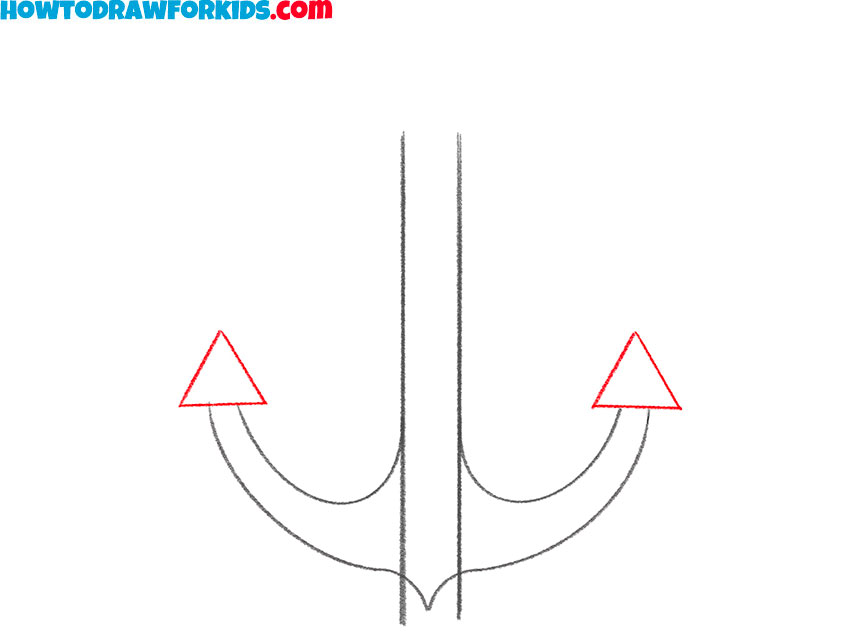
- Sketch the triangular tips.
On both ends of the arms, sketch small triangular shapes that will represent the anchor’s flukes or points. These are the sharp parts that dig into the sea floor. Try to place them symmetrically and make sure they equal in shape and size. Lightly mark the height of one triangle and then copy it on the other side.
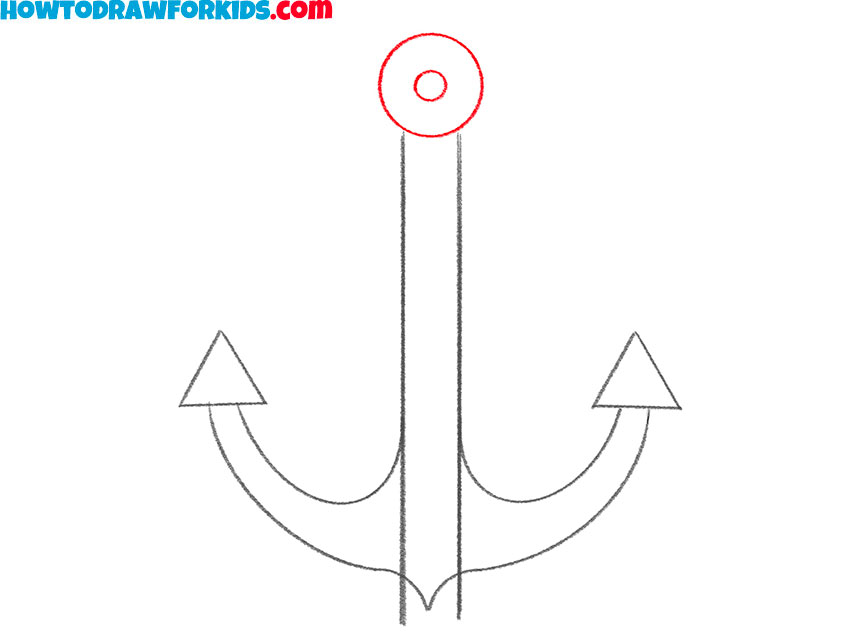
- Mark the loop at top.
At the very top of the shaft, sketch a circle with a smaller circle inside it to form the loop. This part is used for attaching the anchor to the chain. A compass or circular object can help if you want a perfect round shape, but freehand circles give the anchor more unique look.
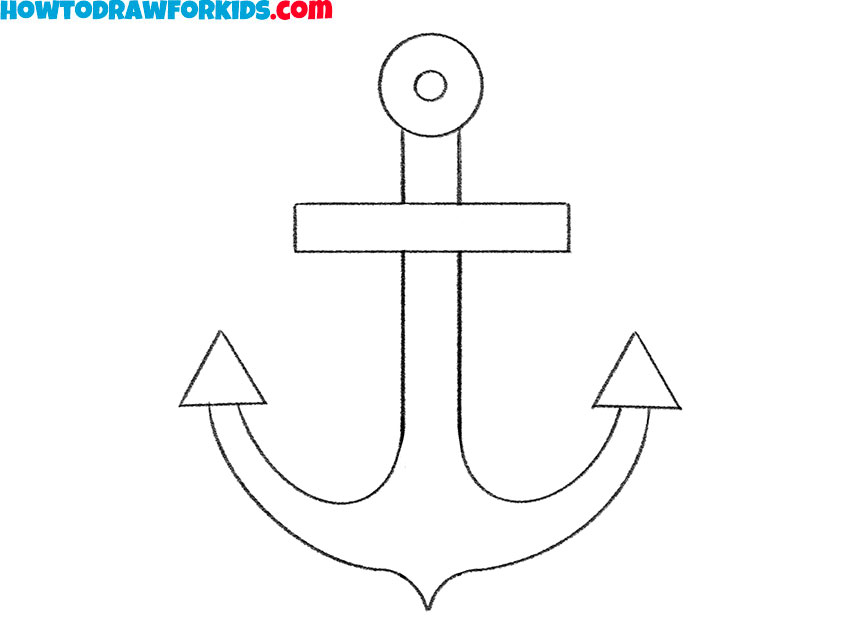
- Start sketching the crossbar.
Now add two short parallel horizontal lines slightly below the loop. These lines are the top and bottom edges of the anchor crossbar. Keep them even and parallel so that the crossbar will look straight. You can place the crossbar higher or lower, depending on the style of anchor you’re illustrating.

- Compete the horizontal bar.
Using the lines from the previous steps, finalize the rectangular crossbar across the shaft of the anchor. This should look like a horizontal beam placed securely across the vertical shaft. Try to keep both ends equal in length, so the drawing feels symmetrical.

- Outline the finished shape.
Darken the lines you want to keep and erasing the guidelines. If you’d like to create different anchor designs, you can also adjust the outline at this stage. For example, adding small notches, thicker arms, or a wider loop.
- Color the finished anchor drawing.
A common choice is gray or light blue to convey metal, but you can use darker shades. You can also add highlights with a lighter color to make the anchor look metallic. For kids, even bright colors can work, as they make the anchor more decorative.
Additional Content
As always, I have prepared a free PDF version of this lesson. In this file, you will find a shortened version of the tutorial that you can download and use offline. The PDF also contains additional materials, such as a coloring page, tracing worksheet, and grid drawing worksheet, which will help you practice and improve your drawing skills.
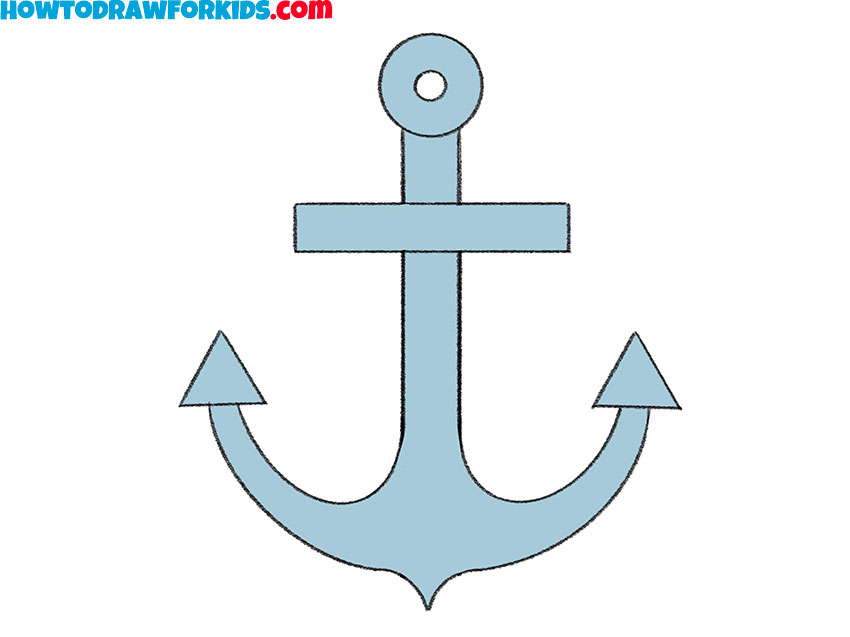
How to Draw a More Realistic Anchor
Another way of showing this subject is through a more detailed anchor. Compared to the previous version, this drawing has more complex shapes and shows some dimension.
To draw this version of an anchor, sketch the top circular part first, keeping the outline smooth and even. Add the short horizontal bar that crosses through the upper part of the drawing. Make sure both sides are equal in length. Continue the long vertical shaft downward.
Draw the large curved arms on both sides, finishing them with pointed triangular flukes. Add a smaller inner circle at the top to represent the opening of the anchor. Check both sides for symmetry and lightly erase any unnecessary lines to keep the anchor clean. Color the anchor with a flat shade such as yellow or gray to complete the image.
Conclusion
You can now experiment with variations, such as drawing a thicker rope wrapped around the anchor or placing it next to rocks to create a small scene. Trying different line weights can also make the metal parts look heavier and more solid.
If you’d like to continue with nautical themes, visit the ship drawing tutorial and the boat drawing tutorial to add more interesting drawing to your collection. These lessons work well together and let you create larger drawings with connected subjects. Don’t forget to share this tutorial, leave a comment with your version, and subscribe to keep up with new drawing guides.