How to Draw Indiana Jones
This drawing guide will teach you how to draw Indiana Jones, one of the most iconic characters from 20th-century cinema, step by step.
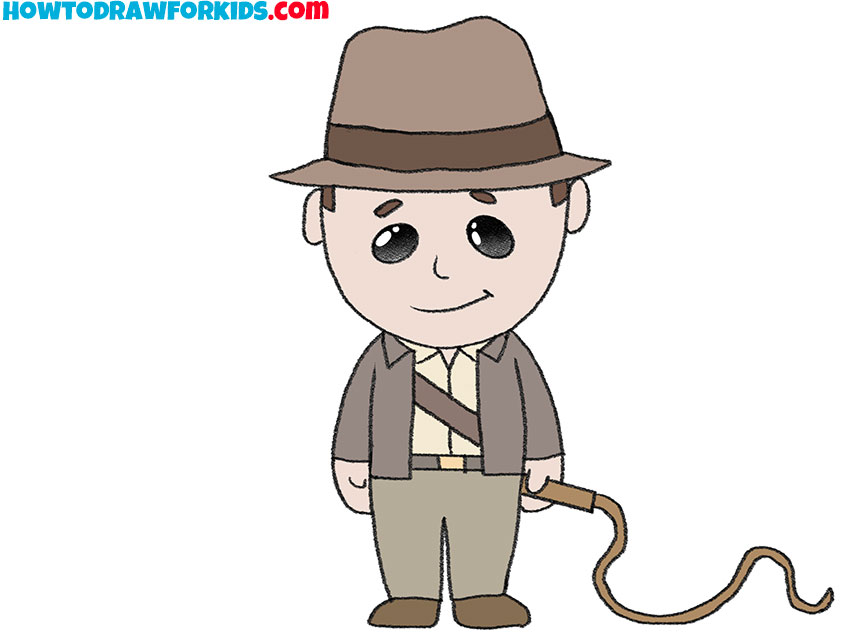
How to Draw Indiana Jones: Basic Information
Drawing Indiana Jones helps kids understand the importance of proportions. Focusing on the size relationship between the head and body ensures that the character looks cartoonish but natural and well-structured. Practicing this repeatedly helps build a strong foundation for drawing other figures accurately.
This Indiana jones drawing tutorial emphasizes capturing facial features, a fundamental skill in character drawing. By sketching Indiana Jones’ eyes, nose, and mouth, artists learn to position and proportion facial elements correctly. This practice trains their ability to draw expressive and recognizable faces.
Indiana Jones is known for his iconic hat and whip, which provide an excellent opportunity to practice drawing accessories. Adding these elements teaches artists how to incorporate additional details into their characters. This skill is really important for creating complex and interesting drawings.
This drawing of Indiana Jones combines realistic human image with stylized features. Drawing him teaches kids how to balance realism with cartoon-like elements, training their ability to create characters that are both believable and cartoonish.
Indiana Jones Drawing Tutorial
Materials
- Pencil
- Paper
- Eraser
- Coloring supplies
Time needed: 30 minutes
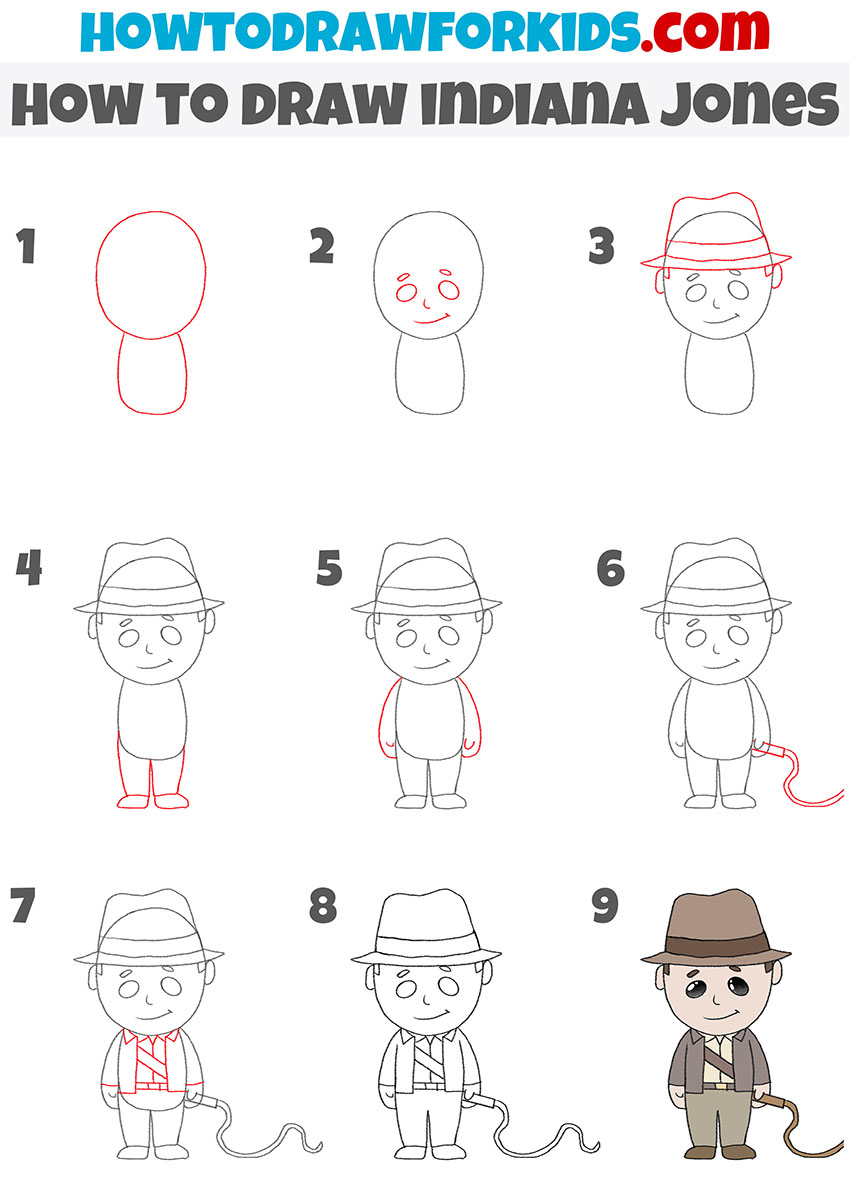
How to Draw Indiana Jones Step-by-Step
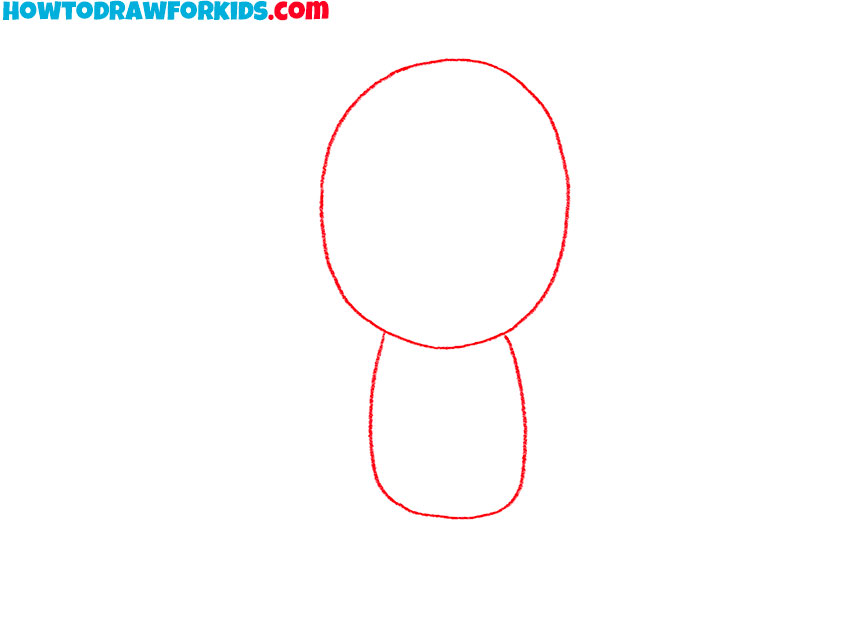
- Draw the head and body of Indiana Jones.
Start by drawing a large oval shape for Indiana Jones’ head. This will serve as the base for his facial features and hat. Below the head, sketch a smaller, elongated oval for the body, which should be slightly narrower at the top and wider at the bottom.
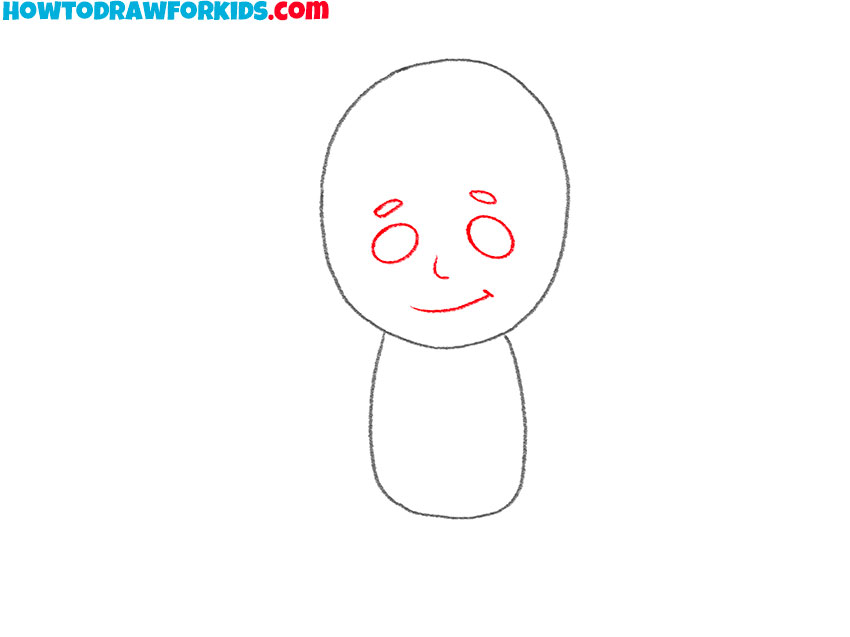
- Add the facial features.
Begin by drawing two small ovals or circles for the eyes, positioning them symmetrically in the middle of the head. Below the eyes, sketch a small, curved line to represent the nose, ensuring it is centered and not too far below the eyes. Add a gentle curve for the mouth, giving Indiana Jones a slight, confident smile.
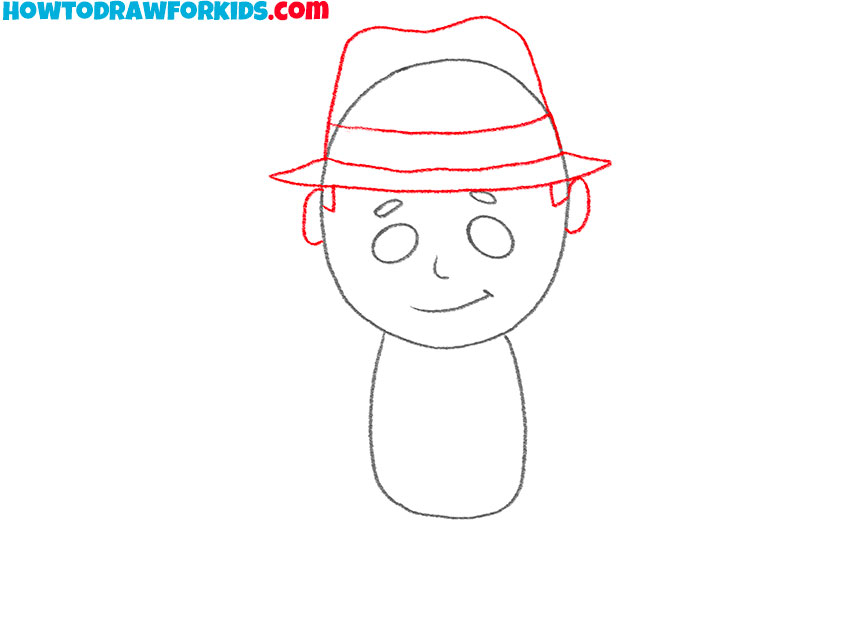
- Sketch the hat and ears of Indiana Jones.
Draw a horizontal line above the head for the brim of the hat. Then, add two slightly curved vertical lines extending upwards from the sides of the brim to form the hat’s crown. Connect these lines with a curved line at the top. Add a band around the hat just above the brim and illustrate the ears with two short curved lines.
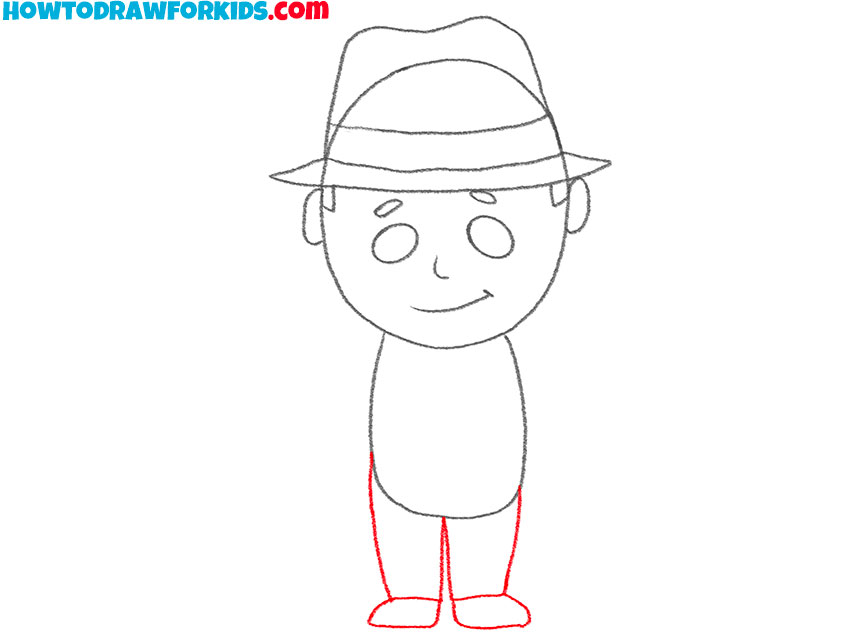
- Draw the legs and feet.
To draw the legs, start by extending two slightly curved lines downward from the bottom of the body oval. At the ends of these lines, sketch small ovals for the feet The legs should be slightly apart. Keep the lines light and adjustable, allowing for easy modifications if needed.
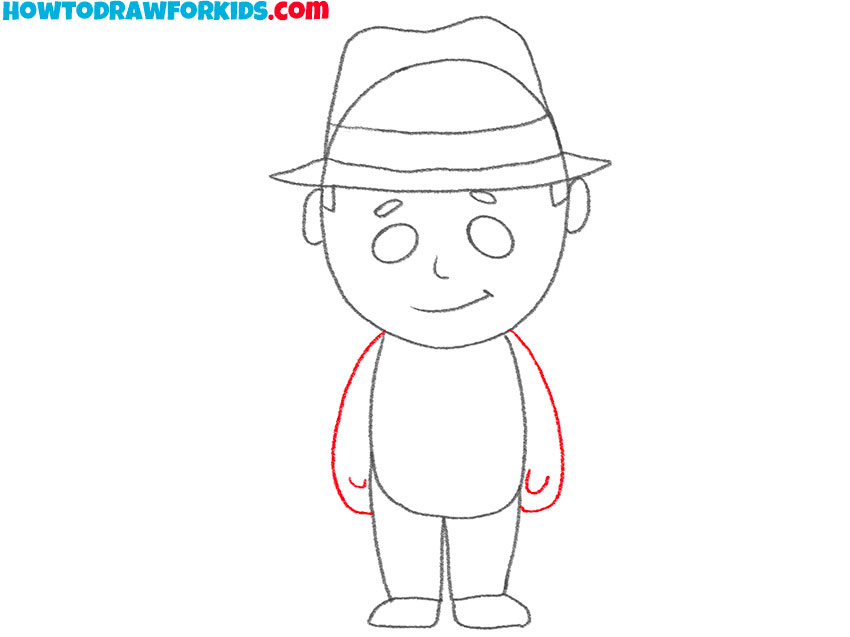
- Add the arms.
Now draw the arms of Indiana Jones on the sides of the body using two long and smooth lines. The arms should reach approximately to the top of the legs. Next, draw the thumbs with two short curved lines to represent Indiana Jones’ hands.
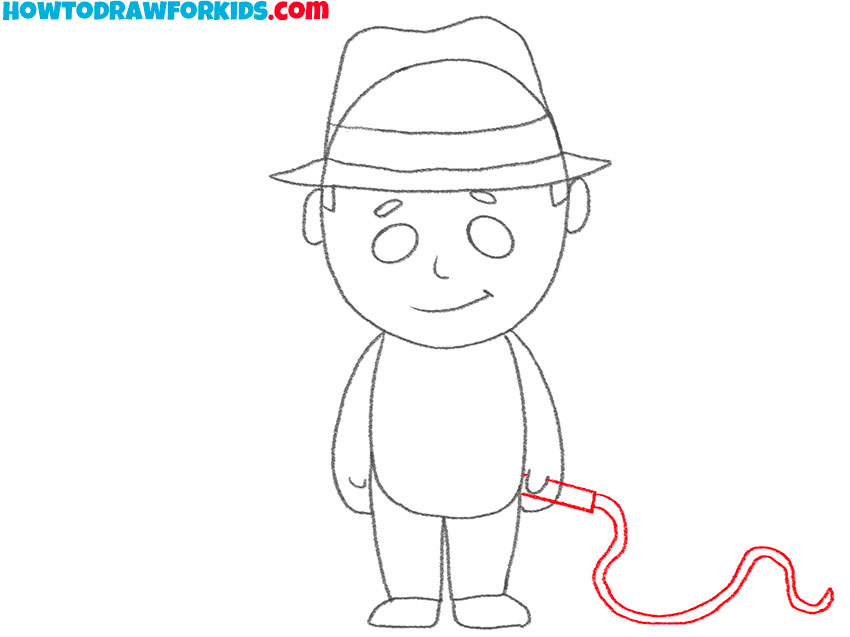
- Draw the whip of Indiana Jones.
Indiana Jones’ whip is a signature accessory. Draw two long, curved lines extending from one of his hands. Ensure the lines flow naturally and give a sense of action and movement. You can add small details like segments or coils to make the whip look more realistic.
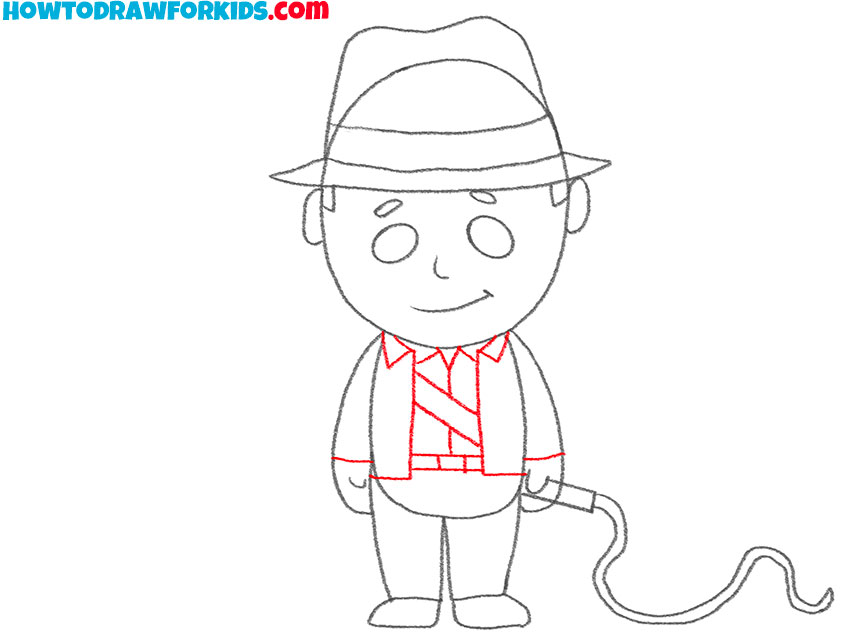
- Detail the clothes.
Begin detailing Indiana Jones’ outfit by drawing the collar of his shirt. Then add lines to define the sleeves and cuffs of his jacket. Draw the belt by adding a horizontal lines across the body, just below the waist. Sketch the bottom of the jacket extending slightly below the belt, giving it a slightly flared look.
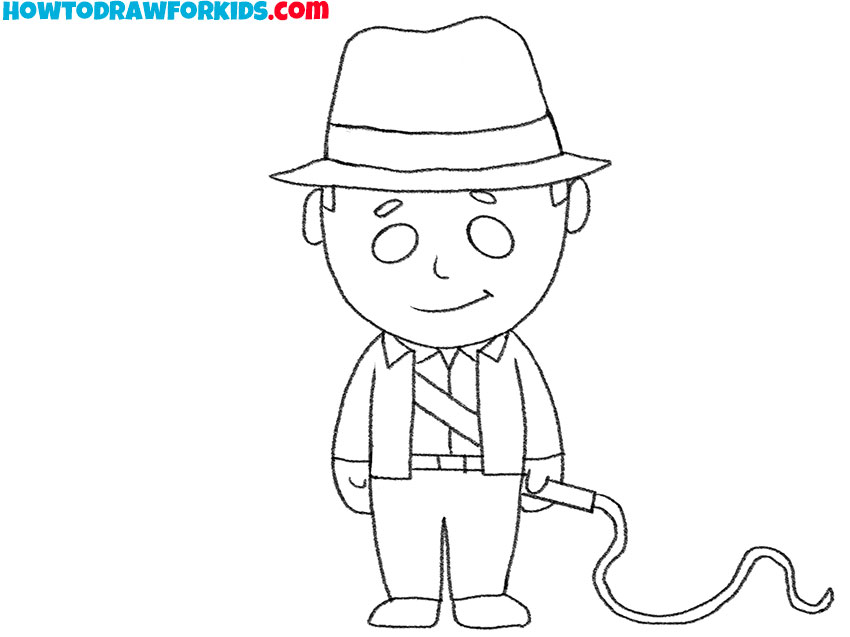
- Erase the guidelines and refine the sketch.
Now, go over your Indiana Jones drawing and erase any unnecessary guidelines or rough sketches. This step is very important for creating a finished and clean look, making your drawing ready for the final touches. You can add details, such as seams on the clothing.
- Color your Indiana Jones drawing.
Use shades of brown for Indiana Jones’ hat and jacket, beige for his pants, and a lighter color for his shirt. You can use darker shades to indicate shadows and lighter tones for highlights, giving the character a more realistic and dynamic look.

Additional Content
This PDF file includes detailed illustrations of each step in the tutorial, a coloring page to train your coloring skills, a tracing worksheet to help you refine your lines, and a grid drawing worksheet to improve your accuracy and proportions.
By downloading and using this PDF, you can conveniently practice and reinforce the skills you have learned, making the drawing process more structured and enjoyable. This printable is a valuable tool for young artists aiming to master the art of drawing Indiana Jones.
How to Draw Indiana Jones: Advanced Techniques
To make your Indiana Jones drawing more lifelike, focus on the facial details. Pay attention to the eyes, adding pupils and subtle reflections to make them more expressive. Refine the eyebrows to match his iconic determined look. Add small lines for wrinkles and expression marks around the eyes and mouth.
Adding background elements can make your Indiana Jones drawing more interesting. Consider including ancient ruins, desert landscapes, or jungle foliage. These elements should be lightly sketched to keep the focus on the character. Adding a background will make your drawing more engaging and place Indiana Jones in a recognizable setting.
Incorporate fine details to make your Indiana Jones drawing more realistic. Add elements like the texture of the hair, small accessories on the clothing, or subtle features on the face, such as stubble or scars. These fine details can add character and realism to your drawing, making it more compelling.
To illystrate Indiana Jones in action, consider adding dynamic elements like dust clouds, motion lines, or flying debris. For instance, if he’s using his whip, add motion lines to show the whip’s movement.
Conclusion
Drawing Indiana Jones is not just about recreating an iconic character; it’s an exercise that trains various drawing skills. Through this detailed tutorial, kids can improve their understanding of cartoonish proportions, facial features, and dynamic poses.
By focusing on elements like Indiana Jones’ hat, whip, and rugged attire, artists learn to incorporate intricate details and unique accessories into their drawings, which can be applied to other characters and projects.
And don’t forget that there are many more exciting drawing instructions waiting for you on my website. How about taking a turn at sketching other iconic such as Chewbacca or Terminator.
In summary, drawing Indiana Jones is a multifaceted exercise that helps artists develop a wide range of skills. From mastering cartoonish proportions and facial expressions to incorporating movement and texture.
To make sure you don’t miss out on any of these fun drawing guides, follow me on social media. That way, you’ll always be the first to know about new content and exciting drawing lesson.