How to Draw Sandy Cheeks
Today, you will learn how to draw Sandy Cheeks. This step-by-step instruction consists of nine simple steps with a detailed description.

I have prepared for you an interesting drawing lesson in which I will show you how to draw Sandy Cheeks step by step. With the help of this instruction, any child and aspiring artist will be able to portray their favorite character.
The finished drawing will turn out very bright and colorful. Sandy Cheeks is one of the ten main characters in the SpongeBob SquarePants animated series. It is a surface squirrel that wears a diving suit and lives in an air-filled glass dome.
By learning how to draw Sandy Cheeks with this easy step-by-step tutorial, you will be able to apply your skills in the future if you want to draw this character as the main subject of your drawing, and also if you want to depict any scene from the cartoon.
Also on our website, you can find drawing lessons dedicated to the image of other characters from the cartoon “SpongeBob SquarePants”.
Materials
- Pencil
- Paper
- Eraser
- Coloring supplies
Time needed: 30 minutes
How to Draw Sandy Cheeks
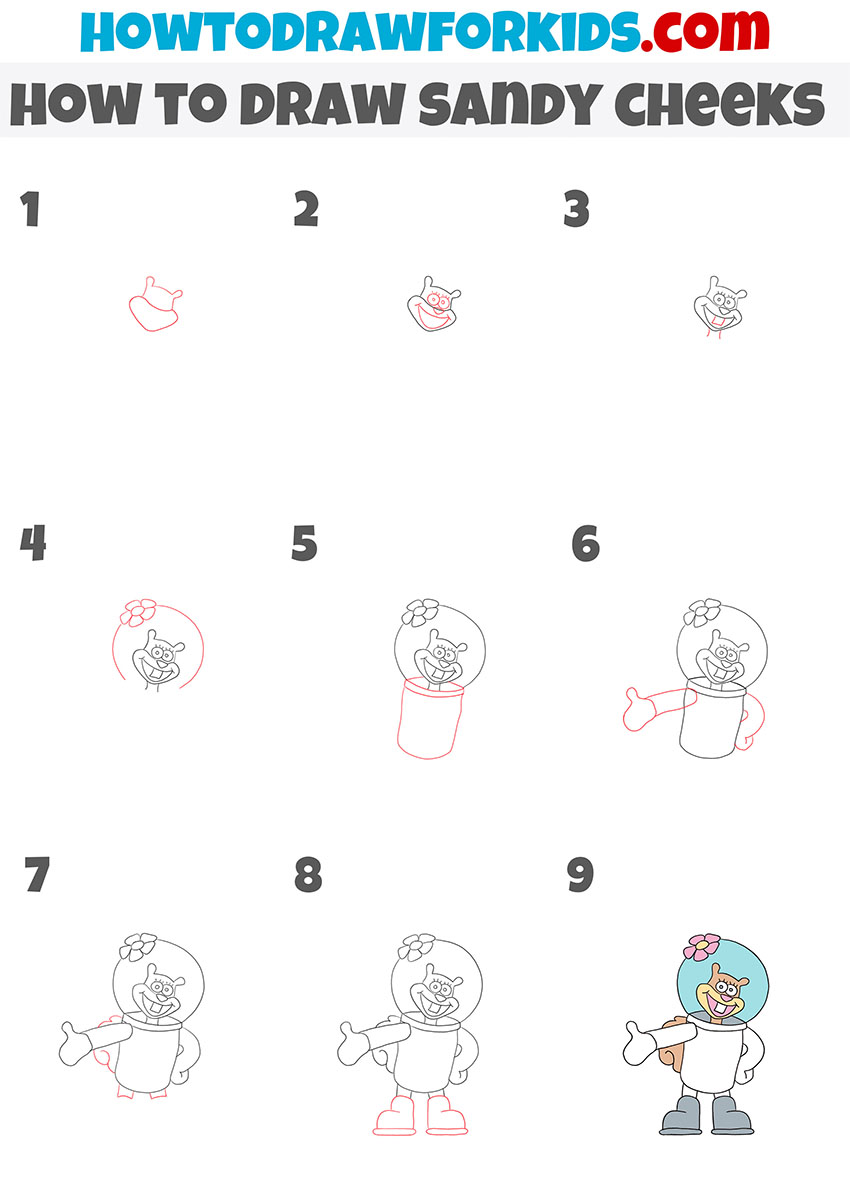
- Draw the outline of the character’s head.
You can depict the head of Sandy Cheeks with two elements using curved lines.

- Add the character’s facial features.
Inside the previously drawn head, draw two eyes, the wide nose and the open mouth.

- Depict the teeth and neck.
Inside the outline of the mouth draw the teeth using curved lines, add the narrow neck.

- Sketch out the element of the Sandy Cheeks suit.
Draw two arcs above the head, and also draw the flower using curved lines and an oval.

- Continue drawing the character’s costume.
Below the character’s head, draw curved lines and arcs, as shown in the figure.

- Draw the arms of the Sandy Cheeks.
One arm is extended to the side, and the other is bent at the elbow. Depict it with curved lines.

- Add the tail and parts of the legs.
At the back of the torso, depict the magnificent tail, and also add two legs using curved lines.

- Add the outline of the boots.
Continue drawing the legs by drawing two symmetrical boots using curved lines.

- Color the drawing.
To color the Sandy Cheeks, use pink, yellow, brown, gray, and blue.
If you liked this tutorial and found it useful, you can share it with your friends. I remind you that you can download the PDF file that I have prepared especially for your convenience. This file contains a short version of this lesson and has additional useful training materials. Download this file so as not to lose it and return to this lesson at any time convenient for you.


sandy what cheeks
so usful