How to Draw the Easter Bunny
Let’s learn to draw the Easter Bunny with an egg, the main symbol of this joyful holiday, in two different and simple step-by-step ways.
How to Draw the Easter Bunny: Introduction
The Easter Bunny with an egg is one of the most recognizable symbols of this holiday. In this lesson on how to draw an Easter Bunny, I will demonstrate several methods that will help in completing this task.
Before starting the lesson, it is necessary to consider several aspects important to the drawing process. First, this is not just a bunny but a character with its own distinctive features. One of the key elements is Easter-related items, such as an egg or a basket with eggs.
Additionally, since this is a character rather than an ordinary animal, it can be stylized in different ways. In this lesson, I have shown a more simplified, cartoonish version, but it is possible to create a different look, such as a more realistic appearance or a chibi-style design.
It is also possible to modify certain details or the entire drawing. You can draw a bunny and add elements specific to Easter. Also, some parts of the character can be adjusted to suit different preferences.
Easter Bunny Drawing Tutorial
Materials
- Pencil
- Paper
- Eraser
- Coloring supplies
Time needed: 30 minutes
How to Draw the Easter Bunny
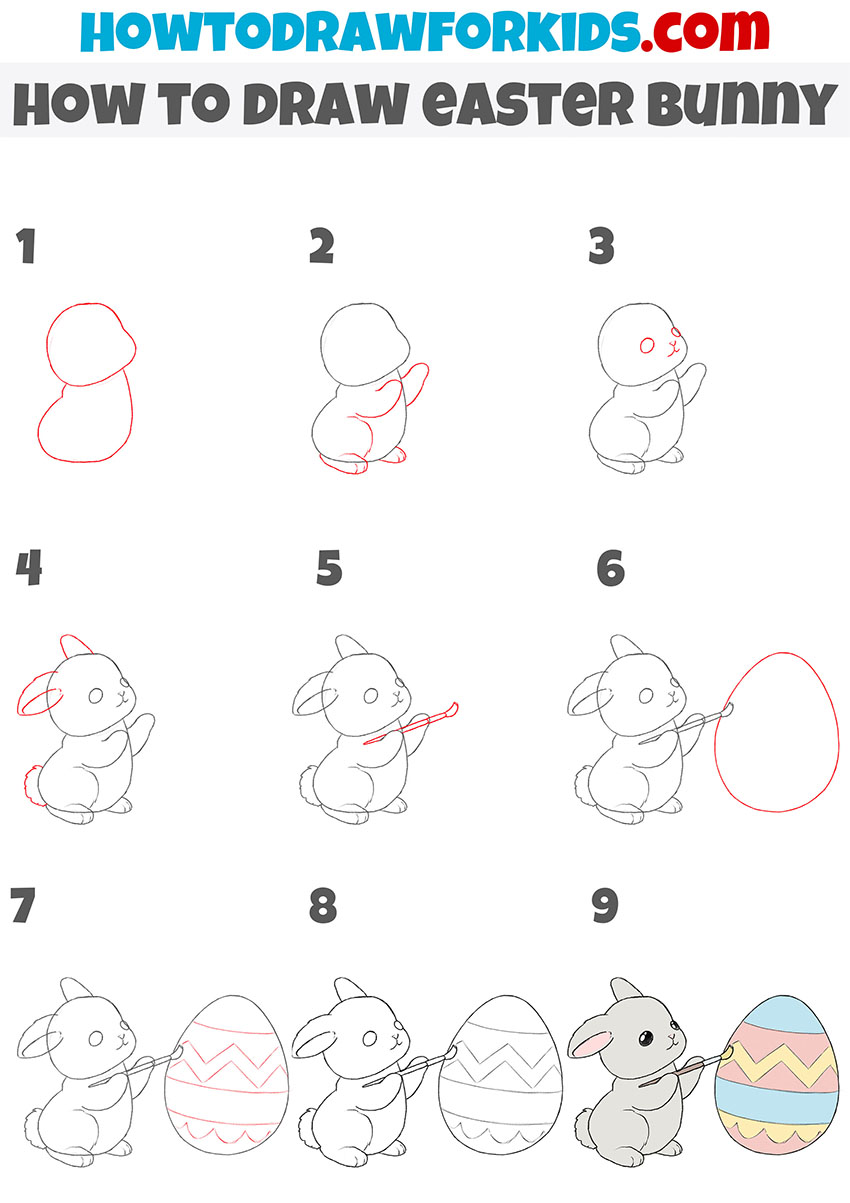
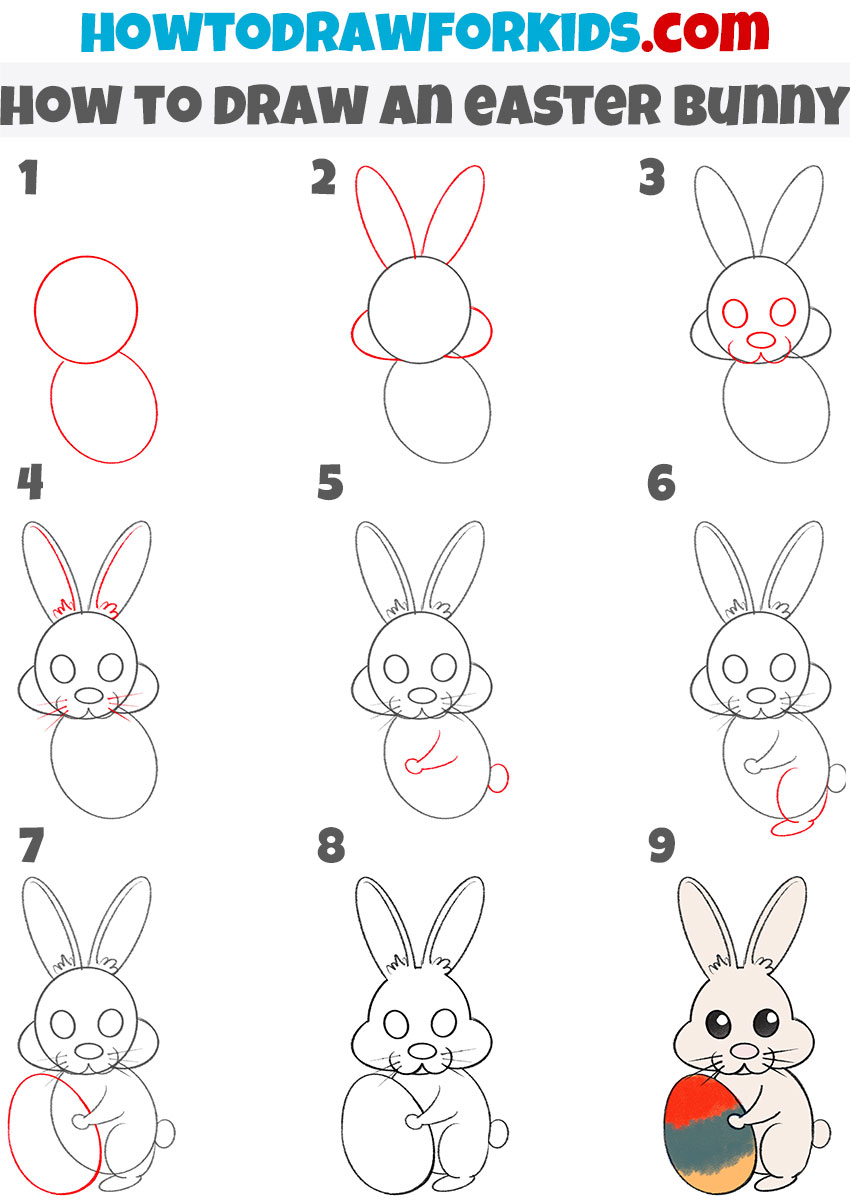
- Draw the basic outline of the Easter Bunny.
To begin this tutorial on how to draw the Easter Bunny, start by sketching the basic shape of the body. Draw an oval for the head and a slightly larger oval below it for the torso. Keep the lines light so they can be refined later. The body should be rounded to resemble the fluffy shape of a bunny.

- Add the legs and paws.
Draw two curved lines on the front to form the raised paws. Then, add the back legs by drawing rounded shapes at the base of the body. Keep the feet small and rounded, as they will give the bunny a soft and gentle appearance.

- Draw the face of the Easter Bunny.
Now, sketch two round eyes. Next, add a small circular nose just below the eyes, followed by a short curved line for the mouth. The mouth should have a slight upward curve to give the bunny a smiling look. Since this is a simplified, cartoonish version of the Easter Bunny, the eyes can remain as simple circles.

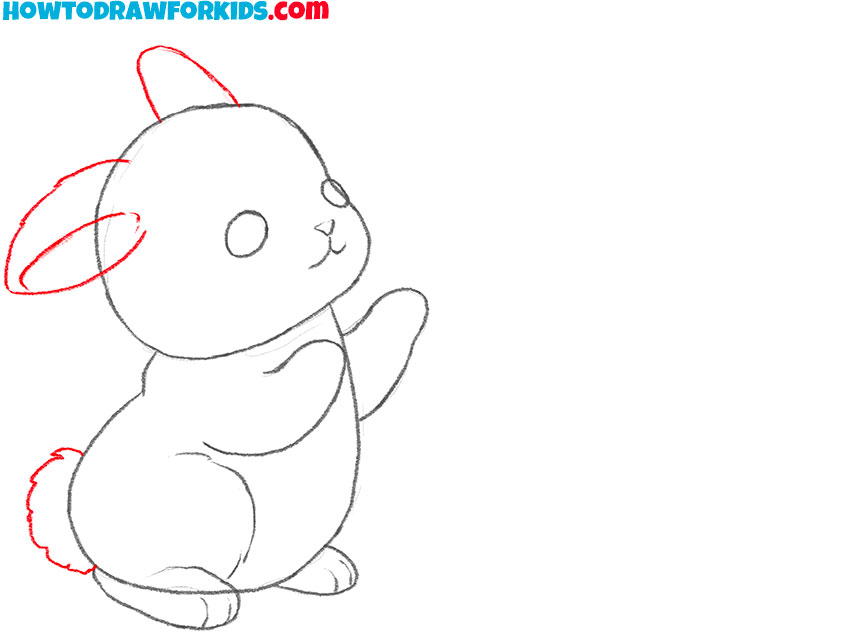
- Sketch the ears and tail.
Draw two large, slightly curved ears on top of the head. The inner part of the ears should be outlined to give them a more detailed look. The ears should be slightly rounded rather than completely straight to match the soft appearance of the character. Then, sketch a small fluffy tail on the back of the bunny’s body.
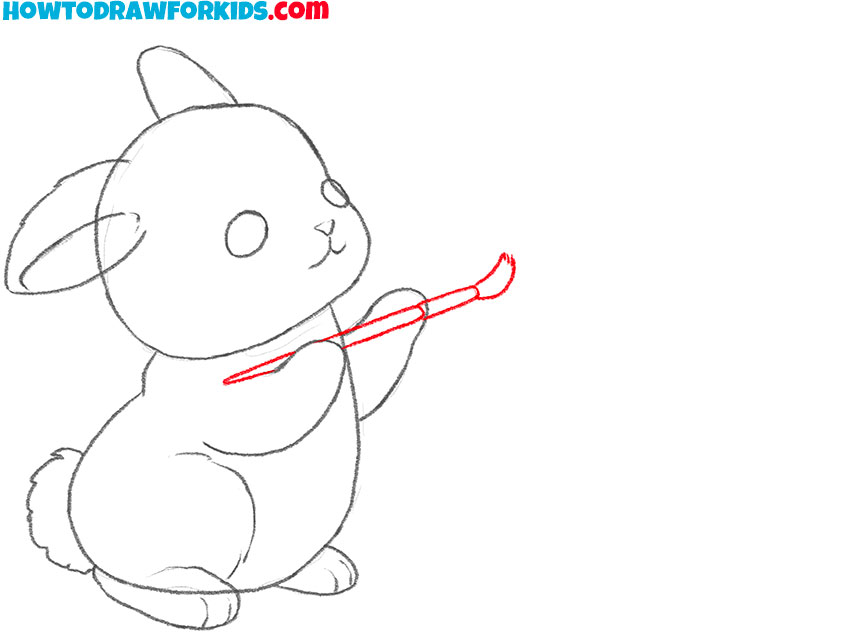
- Add the paintbrush.
To give the Easter Bunny an interesting pose, draw a paintbrush in its raised paw. Begin by sketching a handle extending from the bunny’s hand. At the end of the handle, add a small brush tip. Make the end of the tip slightly curved.
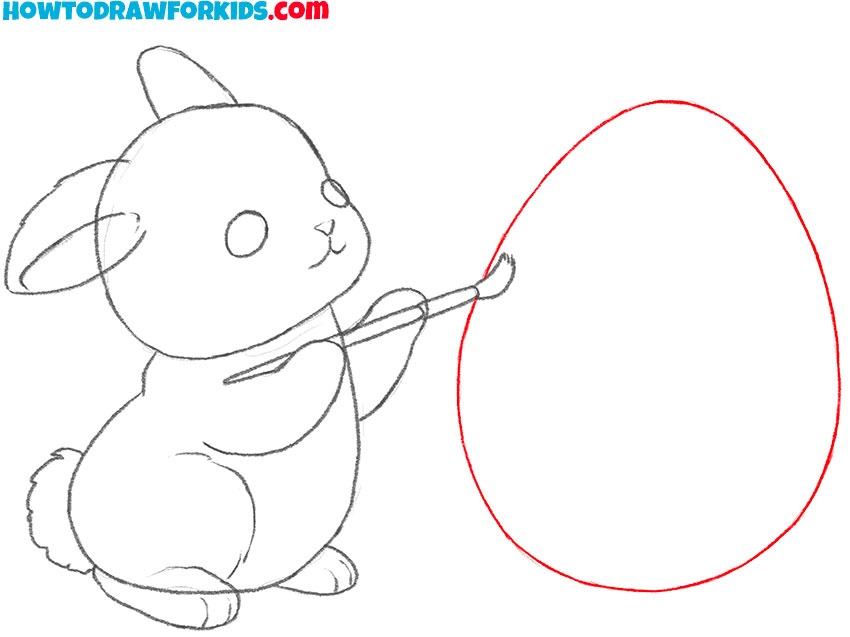
- Draw the Easter egg.
Since the Easter Bunny is traditionally associated with decorated eggs, the next step is to draw an egg in front of the bunny. Start by sketching a large oval, slightly tilted to the side. The top of the oval should be narrower than the bottom.
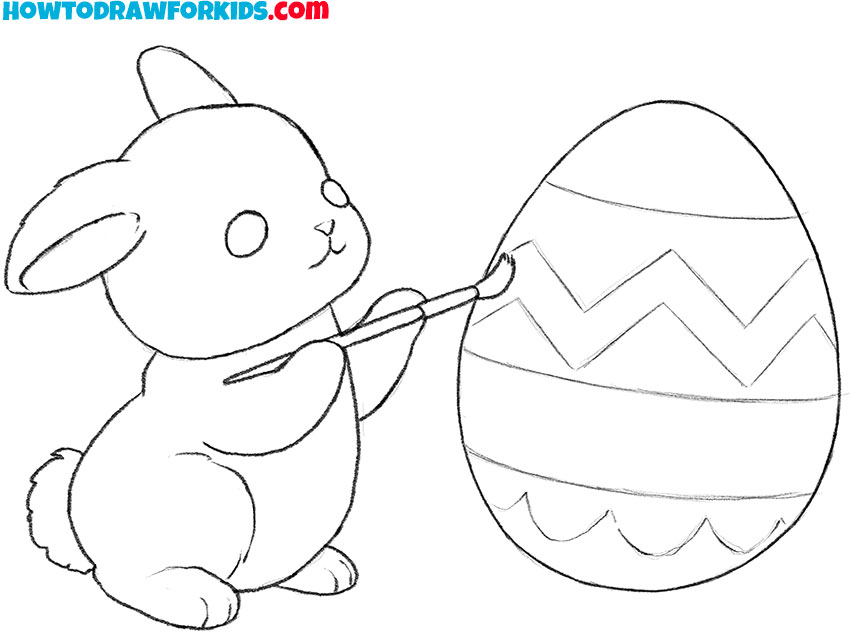
- Add the decorative patterns.
Now that the egg is in place, add decorative patterns to it. Use simple zigzag lines, wavy patterns, and dots to create a festive Easter egg design. The patterns should follow the curvature of the egg to maintain a realistic perspective. Keep the lines clean and simple.

- Finalize the sketch.
At this stage, review the entire Easter Bunny drawing and refine any lines that need adjustments. Erase unnecessary guidelines to clean up the sketch. Make sure the Easter Bunny’s outlines look finished. If any details seem uneven or out of place, adjust them before moving on to the final step.
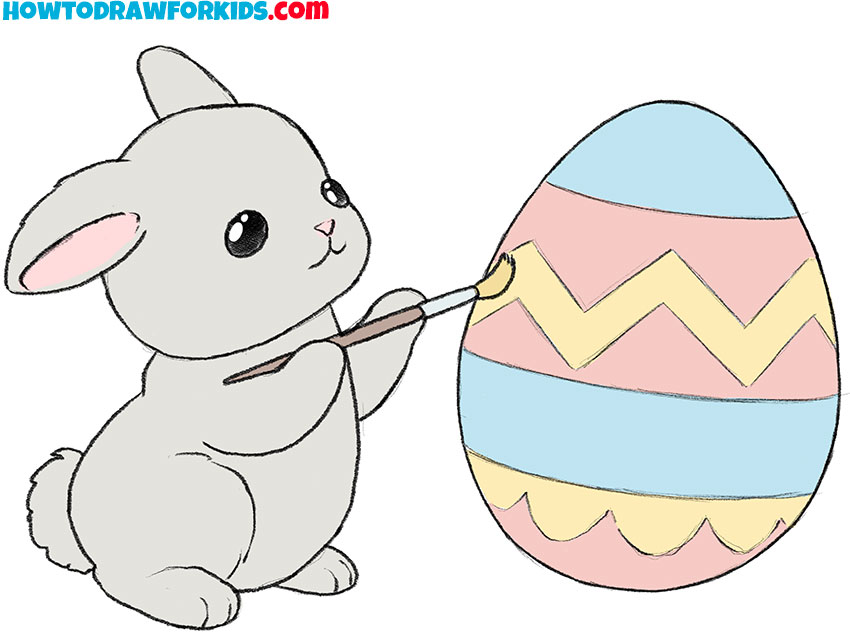
- Add colors to the Easter Bunny.
Use soft shades of gray or light brown for the bunny’s fur, making sure the ears have a slight pink tint inside. The Easter egg can be decorated with bright colors such as yellow, blue, and red to make it look more authentic. The paintbrush should have a wooden handle and a darker tip to represent the paint.

How to Draw an Easier Bunny: Video Tutorial
Additional Content
Here we are at the end of the basic Easter Bunny drawing lesson. It’s time to download some extra materials that will help you hone your skills and just have fun. This file contains the lesson steps, coloring page, tracing worksheet, and grid drawing worksheet.
Alternative Drawing Techniques
Alongside the primary Easter Bunny drawing lesson, a series of alternative techniques have been prepared. These methods provide different approaches to drawing the subject, offering various ways to depict the character.
Below are two additional Easter Bunny drawing tutorials. Each presents a different style and technique. In these additional guides, the character is also shown with an Easter egg. Both tutorials can be used to practice Easter Bunny drawing skills.
Alternative Easter Bunny Drawing Tutorial
This method of how to draw an Easter Bunny differs from the first tutorial by using simpler geometric shapes, giving the character a rounder and more stylized appearance. The head, body, and limbs are based on basic circles and ovals. The facial features are also more exaggerated, with larger eyes and a pronounced muzzle. Unlike the first tutorial, this version of the Easter Bunny is holding the egg in a different position, with both paws supporting it in front of its body.
To start this simple tutorial on how to draw an Easter Bunny, begin by sketching two overlapping ovals for the head and body. Add two large ears on top of the head and small rounded shapes for the cheeks. Draw a horizontal oval for the muzzle and place two circular eyes above it. Add a small nose and a curved mouth below it. Sketch the inner ear details and whiskers. Outline the front paw bent slightly, and add a small oval for the tail.
Draw the second arm curved inward, preparing to hold the Easter egg. Sketch the lower part of the body with a rounded leg and foot. Draw a large oval in front of the bunny to represent the Easter egg. Erase extra guidelines and refine the lines. Complete the drawing by adding colors, shading the bunny’s fur in light tones and decorating the Easter egg with patterns.
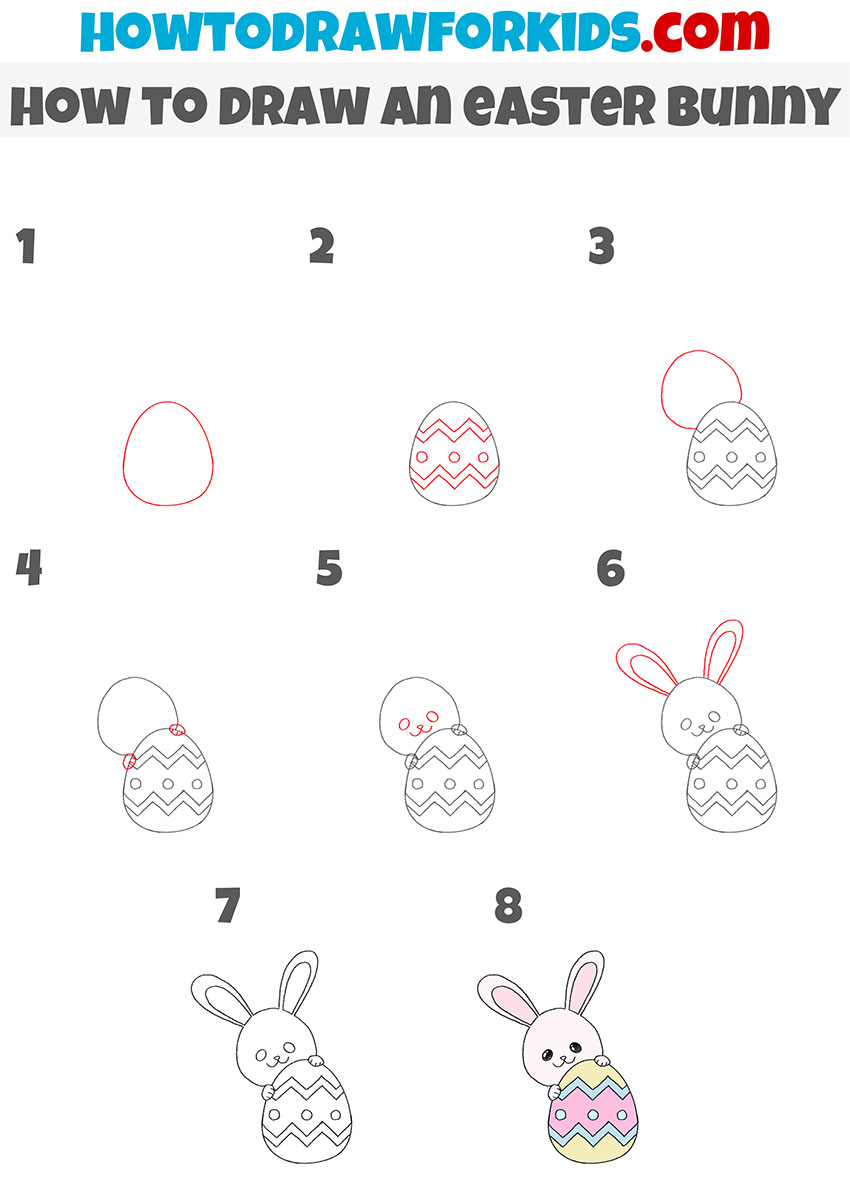
How to Draw a Simple Easter Bunny
This method of how to draw an Easter Bunny differs from the first two tutorials by presenting a more compact and stylized character. Instead of the bunny holding or painting the egg, it is peeking from behind it, creating a different composition. The drawing also has a tilted head and simplified facial features, giving it a minimalistic and decorative look. The design is more curved, with smooth and rounded shapes.
To start this additional tutorial on how to draw an Easter Bunny, begin by sketching an oval for the Easter egg. Decorate the egg with horizontal zigzag lines and simple circular patterns. Draw a small oval above the egg for the bunny’s head, slightly tilted to one side. Attach small rounded shapes at the base of the head to represent the paws.
Sketch a small face with circular eyes, a tiny triangular nose, and a short curved mouth. Add two long ears on top of the head, slightly bent outward. Refine the outlines, making the Easter Bunny appear connected to the egg. Erase unnecessary guidelines and smooth the drawing. Complete the illustration by coloring the Easter Bunny in light shades, giving the egg a bright color scheme with contrasting patterns.
Conclusion
This was a lesson on how to draw an Easter Bunny in three different, simple, and recognizable ways. It is intended to help in creating this holiday symbol. On my website, there are many other drawing tutorials available, covering a variety of characters. For example, you can draw Santa or monsters associated with Halloween.
Also, don’t forget to visit my collection of Easter coloring pages, where I’ve gathered popular characters related to the holiday along with other recognizable Easter symbols.
It is also recommended to subscribe on social media to stay updated on new drawing lessons, coloring pages, and other regularly published content. Additionally, a video version of the drawing lessons is available on YouTube, which may be useful for young artists.