Space Drawing Ideas
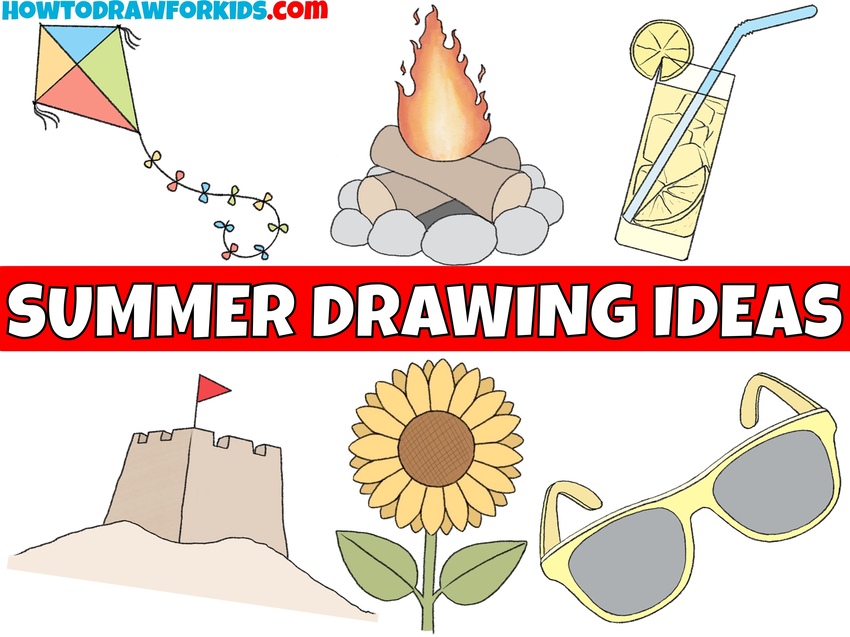
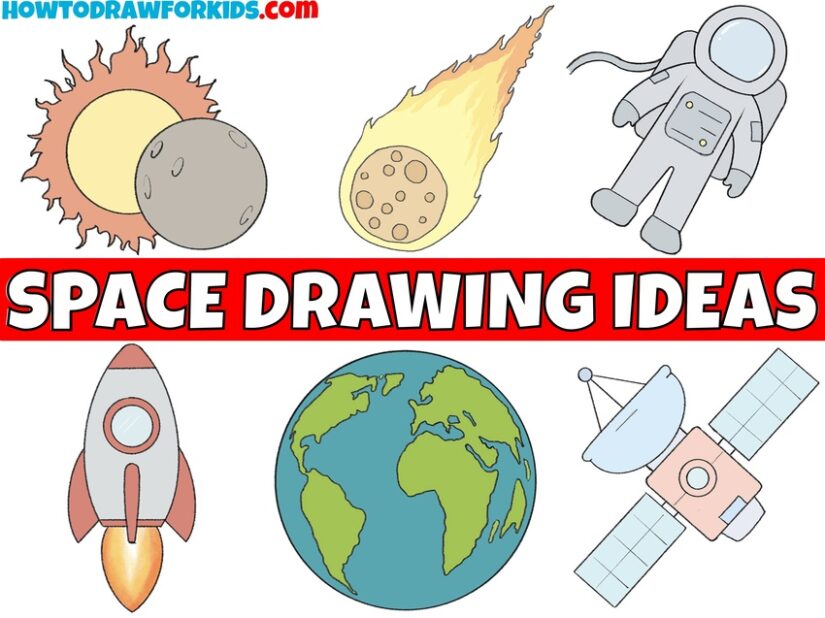
Welcome to my new set of space drawing ideas made for anyone who likes sketching spacecraft, astronauts, and aliens.
Space Drawing Ideas: Introduction
In this collection, I’ve brought together all of my space-themed drawing lessons and everything related to it. Here you’ll find tutorials on drawing different kinds of spacecraft, rockets, unusual creatures from deep space, and much more.
All lessons are created in a simple, basic style so any child can follow them without difficulty. Each drawing can be completed on its own or combined with others.
For example, you can sketch a space scene using one lesson and then add an astronaut and a rocket using two other step-by-step guides.
Collection of Space Drawing Ideas
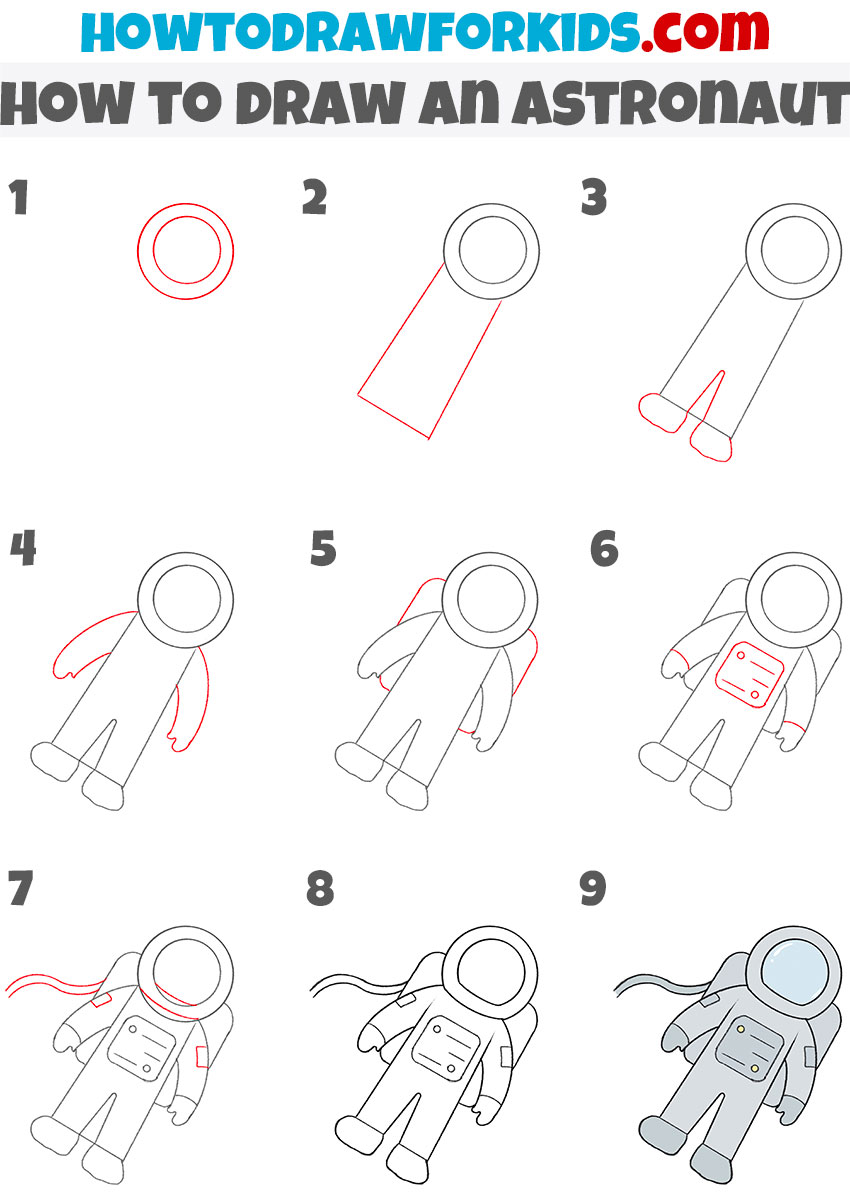
Astronaut
Let’s begin this collection of space drawing ideas with a human figure shown in a recognizable astronaut suit. Here you can see a classic astronaut drawn in a simplified style, with a large helmet and a bulky suit.
The figure is illustrated in a basic manner with very simplified shapes and minimal details.
To draw an astronaut in this simplified style, start by outlining the head, then sketch the basic shape of the body. After that, add the limbs, a few simple details on the suit, and small elements like buttons and hoses to give it a bit more definition.
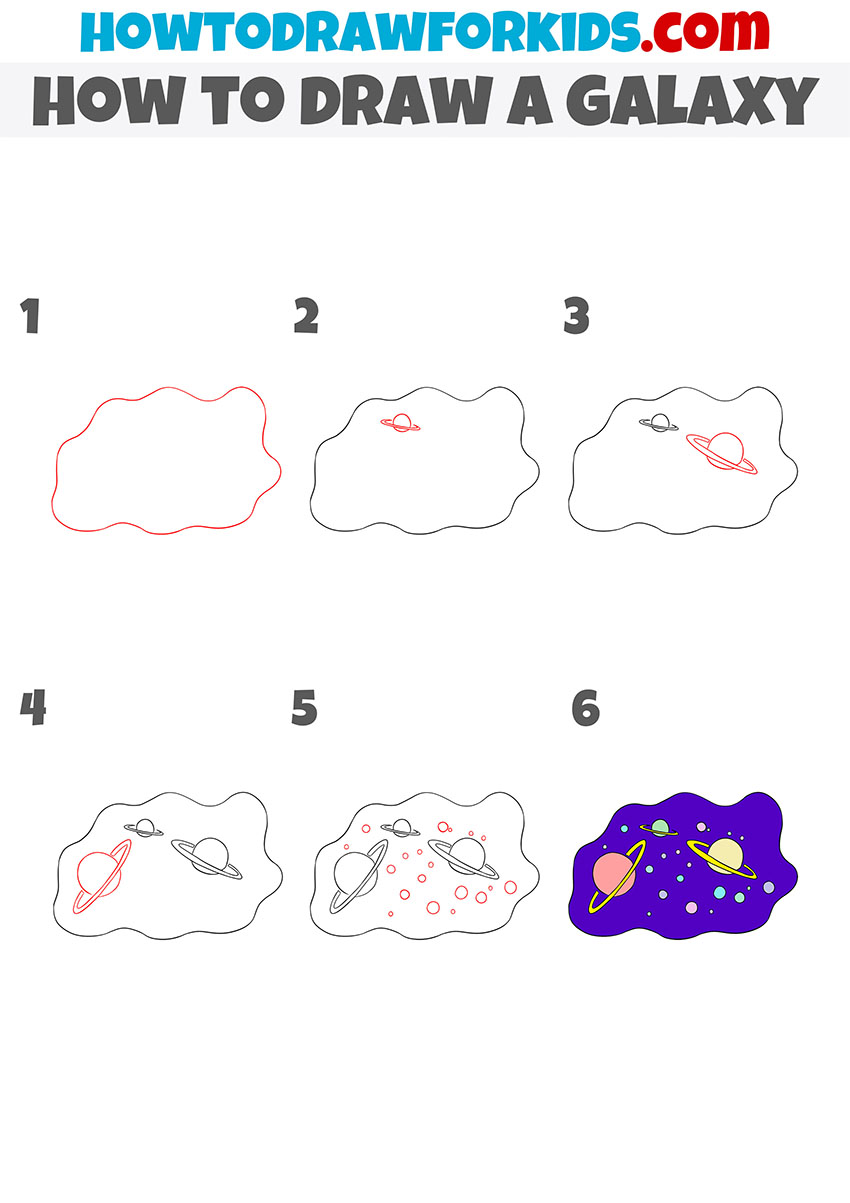
Galaxy
The next space-related drawing lesson is a basic sketch of a galaxy with simple shapes representing celestial bodies scattered across the scene.
The number, shape, and type of these objects can vary depending on what the child wants to draw.
Either way, the main approach stays the same: first outline the general space area, then use light, simple lines to begin sketching planets, stars, and other celestial bodies in a freely chosen, random arrangement.
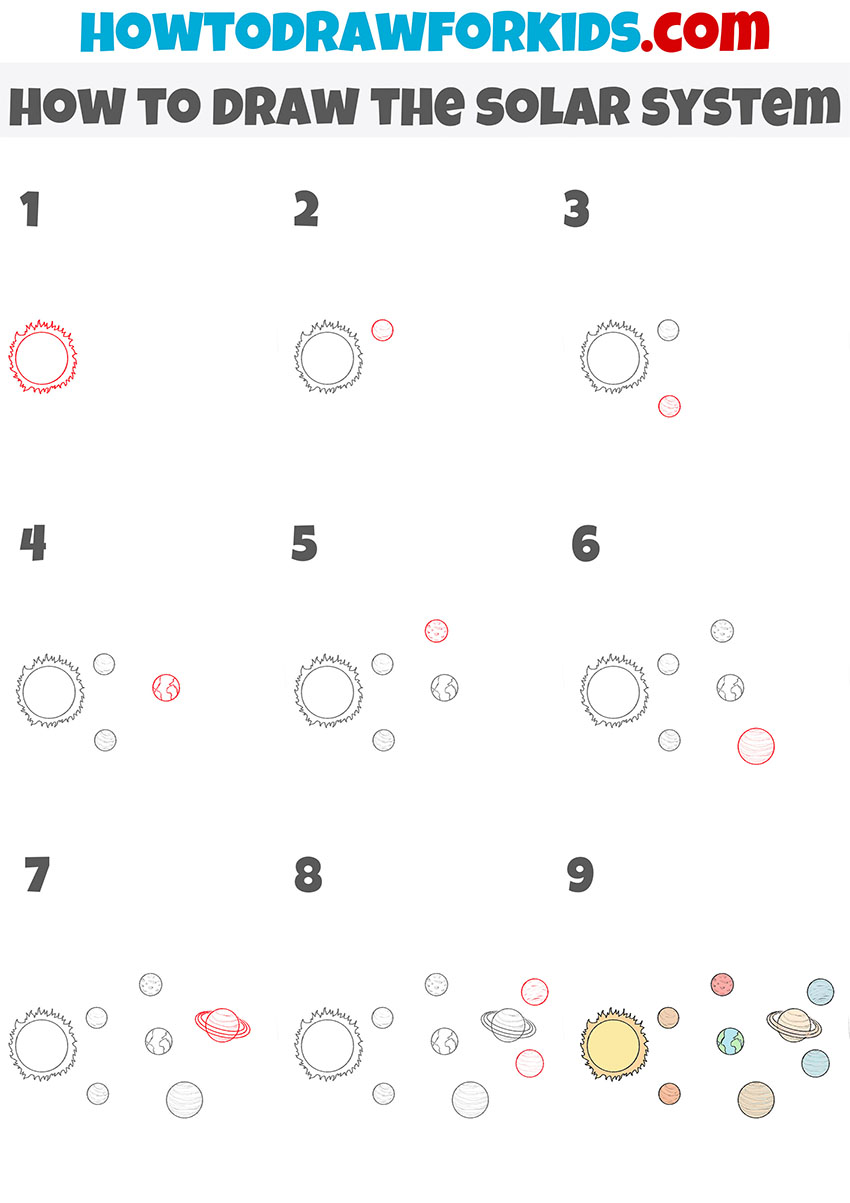
Solar System
Now, moving from a general view of a galaxy, let’s shift to our own solar system – the shared home of humans and, possibly, a few aliens if they exist.
The approach is similar, but instead of placing planets randomly, begin by sketching the outline of the Sun.
Then add all the known planets in order, from the closest to the farthest. You can adjust the level of detail depending on how precisely you want each planet to be represented.
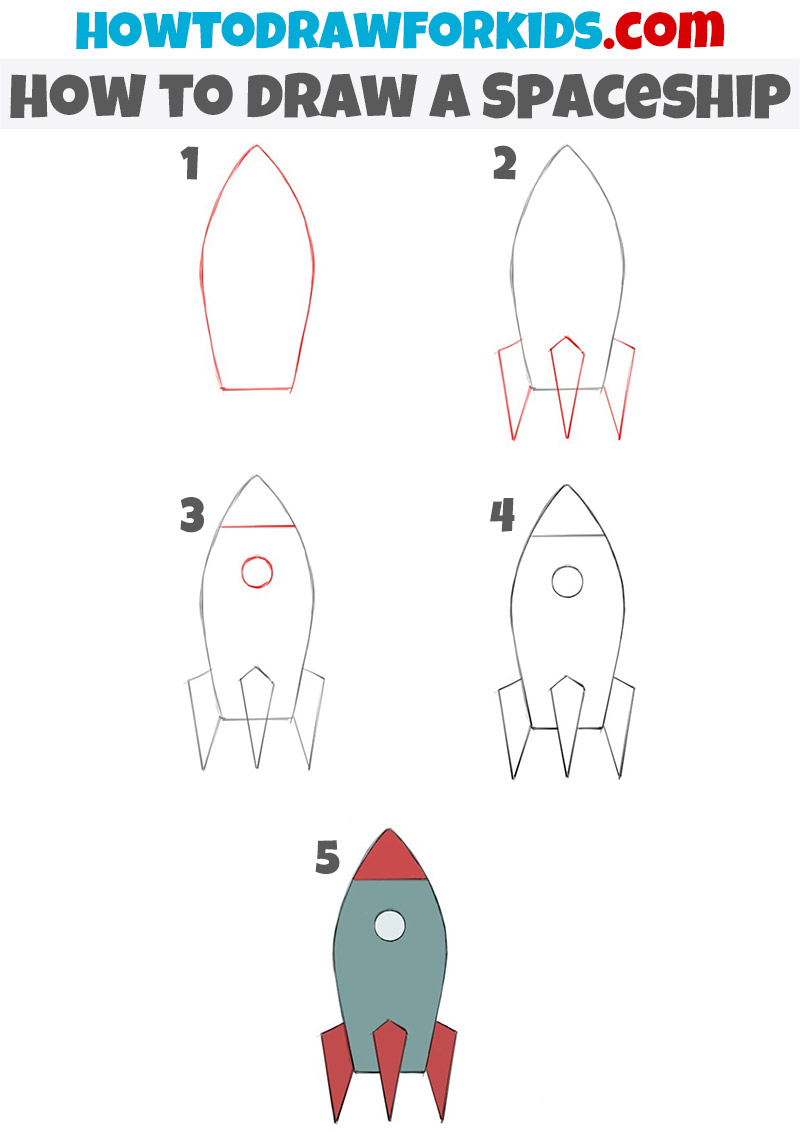
Spaceship
We’ve already sketched an astronaut and outlined outer space, but the first can’t exist in the second without a proper means of transportation namely a spaceship or a rocket.
So let’s draw a spaceship using a simple, basic method built from elementary geometric shapes.
Start by outlining the main body of the spaceship, then add the engines and a small window. Erase the construction lines and color the spaceship in your preferred colors.
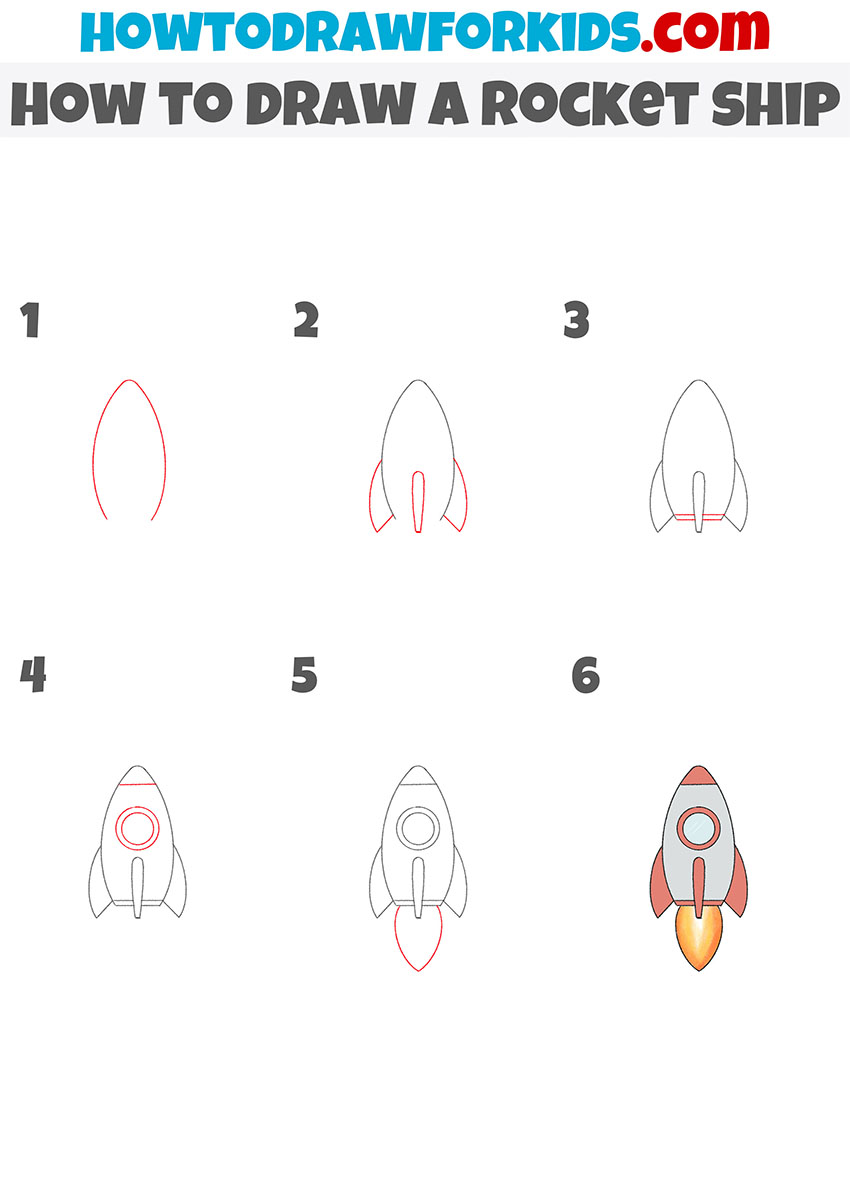
Rocket Ship
We’ve learned how to draw a spaceship, so now let’s try a similar but slightly different type of vehicle – a rocket ship.
In shape and appearance, these two space vehicles are quite close, but there are small distinctions.
As with the previous method, begin by outlining the main rocket-shaped body. Then add the engines, a window, and flames coming from the bottom section.
After that, erase the construction lines and color the rocket in your chosen, characteristic colors.
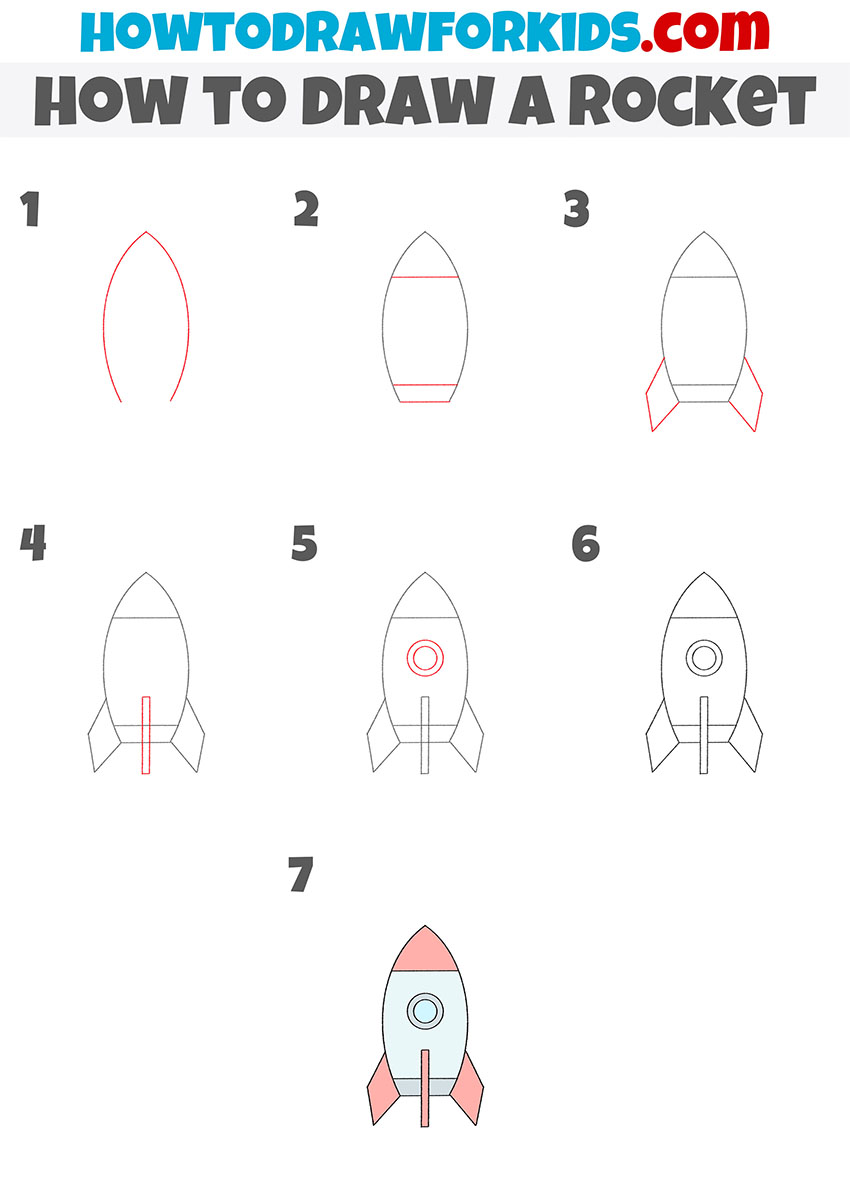
Rocket
Now let’s move on to another type of space vehicle – a rocket. These vehicles are not always used to launch people; they often carry equipment, research instruments, or experimental payloads.
As with the two previous examples, the process is straightforward: outline the basic shape, add the key details, erase the unnecessary lines, and finish by adding clean, simple colors.
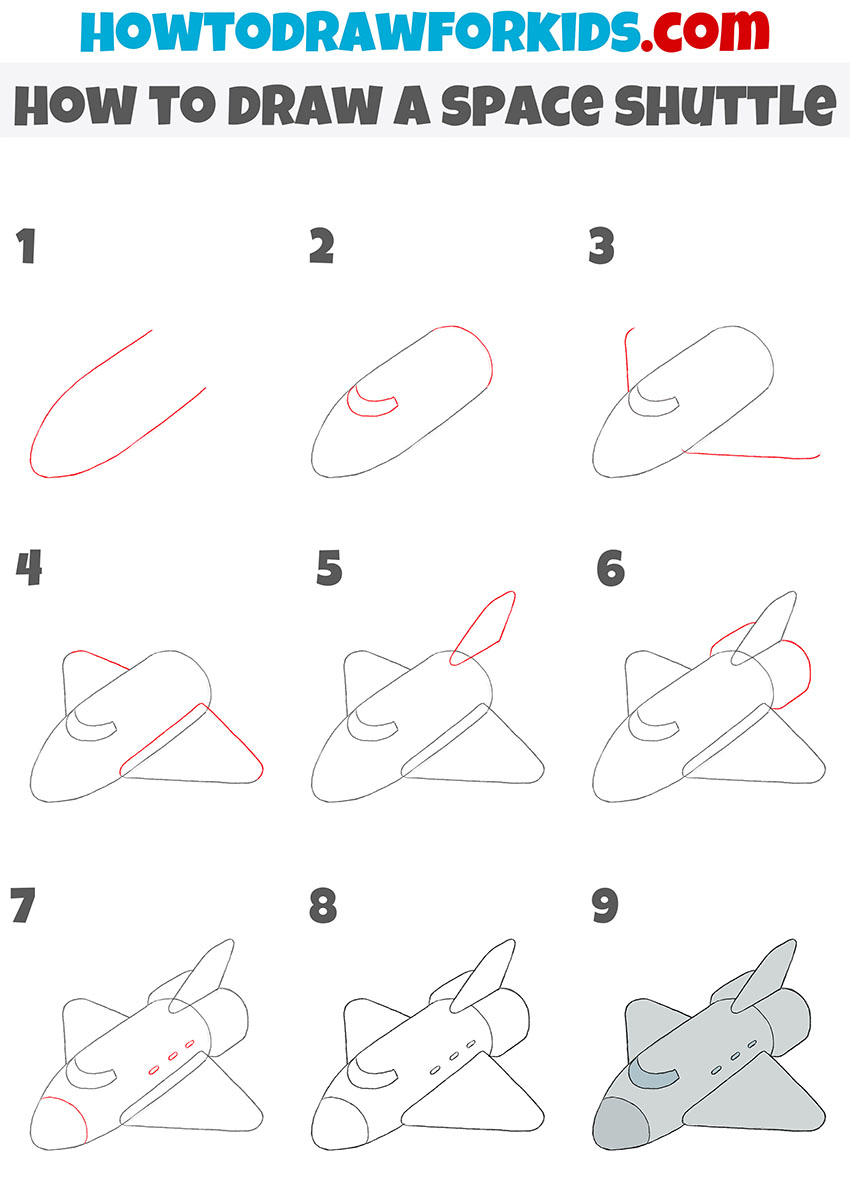
Space Shuttle
A space shuttle is another type of vehicle used for traveling through the depths of the galaxy. It has a different shape, a different overall form, and operates a bit differently.
Its main features resemble an airplane more than a simple rocket. However, the drawing process is very similar to sketching other rocket-based space vehicles.
As before, start by outlining the main body, then add the wings and windows. After that, sketch the rear section, erase all construction lines, and color the body in gray tones with red and yellow for the exhaust flames if you choose to include them.
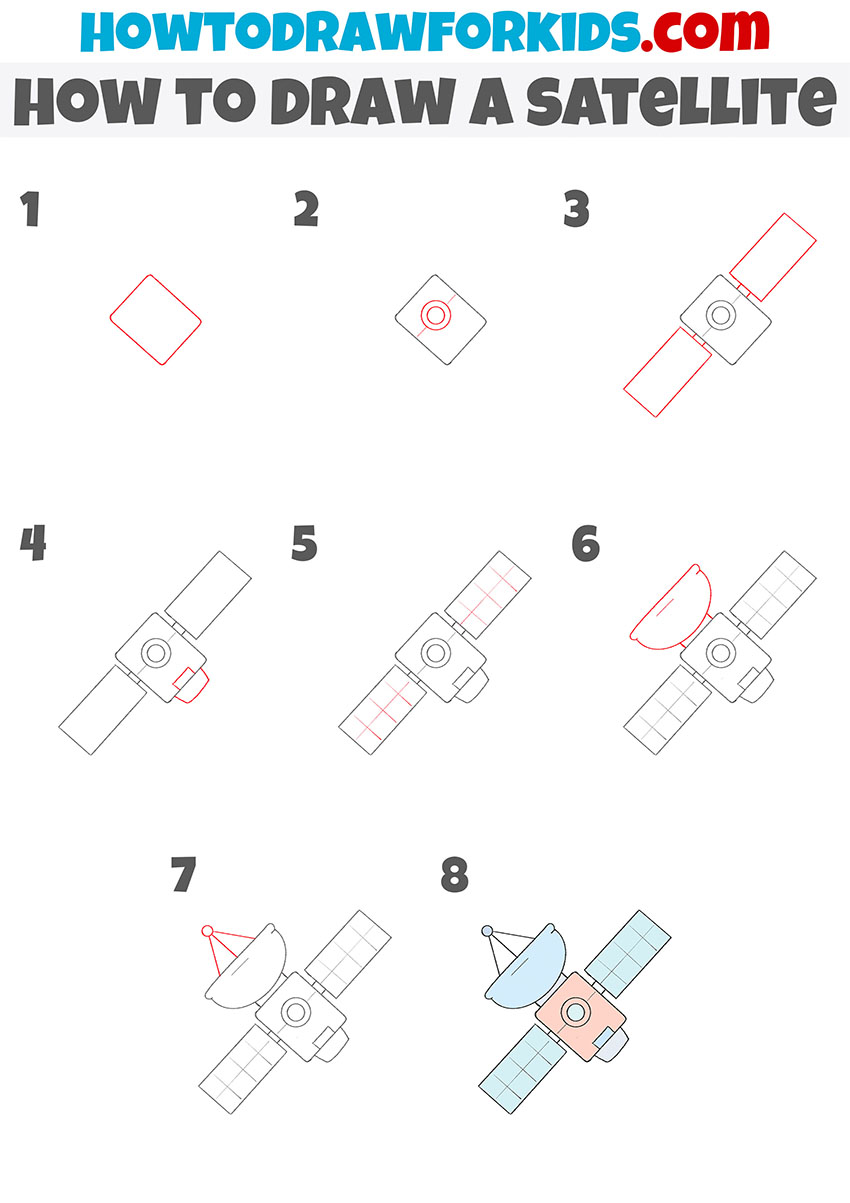
Satellite
Now let’s draw a completely different type of space device, one designed for other purposes. Unlike rockets or spacecraft, a satellite is meant to remain in orbit and perform specific tasks.
The shape is also different, as is the drawing approach. Start by outlining the central body, then add the side panels.
After that, include small details, erase the construction lines, and color the entire object.
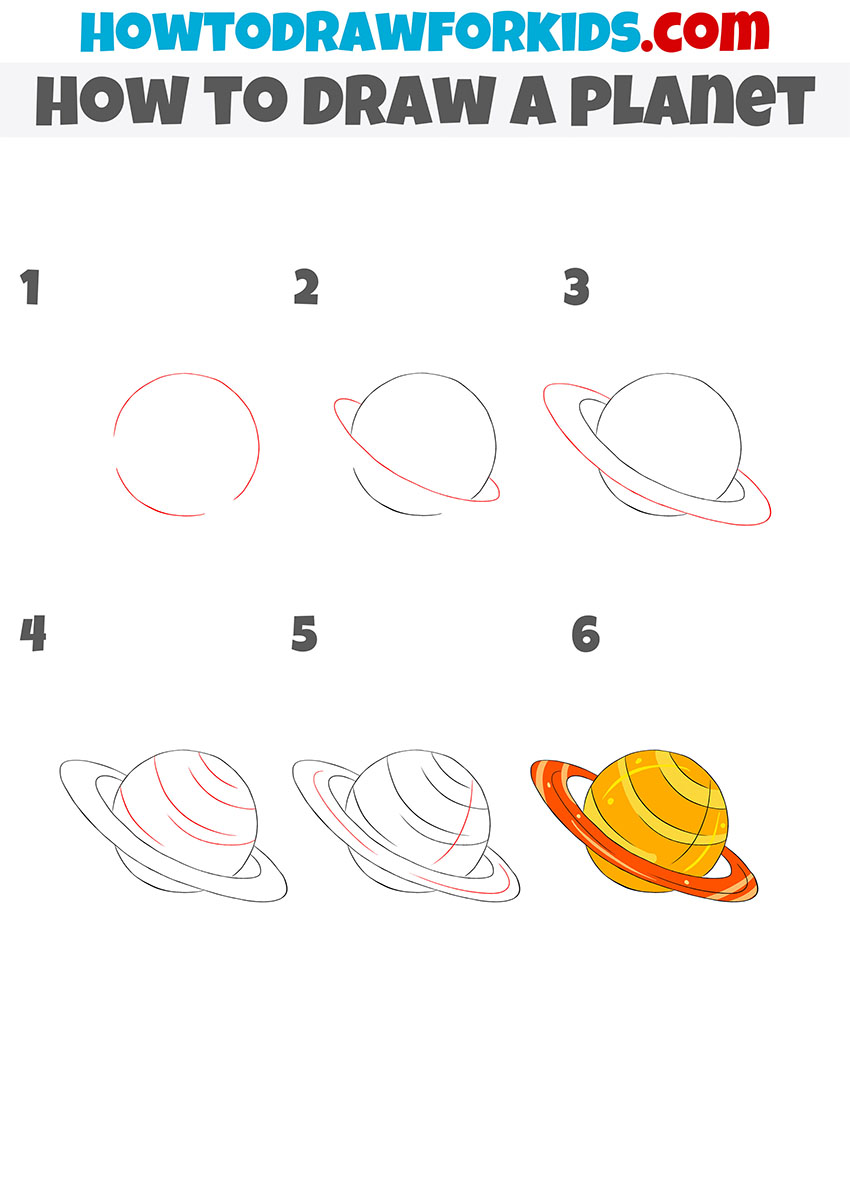
Planet
Now, moving from general space forms and vehicles to specific celestial bodies, let’s focus on one of the most recognizable planet shapes – Saturn with its legendary rings.
To draw a planet using Saturn as an example,, begin by outlining the rounded shape of the planet. Then sketch the ring structure around it using simple oval shapes.
After that, add small surface details and color the planet in yellow-orange tones.
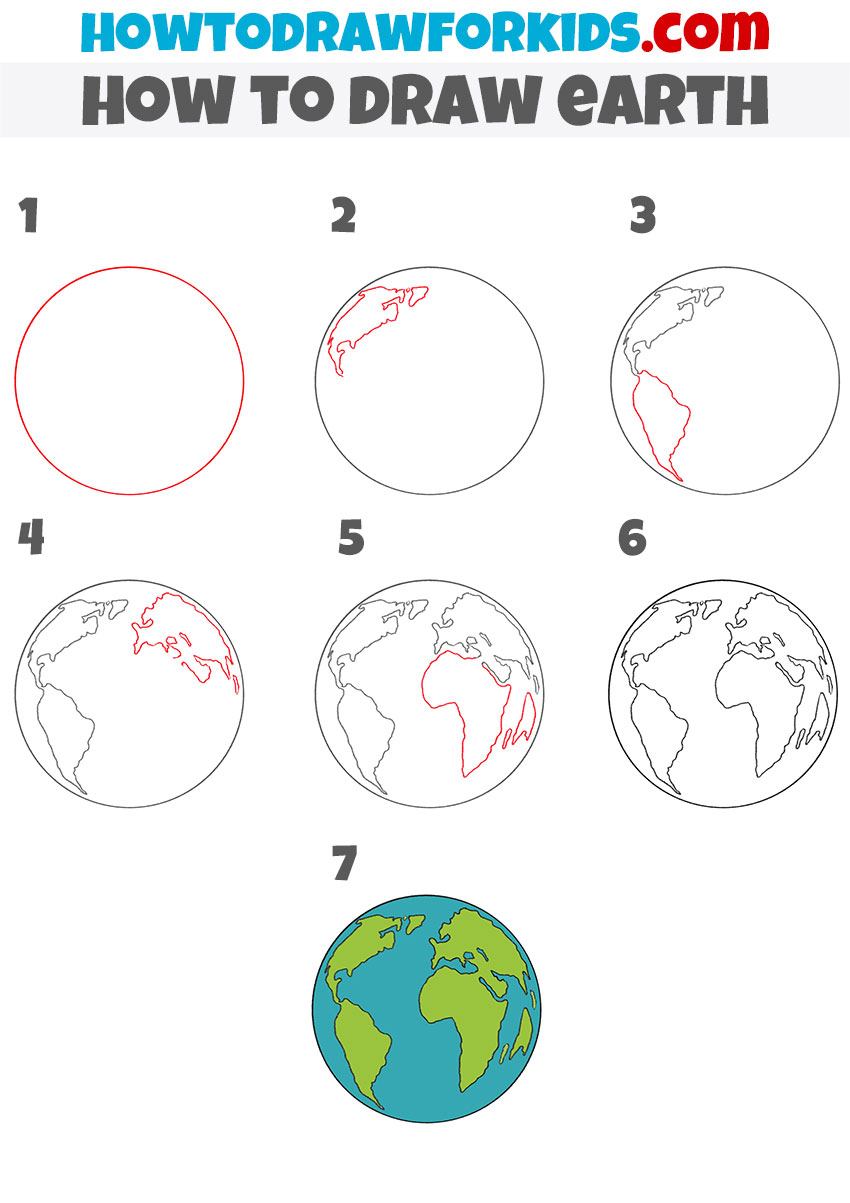
Earth
Of course, even though many planets have unusual and interesting shapes, our favorite is our shared home – planet Earth.
Its appearance is recognizable to anyone living here, so drawing it is also straightforward. As in the previous example, start by outlining the circular shape of the planet.
Then gradually add the contours of the continents, depending on which part of Earth you want to show. After that, color the planet in its characteristic blue and green tones.
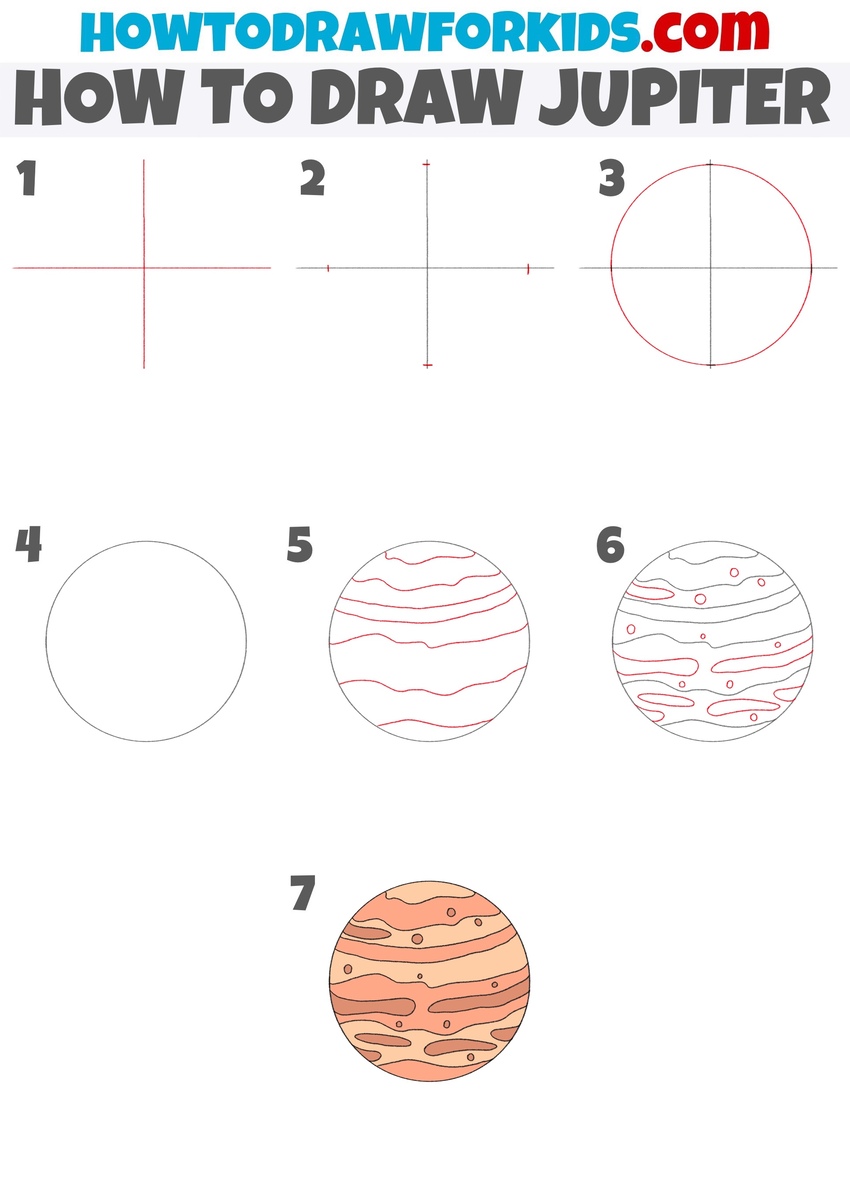
Jupiter
Continuing with space drawing ideas and moving through different planets, let’s now shift to the largest celestial body in our solar system – Jupiter.
As with Earth, begin by outlining the basic shape of the planet as a simple circle. Then use smooth horizontal lines to indicate the bands and spots across the surface
After that, color Jupiter using its characteristic yellow-orange tones.
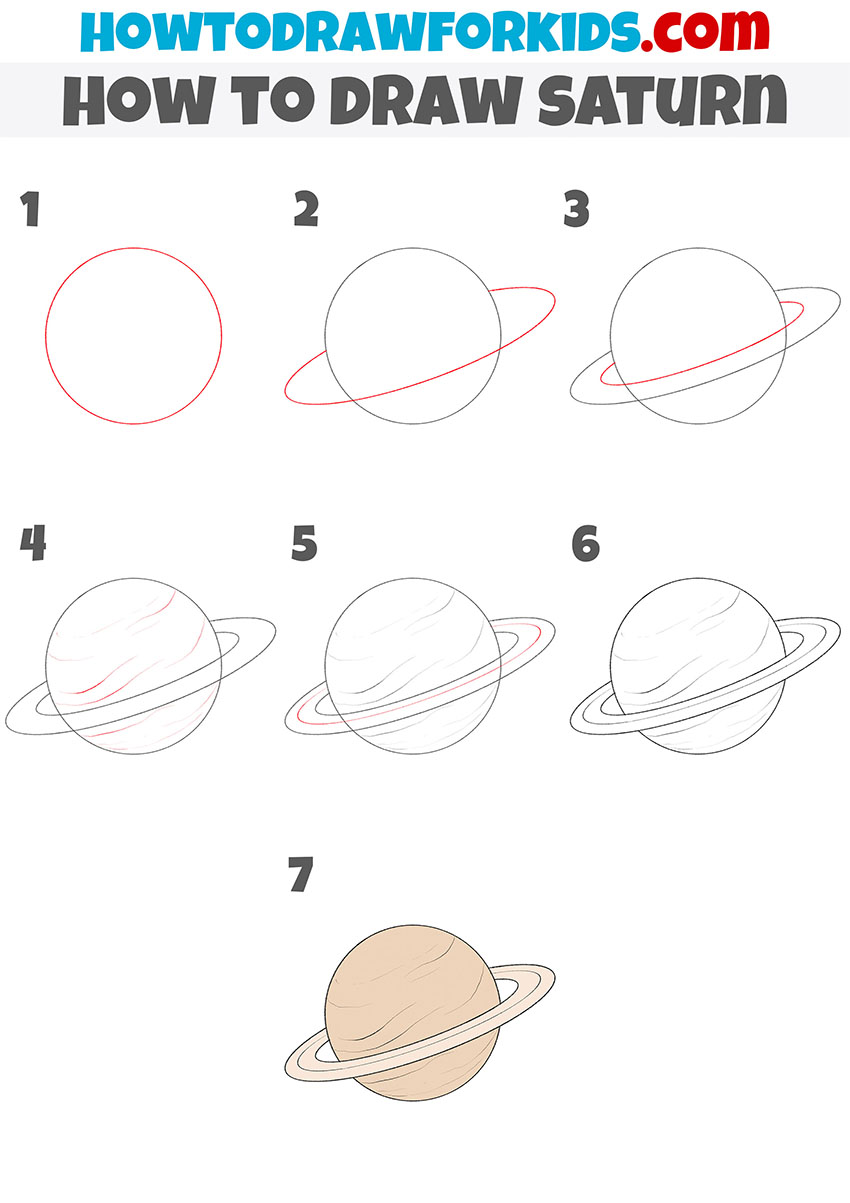
Saturn
A bit earlier I showed how to draw a planet using Jupiter as an example, but here let’s focus specifically on Jupiter itself and sketch it with more detail.
As with any planet, begin by outlining the main shape, which is simply a circle. Then add the characteristic bands, placing light grooves across them.
After that, move to the planet’s surface and outline the key features and markings. Once the details are set, erase the construction lines and color the planet in yellow, sandy, and orange tones.
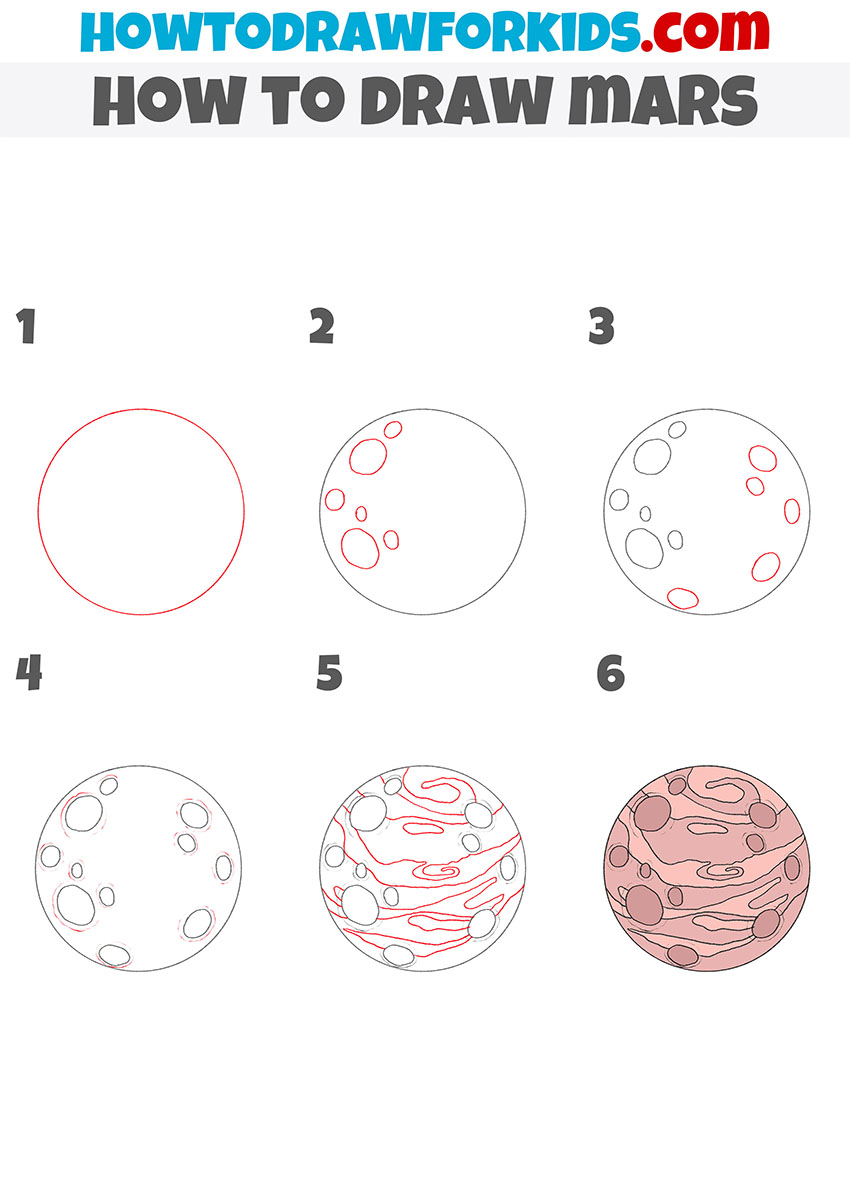
Mars
Now let’s move on to the planet closest to us and the one humans are most likely to visit in the near future – Mars.
As with the planets drawn above, start by outlining Mars with a simple rounded shape. Then add the characteristic grooves and craters of various sizes scattered across its surface.
After that, begin coloring Mars using red and orange tones.
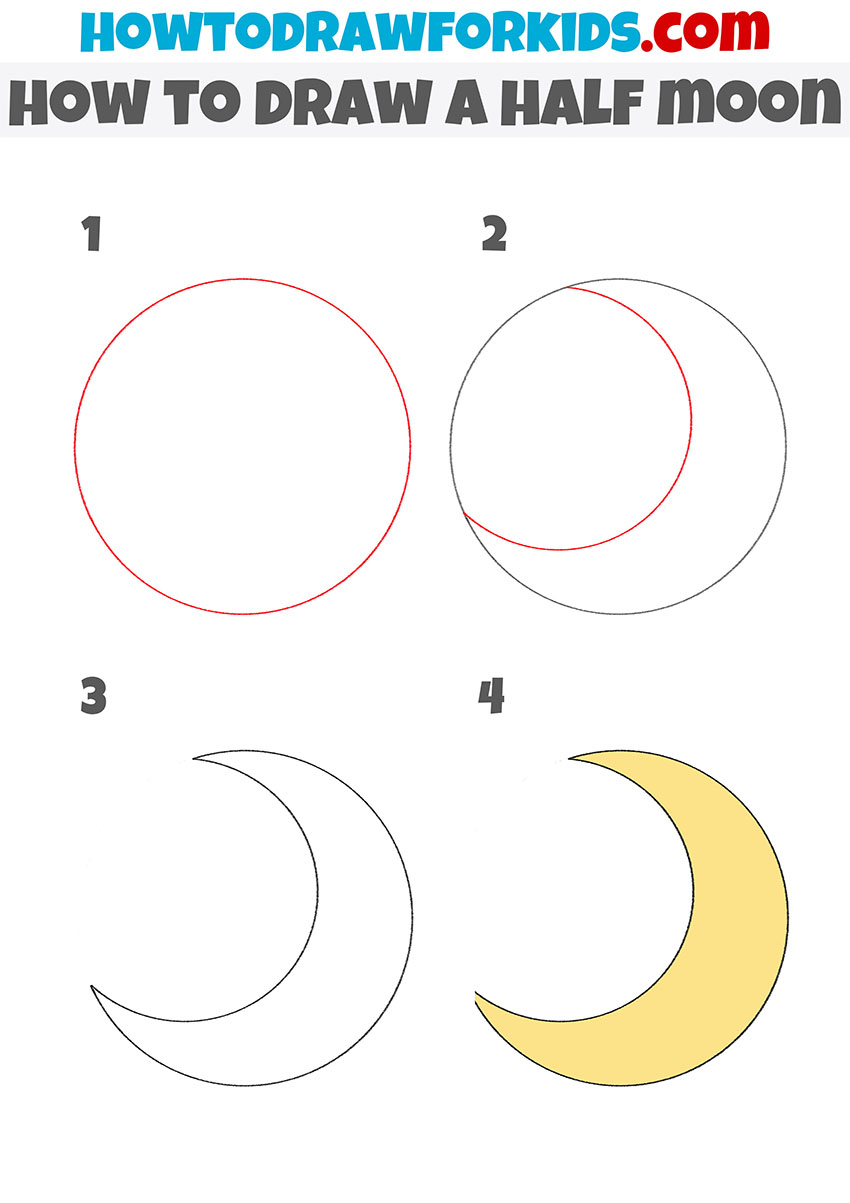
Half Moon
Now, moving from distant planets and solar systems that are invisible to the human eye without special equipment, let’s draw a celestial body we can see almost every night.
To draw the Moon, there are two simple approaches we can use, and we’ll go through them one at a time.
Let’s begin with the crescent shape. To create this form, start by drawing a circle. Then draw a half-circle inside it.
After that, erase the unnecessary part of the outer circle so that the familiar curved crescent shape remains. All that’s left is to color it in a light yellow tone.
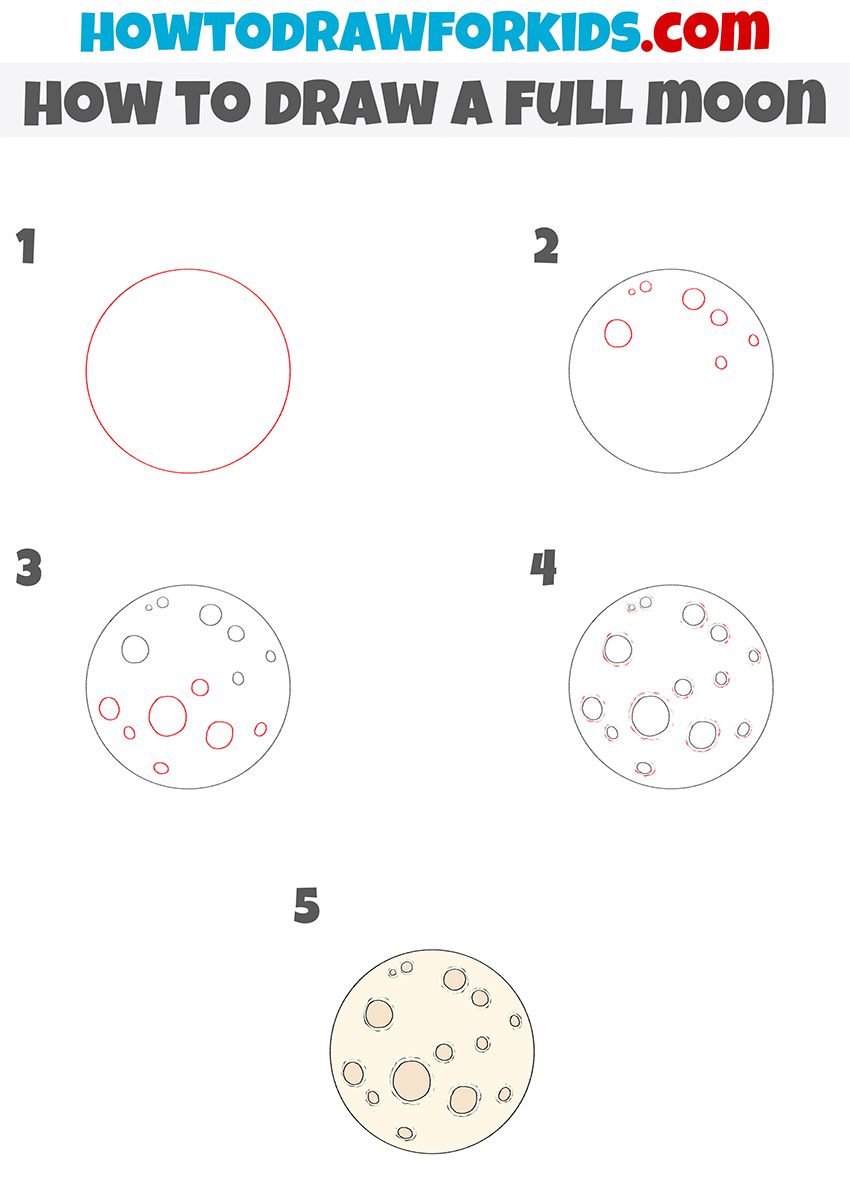
Full Moon
Moving from the crescent shape to the full Moon, let’s draw the lunar disk in its complete form. The approach is similar to how you drew the planets.
Start with a circle to outline the overall shape of the Moon. Then add both small and large craters, placing them evenly but with natural variation across the surface.
After that, fill the drawing with simple yellow tones.
Sun
There are two celestial bodies we can see without any instruments during the day, and we’ve already drawn the first one.
Now let’s sketch the second – the Sun. Without this star, life on Earth would be impossible.
To draw the Sun, begin with a simple circle, keeping it as even as possible. Then carefully add rays around the circle, giving them a slightly irregular shape for a more natural look.
After that, fill the central part with a light yellow tone and color the rays in darker yellow or orange.

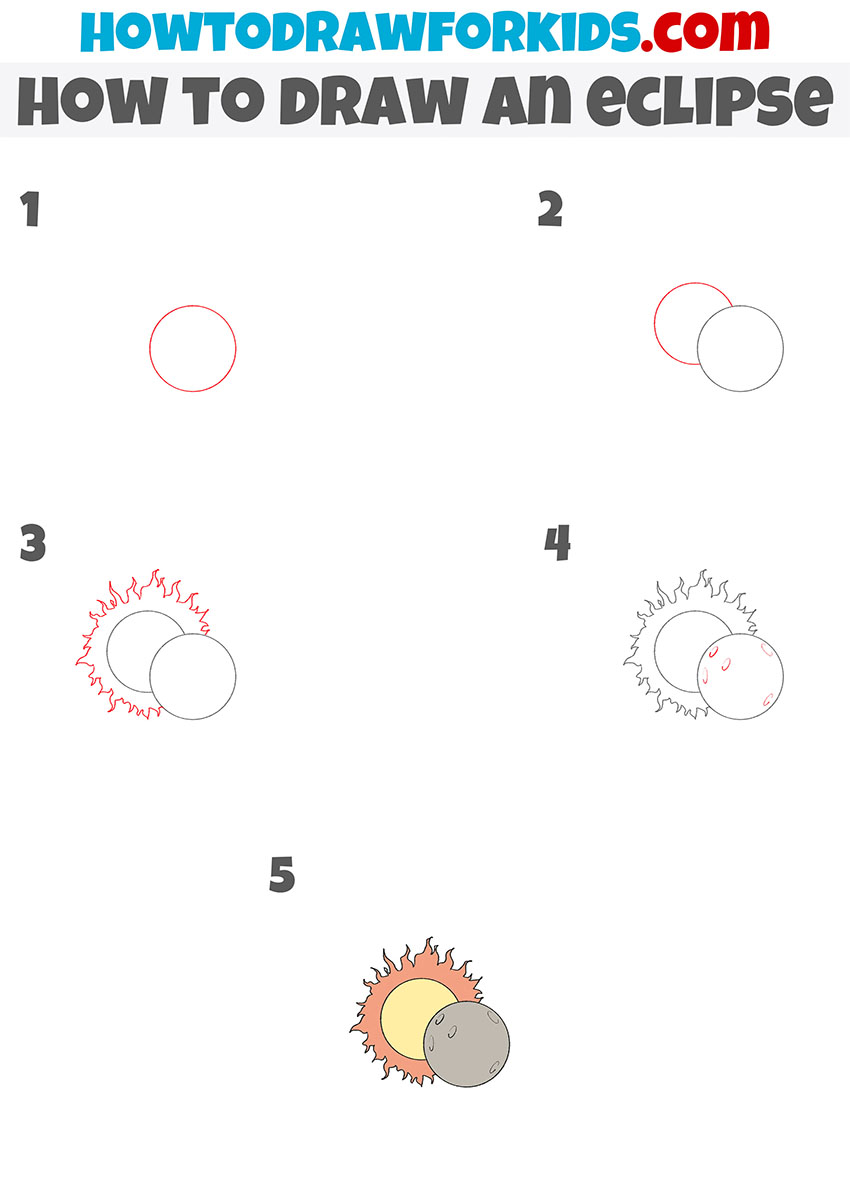
Eclipse
Among the space drawing ideas in this collection, there are also slightly more complex ones, such as this eclipse lesson.
Here you can see two interacting celestial bodies. To draw an eclipse in a simple way, start by outlining the Moon as a circle.
Then, behind it, sketch the outline of the Sun. After that, draw the Sun’s rays and add craters on the Moon, using the same approach as in the earlier lessons.
Once the shapes are set, fill the Moon with gray and the Sun with yellow-orange tones.
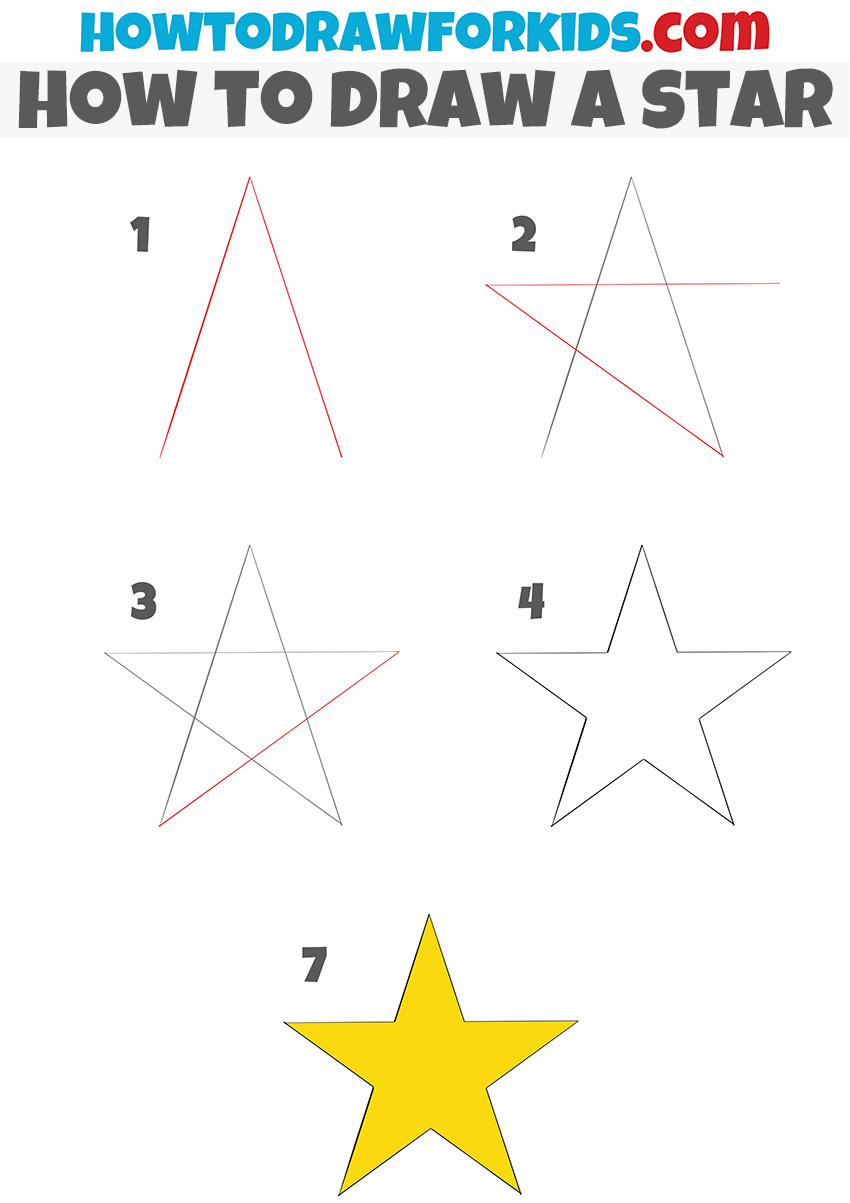
Star
From more authentic-looking celestial bodies, let’s move to something a bit more abstract and draw a star – not the way we see it in the sky, but as a simple schematic illustration.
Any star like this is very easy to draw. Just build up the edges of the star line by line until you get the final shape, trying to keep the symmetry and accuracy at every stage, as shown in the step-by-step guide.
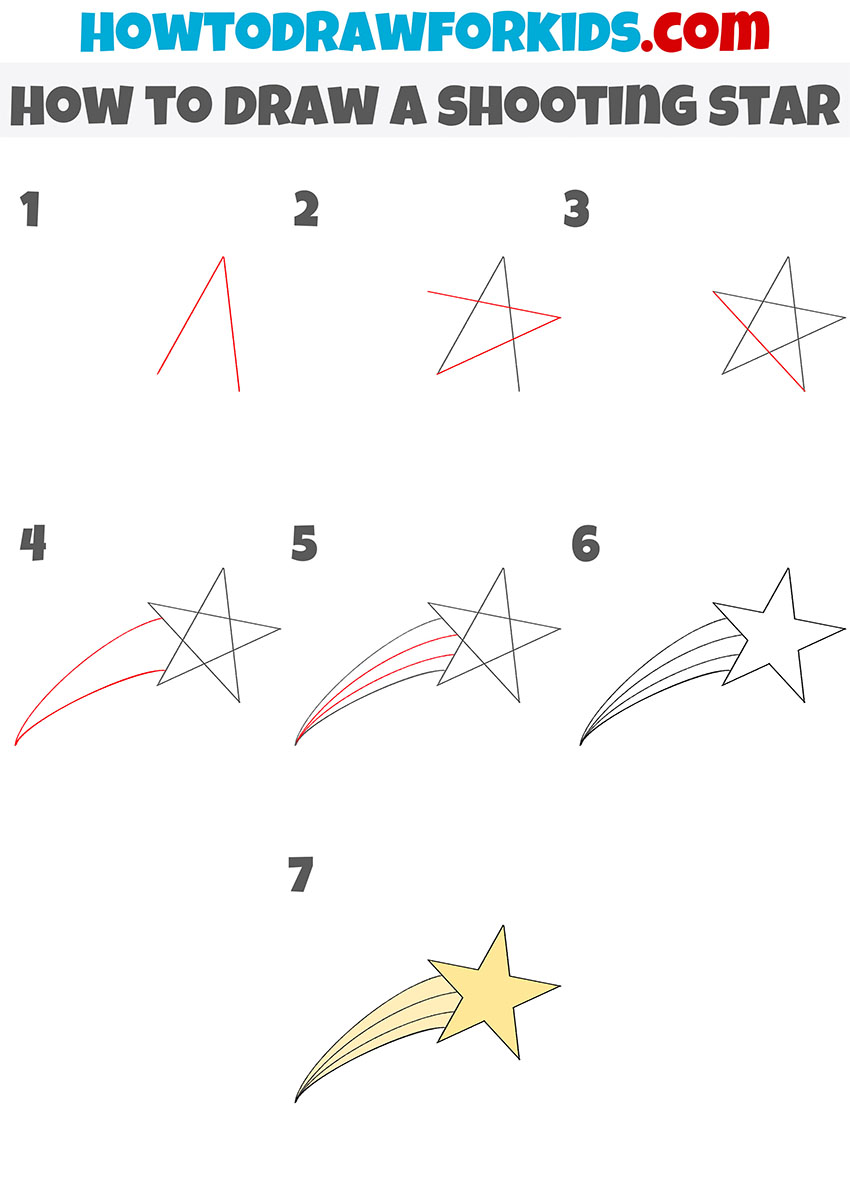
Shooting Star
A star doesn’t have to be static; it can also be drawn as a shooting star. Here’s how to sketch it in the same simple, schematic style.
Start by drawing a star just like in the previous step, using clean, straight lines. Then add the long tail of the shooting star with several smooth, extended strokes.
Erase the construction lines and color the entire shooting star in yellow tones.
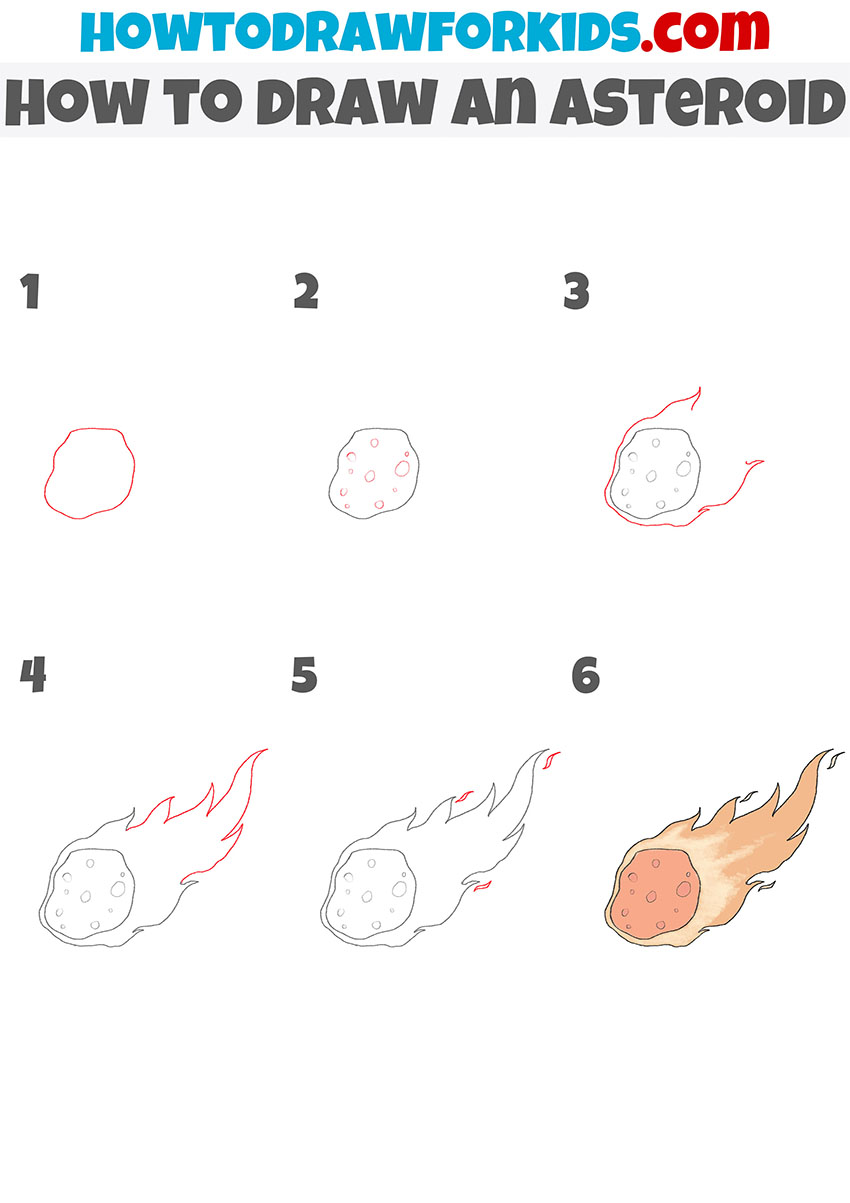
Asteroid
Now let’s move from schematic flying space objects to ones that look more natural and realistic. Space contains many types of celestial bodies like comets, asteroids, meteors, meteorites, and others.
Start with an asteroid by carefully outlining the rough shape of the space rock. Then add light surface textures along with a long fiery tail.
After that, fill the entire drawing with different shades of brown, orange, and yellow.
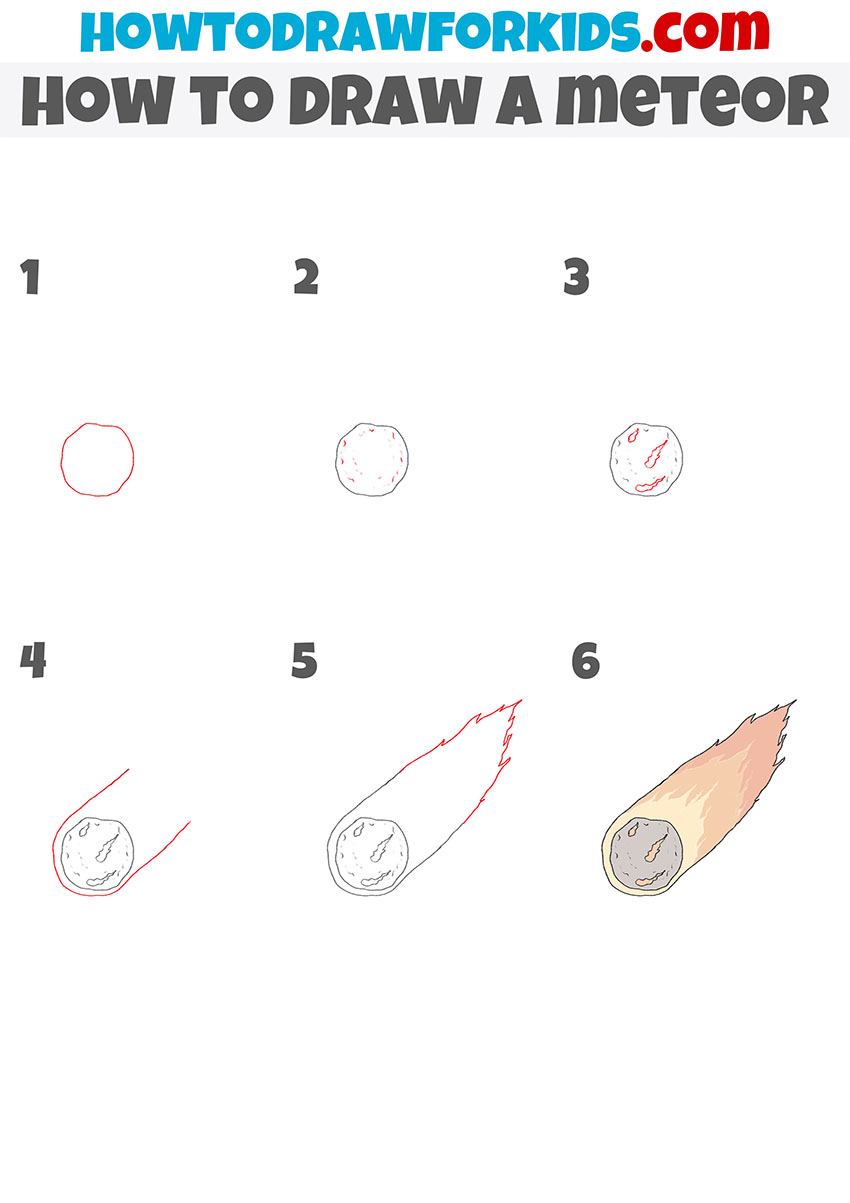
Meteor
Let’s draw a similar celestial body but with a few small differences. As in the previous example, start by outlining the main shape of the object as an uneven oval.
Then add small craters on the surface and traces of fire. After that, sketch the long tail and color the entire space object in similar shades of brown, orange, and yellow.
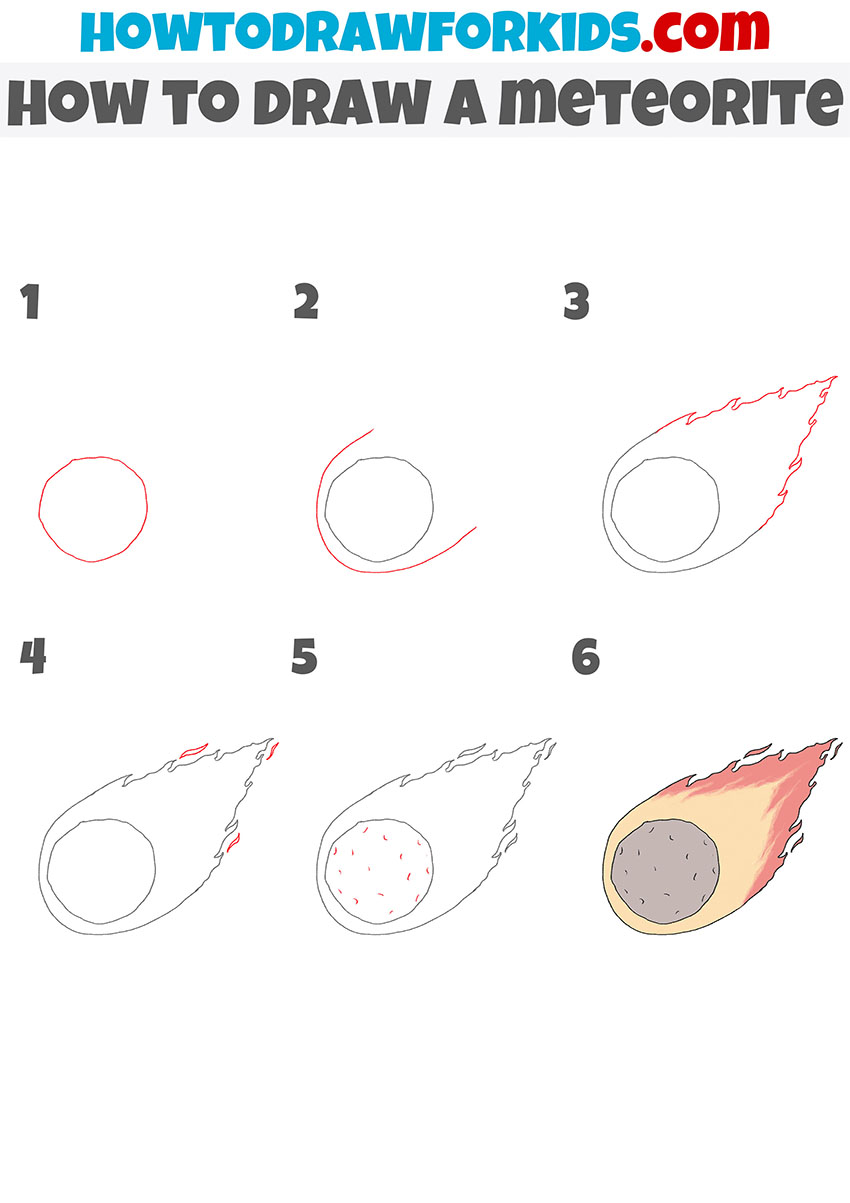
Meteorite
Using similar principles, draw a meteor – a celestial body with a slightly shorter tail. As with the flying objects above, begin by outlining the main shape of the rock as an uneven oval.
Then add small cracks and rocky textures on its surface. After that, draw the tail with irregular forms and small separate flames extending from the main trail. Finally, fill the drawing with the familiar brown and orange tones.
Meteorite
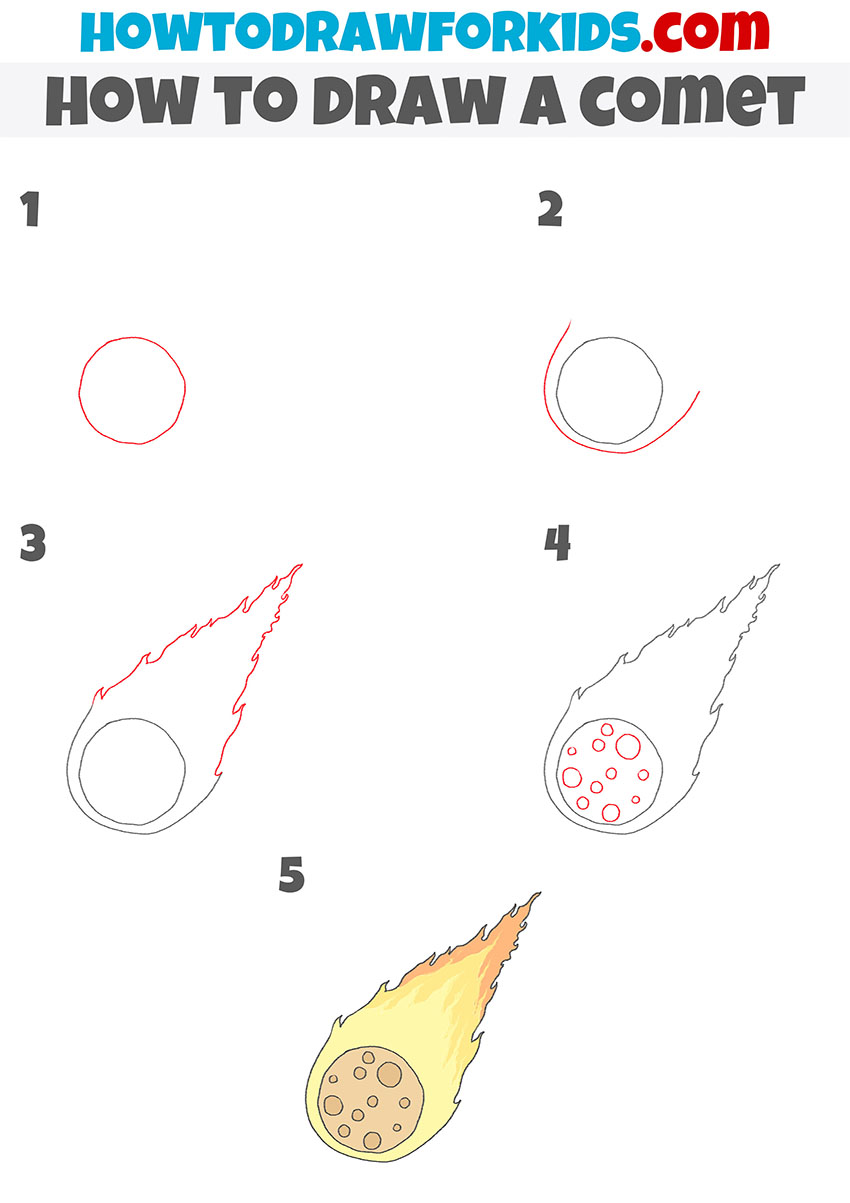
A comet, as you’ve probably noticed, is drawn in much the same way as the other flying celestial bodies, but with a few small differences.
As before, sketch an oval or circular shape for the main body of the object. Then use light rounded shapes to add craters on the surface.
After that, draw the long tail with smooth, slightly uneven strokes, and fill the entire drawing with yellow and orange tones.
Black Hole
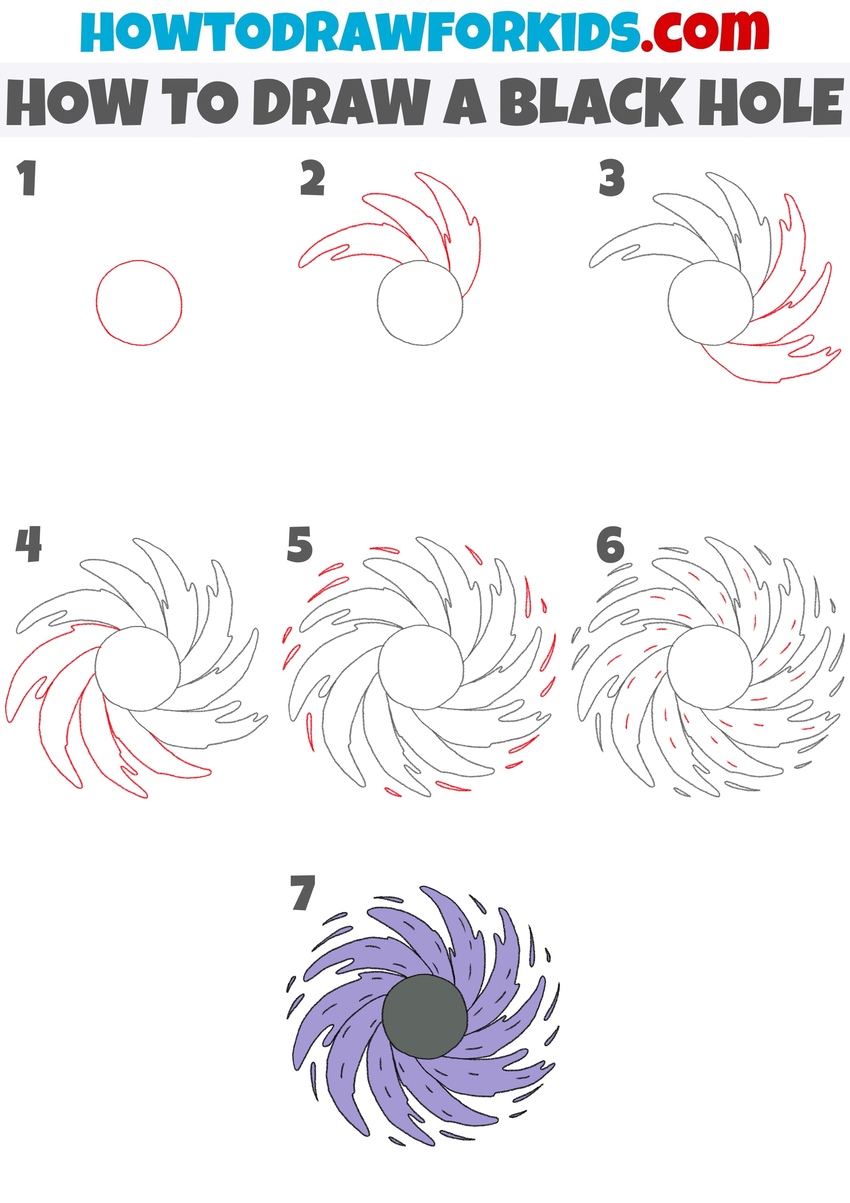
Moving from the well-known space objects we’ve already covered, let’s turn to something more mysterious and unusual – a black hole.
To draw a black hole in a simple way, begin by outlining the core as a basic circle. Then sketch the waves or swirling shapes extending from the center, forming a large vortex.
Try to keep these outlines uneven while still creating an overall circular form. After that, fill the entire drawing of this unusual space object with black and purple tones.
Telescope
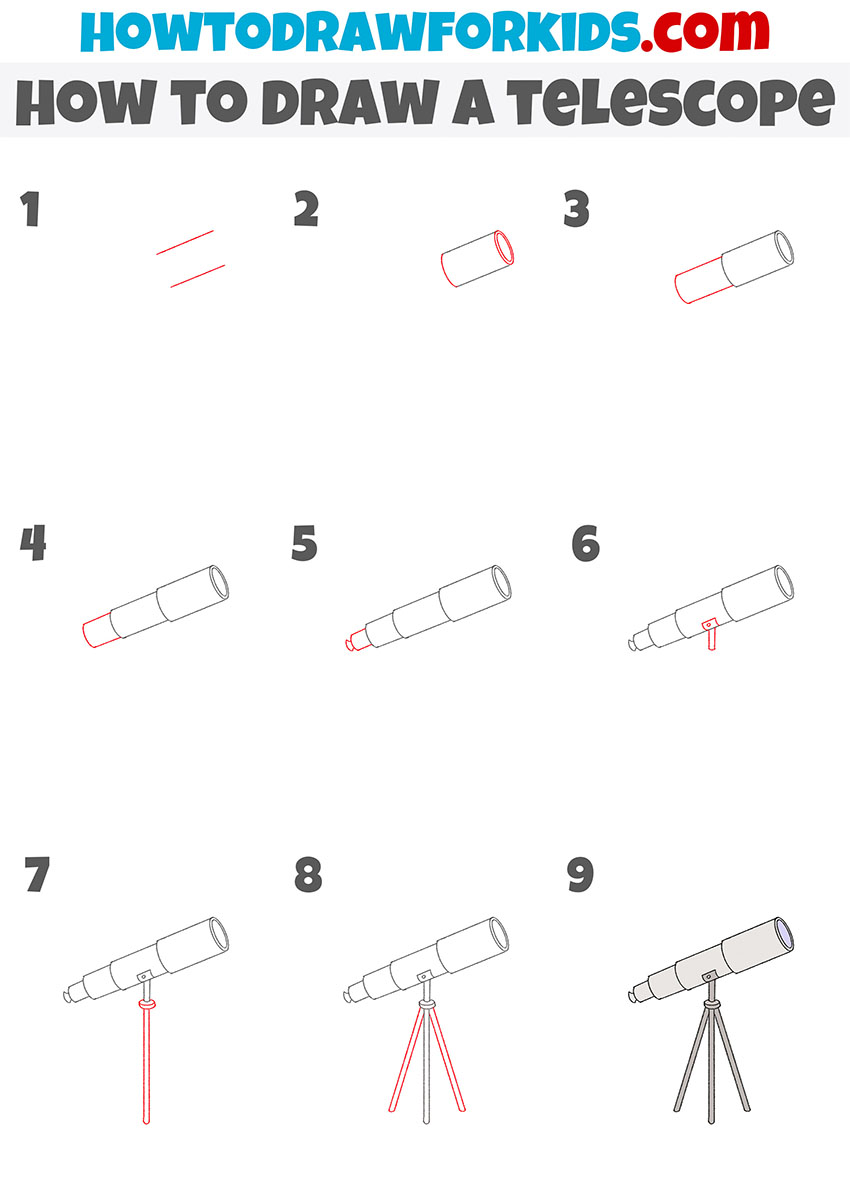
We’ve outlined many different space objects, celestial figures, spacecraft, and even an astronaut. But here on Earth, the easiest way to observe all of this is with a telescope, which I’ll show you how to draw now.
To sketch a telescope, start by drawing the main tube using a series of cylindrical shapes. Then outline the tripod with several straight, clean lines.
Next, you can add small details to the surface and color it in any shades you prefer.
Conclusion
In this collection of space drawing ideas, I’ve gathered the most recognizable figures and objects connected to the vast, incomprehensible expanse surrounding our planet Earth.
Each drawing is presented in a very simple, streamlined style so children can learn to sketch them without difficulty, and so parents and teachers can show the most accessible way to approach art.
As mentioned at the beginning of the lesson, you can combine any of these drawings to create more complex space scenes.
You can also add extra detail to each object or color them in completely different tones if you prefer.