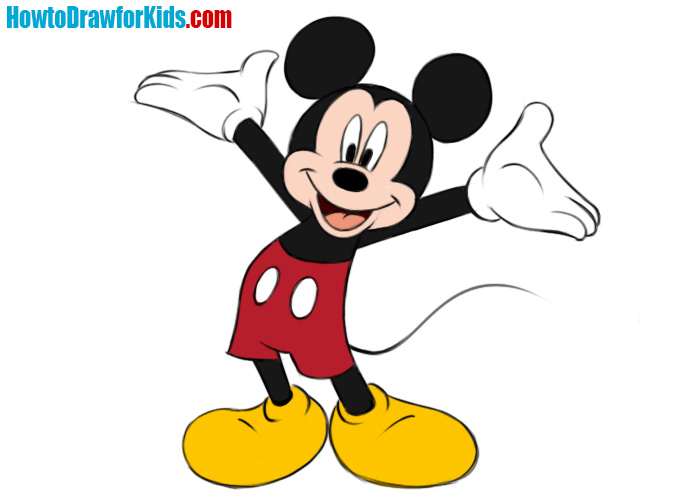
How to Draw Mickey Mouse
Welcome, everyone, to a delightful session where the aim is to master how to draw Mickey Mouse. Our artistic endeavor begins with the simplest of shapes and evolves, line by line, into the joyous character known across the globe. This tutorial is crafted with ease in mind, letting each pencil stroke bring us closer to Mickey’s timeless appeal.
How to Draw Mickey Mouse: Basic Information
Have you ever dreamed of bringing to life the world’s most iconic character? My lesson on how to draw Mickey Mouse is designed to make that dream a reality. I’ve laid out a simple method that will have you sketching out Mickey’s cheerful demeanor in no time. This tutorial is a gentle introduction to drawing characters, capturing the essence of Mickey’s joyful spirit.
Our focus will be on the flow of lines and the balance of shapes that come together to capture Mickey’s cheerful essence. Each step, from the round ears symbolizing his joyful presence to the gentle curves of his smiling face, has been carefully chosen to make the process of drawing as enjoyable as the final result.
Now, let’s draw Mickey Mouse together, focusing on each line and curve that creates the character we all adore. This tutorial goes beyond just copying an image – here you’ll catch the symphony of shapes that make up our beloved Mickey. Through this process, you’ll learn to draw Mickey and tap into the enduring enchantment he embodies.
Mickey Mouse Drawing Tutorial
Materials
- Pencil
- Paper
- Eraser
- Coloring supplies
Time needed: 30 minutes
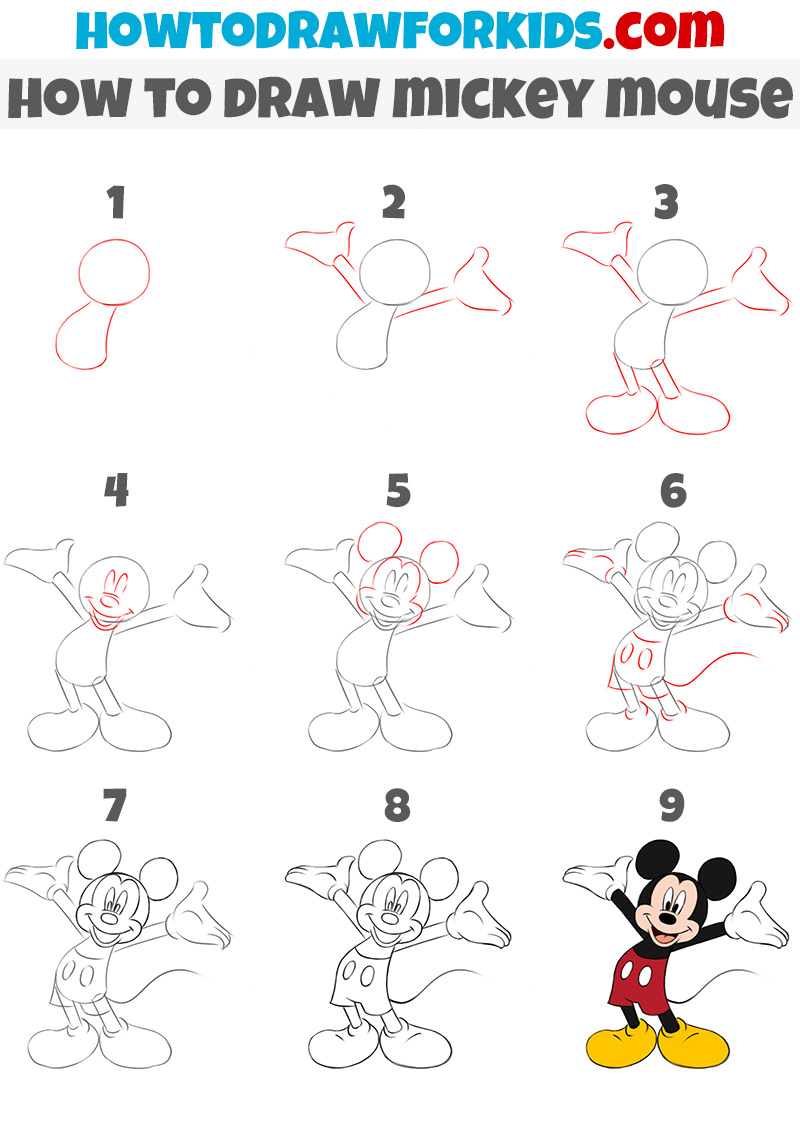
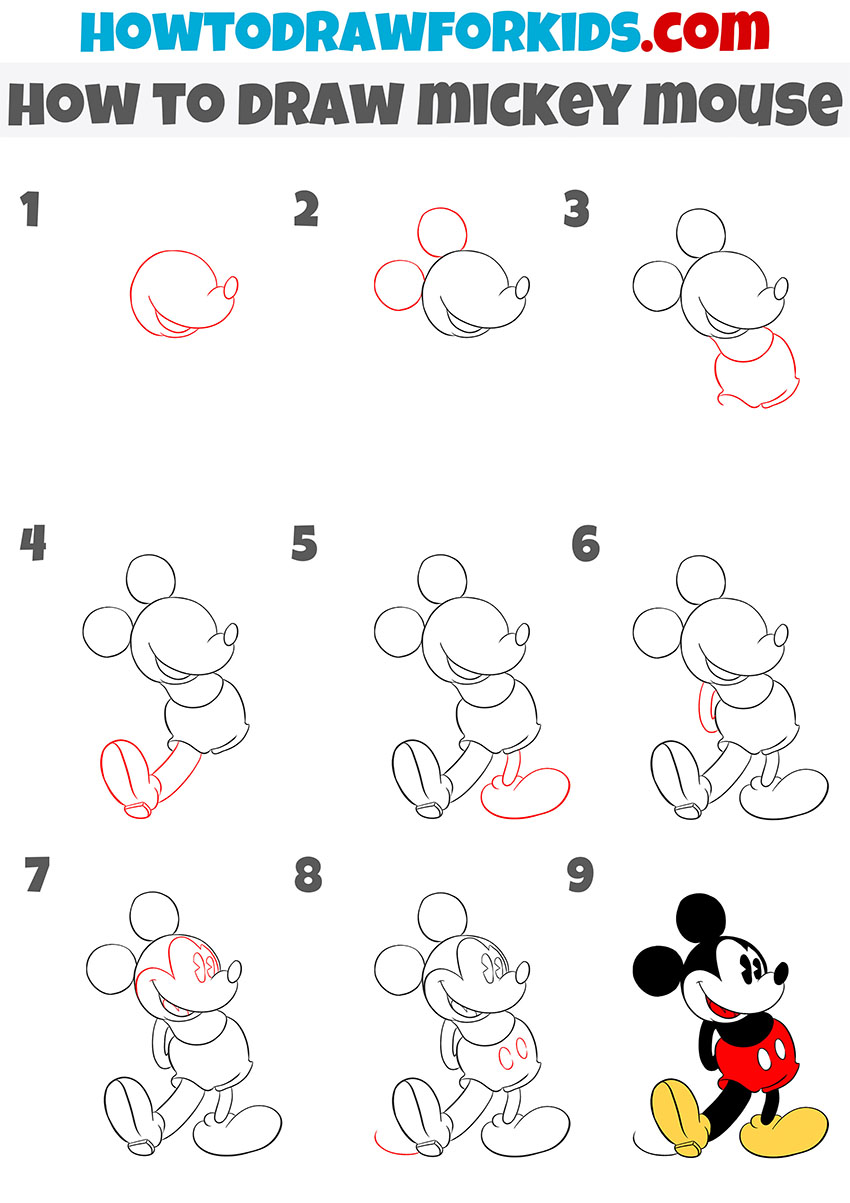
How to Draw Mickey Mouse
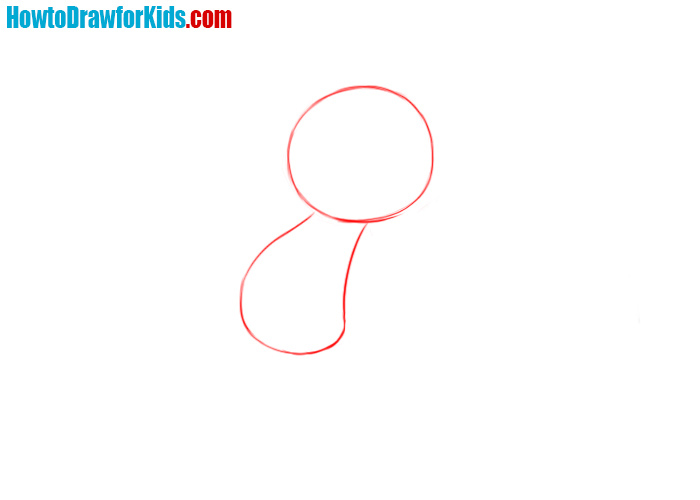
- Sketch out the head and torso of Mickey Mouse.
As you can see, it looks like a curved hole for the door key. The head has the shape of an ordinary circle. The head should be much wider than the body.
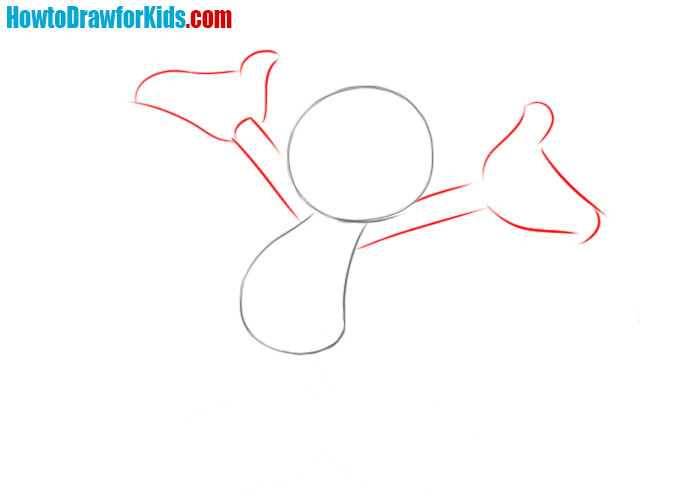
- Add the arms.
Huge hands are typical of Disney characters. The thumb is opposed to the rest of the fingers at an angle of 90 degrees.
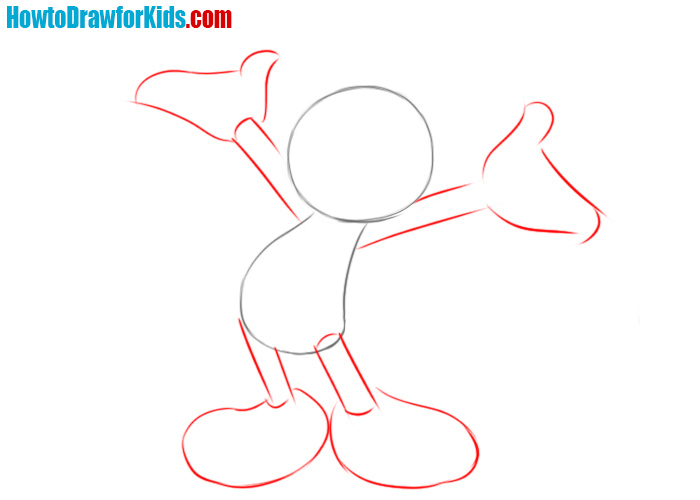
- Draw the contours of the legs.
You can see very thin legs and huge, rounded feet. This is also a very recognizable mark of Disney characters.
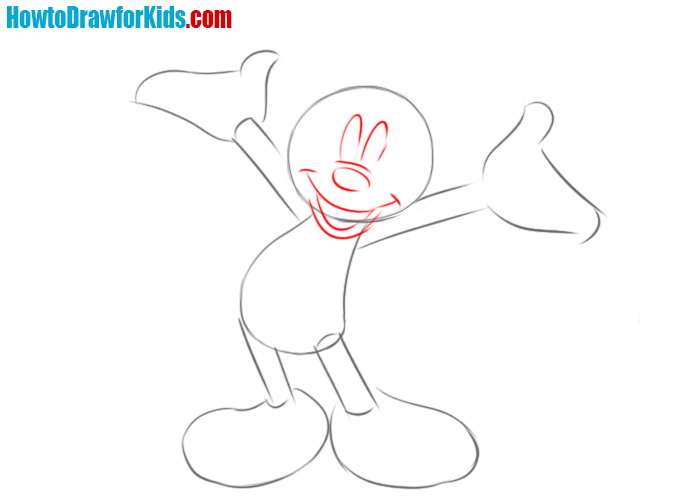
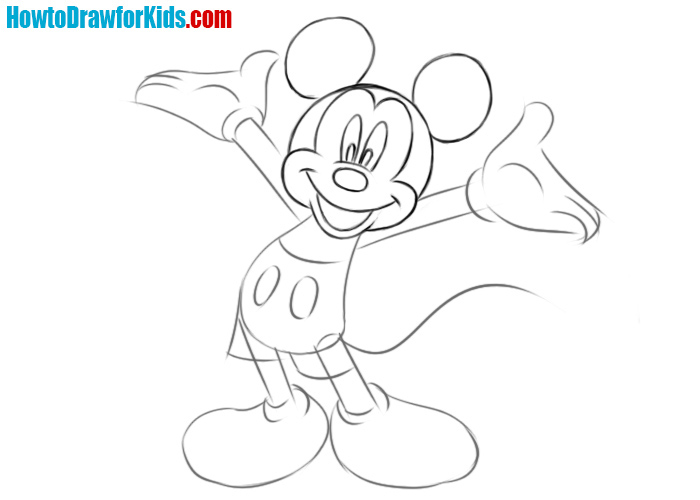
- Draw the face of Mickey Mouse.
Notice that his eyes are very close together. The nose looks like a flat oval. The mouth is formed by several smooth figures. All features are located in the same sloping plane as the head.
- Draw the ears.
Remember the colors Mickey Mouse painted in? Remember the usual colors of Mickey Mouse? On his head, there is a black edging. Let’s outline this edging. In the same step, draw the outlines of large oval ears.
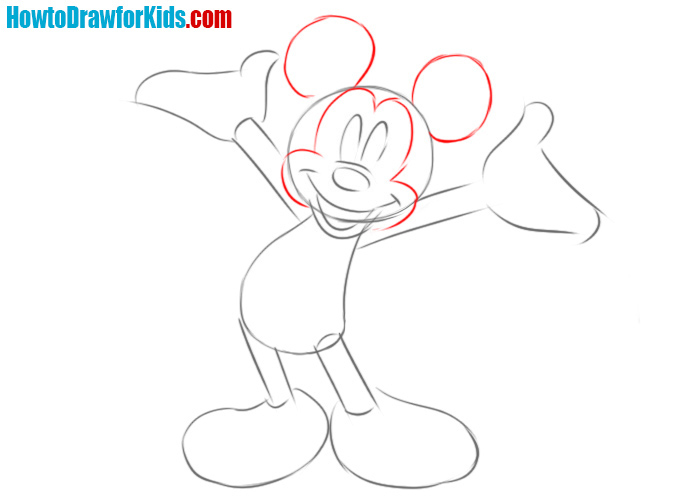
- Draw the clothes and tail.
Mickey Mouse loves to wear shorts with two white circles. Let’s draw it. Also in this step, draw smooth lines of fingers and palms.
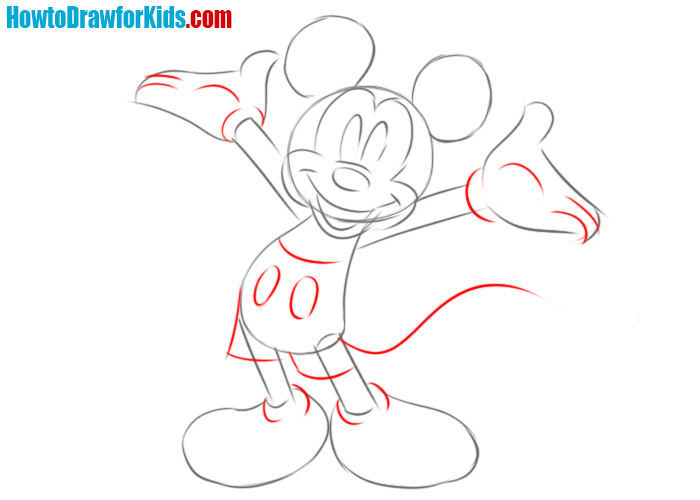
- Detail the facial features.
We have a finished the sketch of Mickey Mouse. Now let’s work with the details. In this step, draw the contours of the pupils and the folds around the mouth. Also erase all the extra lines from the face and make the final lines darker and more contrast.
- Detail the body of Mickey Mouse.
Now repeat the same actions with the torso and limbs of the character. Also, don’t forget to draw small folds on the shoes and draw the tail.
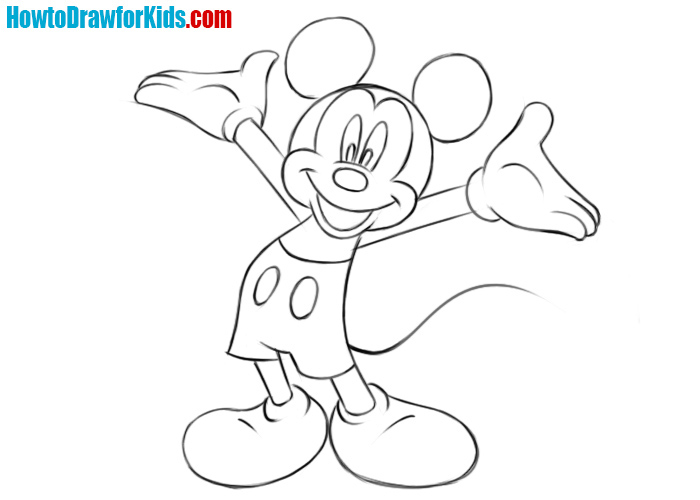
- Color your Mickey Mouse drawing.
As you know, Mickey Mouse is a little black mouse. Therefore, paint him in black color, leaving some areas unpainted. We are talking about the face, palms, feet, and elements of clothing.

Additional Content
To make the learning process easier for you, I have also prepared a free PDF to accompany this drawing lesson. It’s a condensed version of the lesson, designed for offline use so you can practice anytime, anywhere. This resource is especially handy when internet access is limited, allowing you to keep honing your skills.
The PDF doesn’t contain step-by-step instructions or tips; instead, it’s packed with additional exercises and challenges. These are meant to enhance your drawing skills after you’ve completed the basic course. It’s a perfect tool for continuing your artistic growth on your own schedule.
Feel free to download this PDF and use it as a supplementary guide as you advance in your drawing abilities. It’s crafted to provide further practice that builds on what you’ve learned, pushing your skills further and enriching your overall drawing proficiency.
Alternative Drawing Technique
In addition to the main tutorial, I’ve developed an alternative technique for drawing Mickey Mouse, designed to expand your practice and enhance your artistic skills. This new method introduces Mickey in a different pose, challenging you to tackle fresh angles and dynamic expressions.
This secondary approach aims to broaden your understanding of character anatomy in various stances. By exploring Mickey Mouse in an alternative pose, you’ll gain a deeper grasp of proportion and movement, critical elements in any artistic depiction of animated characters.
By practicing this advanced technique, you will solidify your skills and increase your versatility as an artist. This method provides an excellent opportunity to experiment with your style and discover new ways to convey character and emotion through your drawings.
How to Draw Mickey Mouse in a Different Pose
This method of drawing Mickey Mouse is crafted to build from simple to complex, guiding the artist’s hand through a natural progression of shapes and lines. We begin with a basic circle for the head, capturing the essence of Mickey’s cheerful face. To this, ears are added – perfect orbs that stand as an unmistakable hallmark of his character.
As the artist moves forward, each subsequent step introduces a new part of Mickey’s form. We carefully draw in his body, ensuring each proportion reflects the jovial and energetic posture we know so well. The arms and legs are then sketched to suggest movement, lending a dynamic quality to the static image.
Precision guides the final touches, from Mickey’s lively features to his iconic gloves and shoes, culminating in a vibrant depiction of this adored character. Each step is a chance to not just copy but grasp the nuances that endow the figure with life, ensuring the artwork mirrors the animation’s spirit.
Your Post-Drawing Mickey Mouse FAQs
In the wake of our artistic session with Mickey Mouse, a myriad of questions may dance through your mind. The path to mastery is often lined with curiosity, and here, I’ve compiled answers to your most pressing inquiries to aid in your continued artistic exploration.
- How can I keep my paper from smudging while I work? Place a clean piece of paper under your drawing hand to protect your work as you sketch.
- Can this drawing technique be used with characters other than Mickey Mouse? Certainly, the foundational principles of shape and proportion apply to a wide range of character drawings.
- How do I choose the right paper for my drawings? Medium-textured paper, such as sketch paper, is ideal as it provides enough tooth for pencil work without hindering detail.
- What should I do if I make a mistake? Gently erase but remember that each misstep is part of the learning process. Sometimes, those ‘mistakes’ can add character.
- When should I start adding details to the drawing? Once you’re satisfied with the basic shapes and proportions, you can begin layering in the details.
- How do I draw Mickey’s hands and make them look symmetrical? Start with basic shapes like circles and ovals to form the palms and fingers, then refine from there.
- What’s the trick to getting Mickey’s ears to look right? Think of them as two equal circles that maintain their shape regardless of his head’s angle.
- How can I improve my drawing speed? Speed will naturally improve with practice as your confidence and muscle memory build.
Once you have these details memorized, may your next session be even more fruitful. Keep these responses as your guide, and let each pencil stroke on the page be a confident step forward in your artistic voyage. Remember, the canvas of progress is vast, and every drawing brings you closer to the artist you aspire to be.
Conclusion
Our sketching session has brought Mickey Mouse from a few simple lines to a vibrant drawing full of life. If your interest in art has been piqued, my website offers a variety of tutorials to suit your creative needs. From the peacefulness of drawing a turtle to the energy of sketching a soccer ball, there’s a variety of themes to keep your pencil moving.
For those who want to be aware of new content first of all, following my social media is the way to go. And if there’s a particular subject you’re itching to draw, I’d love to hear about it! Drop a comment on the lesson – your input is the spark that ignites the next wave of creative tutorials.