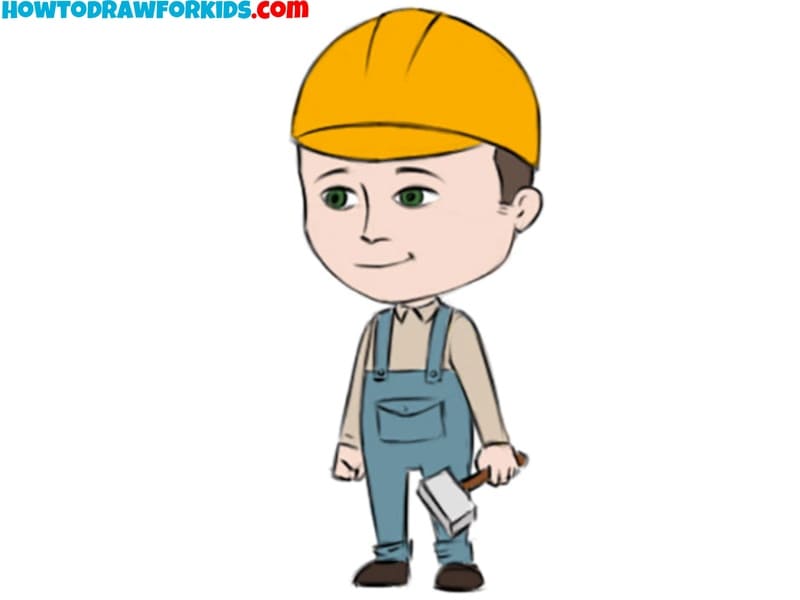
How to Draw a Builder
This is another simple drawing guide from the series of tutorials about people in which I will demonstrate you how to draw a builder for kids.
How to Draw a Builder: Basic Information
Drawing a builder, with its combination of simple shapes and recognizable features, offers an excellent opportunity for young artists to refine and train their drawing skills.
By focusing on proportion, symmetry, and detail, you will learn how to create a well-structured character. This exercise boosts technical skills and encourages a deeper understanding of stylised character design.
In addition, this lesson teaches how to give the standard human figure the look we need by adding the necessary details. The builder’s hard hat is more than just an accessory; it’s a defining feature that immediately identifies the character’s role and profession.
Learning to draw this accessory with accuracy and attention to detail teaches young artists how to use specific elements to enhance the identity of their characters.
Builder Drawing Tutorial
Materials
- Pencil
- Paper
- Eraser
- Coloring supplies
Time needed: 50 minutes
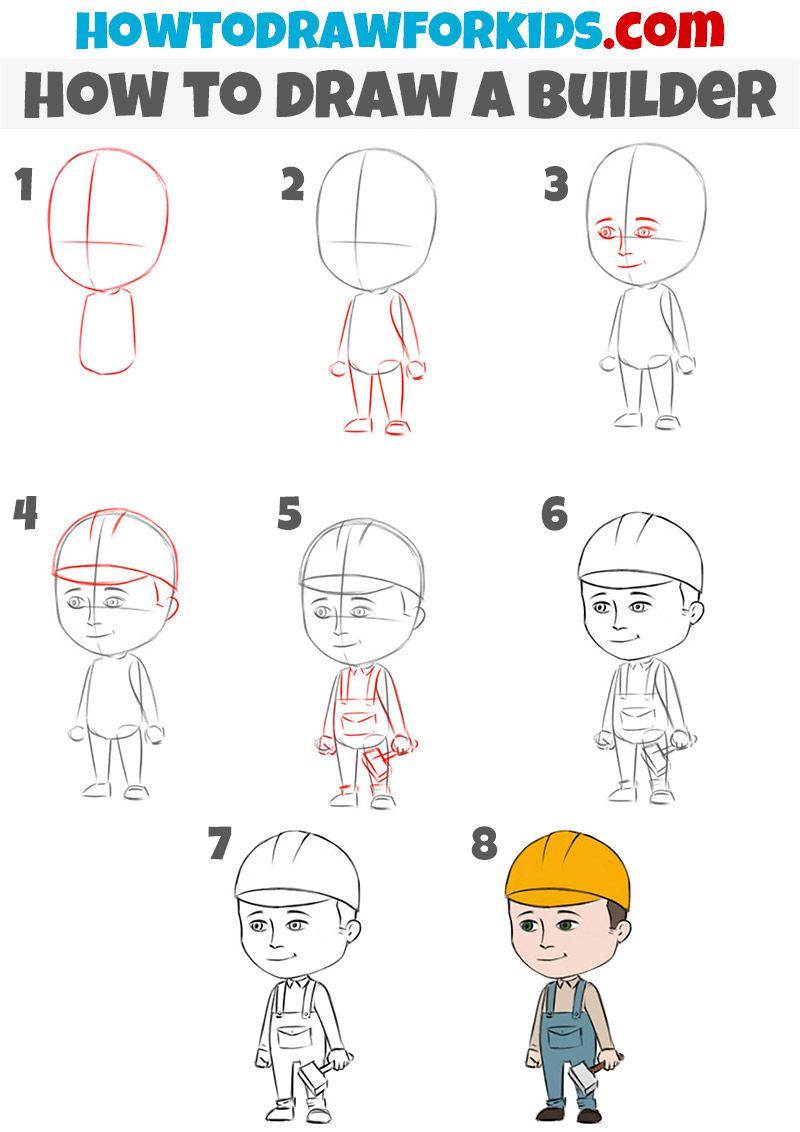
How to Draw a Builder Step-by-Step
- Draw the contours of the head and torso.
Starting with the head, you draw an oval shape for the face and a smaller rectangle beneath it for the neck and torso. The cross lines on the face serve as guides for where the eyes, nose, and mouth will be placed. For the body, keep the lines loose and light to capture the basic posture and proportions of the builder.

- Sketch the limbs of the builder.
Now, refine the body by adding cylindrical shapes for the arms and legs to give volume and structure. These cylinders act as the limbs of your builder and should be proportional to the body. The feet and hands at this stage look like small round shapes.

- Add the builder’s facial features.
Draw two small, almond-shaped eyes on the horizontal guideline. Add small circles within the eyes to represent pupils. The pupils in both eyes should be shifted to the same side and be the same size. Below the eyes, sketch a small curve to create a simple nose, and draw a gentle curve for the mouth just below it.

- Draw the builder’s helmet.
Here we can start dressing the character by adding a safety helmet and the outlines of clothes. The helmet should sit comfortably on top of the head, curved at the bottom to mimic its snug fit over the builder’s forehead. Sketch lightly at this stage to keep the ability to correct proportions.

- Draw the builder’s clothes.
In this step we continue to detail the builder’s attire by drawing a vest with pockets and tools. The vest should have straight lines to suggest a sturdy material, with square pockets for holding nails or screws. Also add some tool, for example a hammer in the hand.

- Remove the unnecessary lines from the face.
Start by removing any excessive lines that were initially sketched to position the eyes, nose, and mouth. Refine these key features to make the builder’s face look finished. You can make your builder look different by changing particular facial features.

- Remove the unnecessary lines from the body.
It’s time to erase any unnecessary guidelines and to sharpen the details like the facial features, the folds in the clothing, and the accessories. To make your builder drawing look more realistic you can add some additional details. By now, the builder should look lively and completed, ready for color.

- Color the builder drawing.
Finally, add color to your builder to complete the drawing. Use vibrant colors for the helmet to signify safety and more subdued, realistic tones for the workwear. Apply colors carefully within the outlines and add shadows to the folds in the clothes and light reflections on the helmet.

How to Draw a Builder: Advanced Techniques
A builder often interacts with various tools, such as hammers, wrenches, or measuring tapes. Improving your drawing by adding intricate details to these tools can significantly elevate the overall composition. Focus on the precise shapes, contours, and textures of these objects, as well as how they are held or carried by the builder.
Employing sophisticated light and shadow techniques can add dramatic realism to your builder drawing. Experiment with different light sources to create complex shadows, such as cast shadows from the builder’s hard hat or deep shadows in the folds of their clothing.
Going beyond basic facial expressions, advanced techniques involve exploring the subtle nuances of facial anatomy to convey complex emotions and personality traits. Focus on the small muscles around the eyes, mouth, and brow to show signs of concentration, determination, or fatigue, which are common in a builder’s expression.
While realism is often the goal, experimenting with stylization and exaggeration can bring a unique flair to your builder drawing. Consider exaggerating certain features, like the size of the hard hat or the thickness of the boots. Stylizing the character with bold lines, simplified shapes, or even a cartoonish approach can create a more distinctive and memorable image.
Finally, improve your builder drawing by using advanced color theory and shading techniques. For shading, explore gradients, blending, and layering to add depth and volume to the builder’s form. Using techniques like cross-hatching or stippling can also make your drawing more voluminous and realistic. These advanced color and shading techniques help to create a polished final artwork.
Conclusion
In conclusion, drawing a builder provides a focused opportunity to develop a range of really important drawing skills. By concentrating on aspects such as simplified anatomy, texture, and character interaction with the environment, artists can create a compelling portrayal of this occupation.
If this article on how to draw a builder for kids was interesting to you, then be sure to visit my other instructions from the People section to learn how to draw a ninja, a doctor, an artist, and other interesting characters.
Additionally, be sure to follow me on social media to stay updated with the latest articles on my site. To support art education, consider sharing this and other drawing tutorials with fellow art enthusiasts like yourself.