How to Draw a Shoe
Footwear comes in endless designs, but in this lesson on how to draw a shoe will help you to illustrate any type and style you want.

How to Draw a Shoe: Introduction
Footwear is one of the most important parts of our clothing. In addition to its protective function, it serves many other purposes, such as helping to emphasize style and express a person’s character. There is an enormous variety of footwear in the world, and throughout human history we have created an incredible number of different types.
In this lesson, I will show you how to draw footwear in a very simple yet highly detailed way, explaining each element clearly and including several additional instructions. This will help you learn to draw this clothing item in maximum detail, as well as create any design you like according to your own taste and style.
And to help you strengthen your skills and learn to create any type of shoes you want, I’ve added several additional instructions in different styles and with various approaches.
Shoe Drawing Tutorial
Materials
- Pencil
- Paper
- Eraser
- Coloring supplies
Time needed: 25 minutes
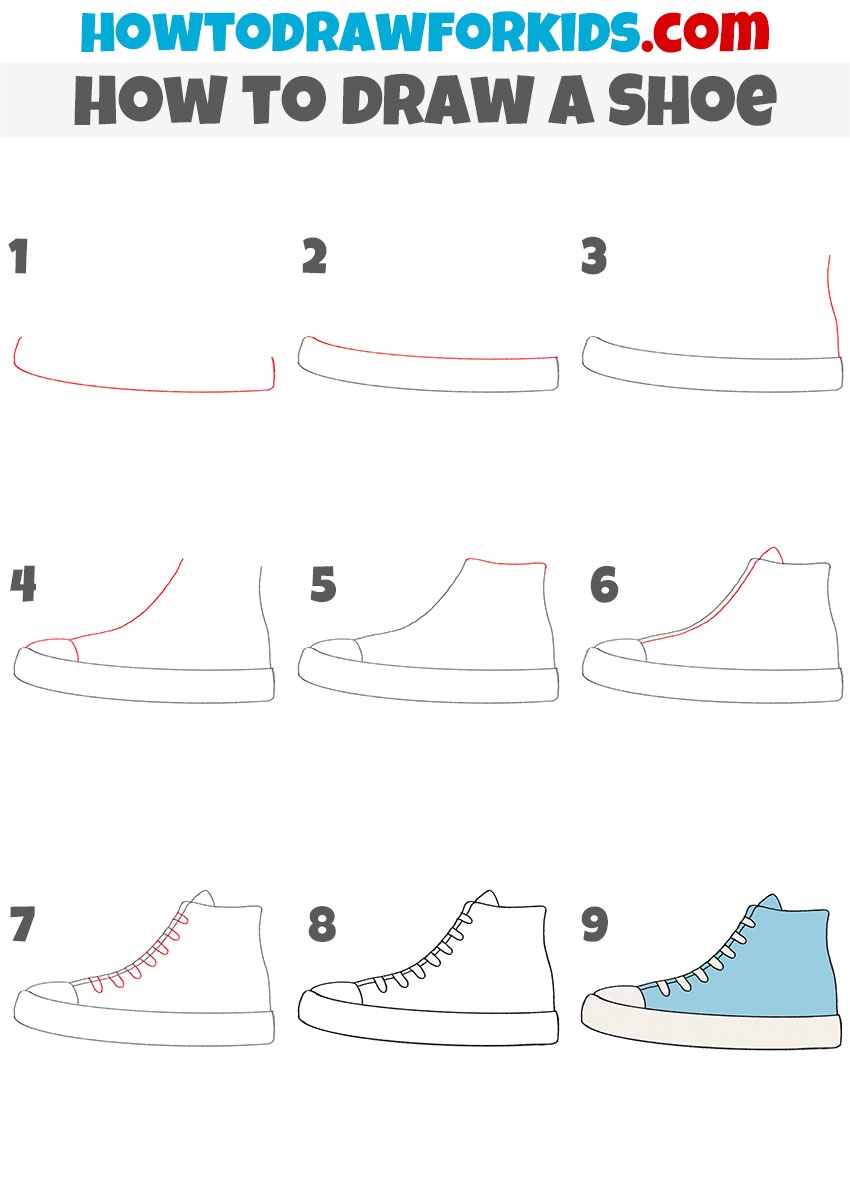
How to Draw a Shoe
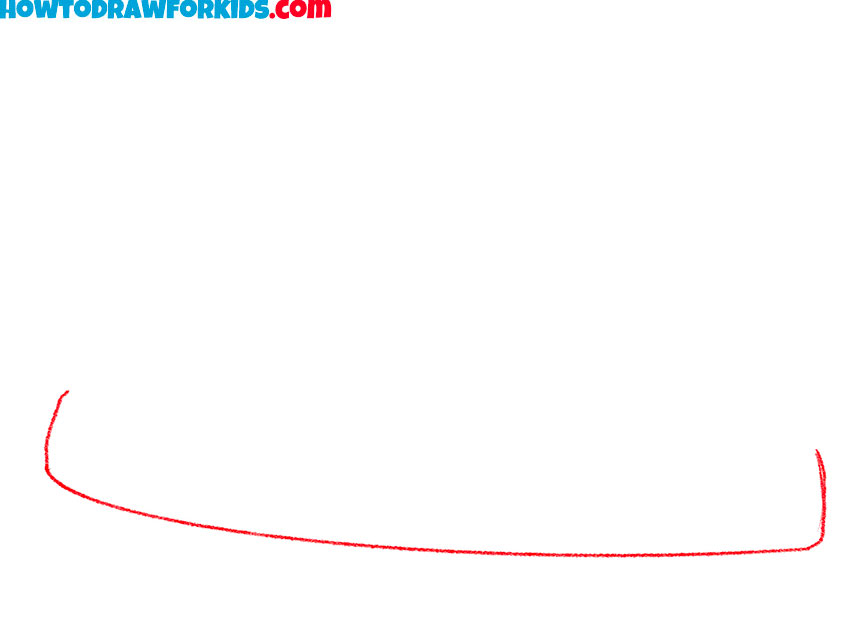
- Sketch the base of the shoe.
First, sketch a long, slightly curved shape to represent the base of the shoe. The heel can be a bit higher than the toe line, and both ends should be slightly upturned for a natural look. Keep your line smooth, but don’t be afraid to lightly redraw until you’re satisfied.
- Draw the upper sole line.
Draw another curved line above the first one, following its shape but leaving a small gap for the thickness of the sole. Connect both ends with short vertical lines. It’s also a good time to check the symmetry from heel to toe.

- Sketch the back edge.
From the heel end of the sole, draw a vertical line upward to start forming the back of the shoe. Remember that this part should exactly follow the contours of the heel. Look at real shoes to understand how the back supports the ankle and how the front slopes down.

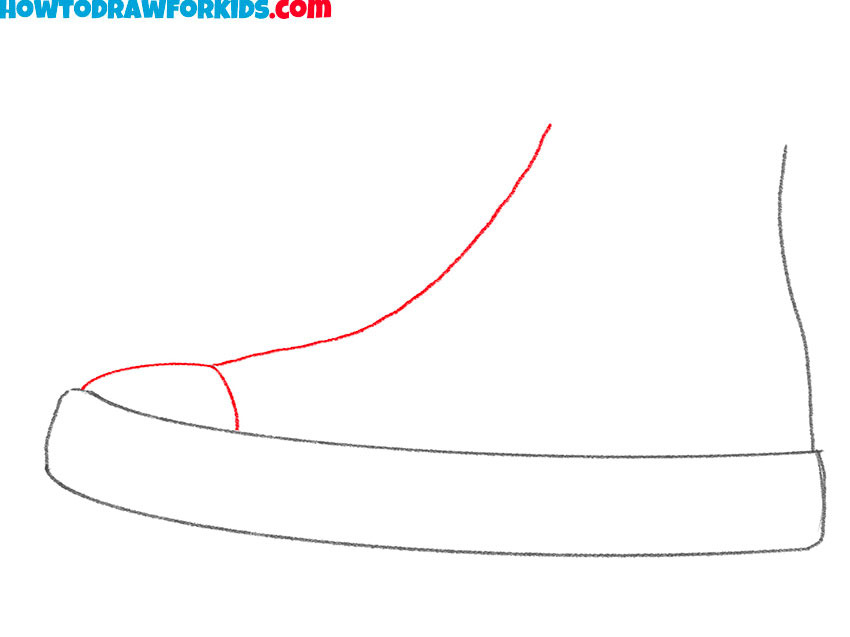
- Sketch the front edge and toe cap.
At the front of the shoe, draw a curved line across the sole to separate the toe cap from the rest of the upper. The line should follow the curve of the sole to keep the proportions correct. Toe caps are common in sneakers and give the shoe a unique and recognizable look.
- Sketch the top line of the shoe.
On the very top of the liens from the previous steps draw a smooth horizontal line, forming the opening for the foot. When illustrating shoes, I like to remind students that this is also a design choice: high-tops will have a taller, more enclosed ankle section, while low-top sneakers will sit closer to the foot.

- Sketch the tongue shape.
Inside the upper part, draw a curved line that starts near the toe cap and runs upward toward the ankle opening. This will be the shoe’s tongue. The tongue should follow the natural curve of the shoe but sit slightly inside the opening.

- Draw the shoe’s laces.
Using straight or crisscross lines, create the laces of the shoe. Along the tongue line, you can draw small ovals for the lace holes. You can lightly curve the lace lines to give your sketch a more dimensional look. This is also a great step to personalize your shoe drawing.

- Clean and darken the outline.
Erase any overlapping lines and make the outer shape clear and smooth. This step is important for preparing your shoe for coloring, as messy lines can distract from the final look. You can also slightly vary the thickness of the outline to make the sketch more cartoon or realistic.

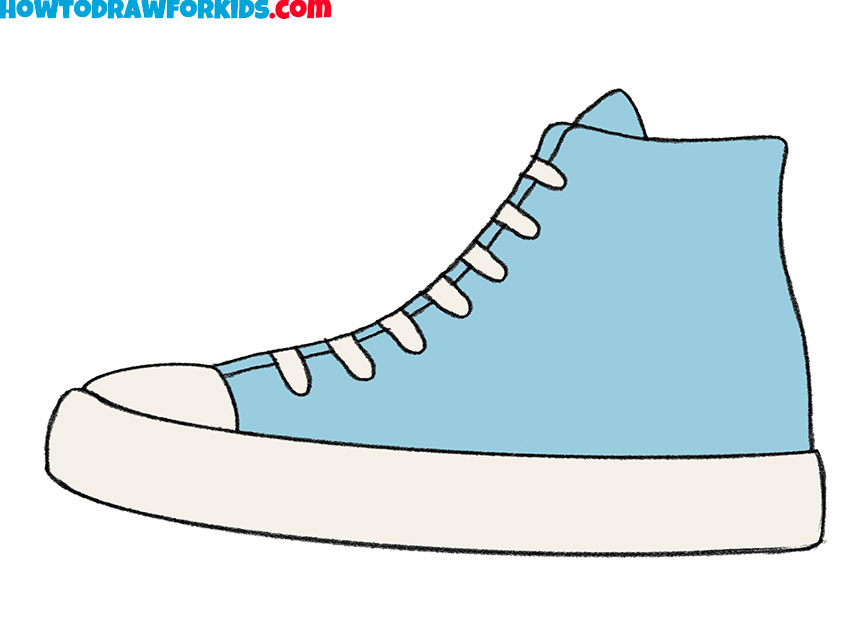
- Add colors to the shoe parts.
Choose colors for the different parts of your shoe, such as the upper, sole, toe cap, and laces, and fill them in evenly. Light blues, reds, or classic black-and-white combinations work well for sneakers, but you can experiment with patterns or bright colors.
Additional Content
This PDF is a shortened version of the shoe drawing lesson, created for convenient offline use. It contains the main steps, allowing you to review and practice without the need for an Internet connection. You can print it or keep it on your device to continue improving your drawing skills at any time.
How to Draw a Shoe: Alternative Methods
And now, after completing the basic shoe drawing tutorial, you can try some additional techniques that vary in style and sequence. These versions provide extra practice and let you explore different ways to draw shoes, helping you to become a real footwear drawing expert.
Simple Shoe Drawing Tutorial
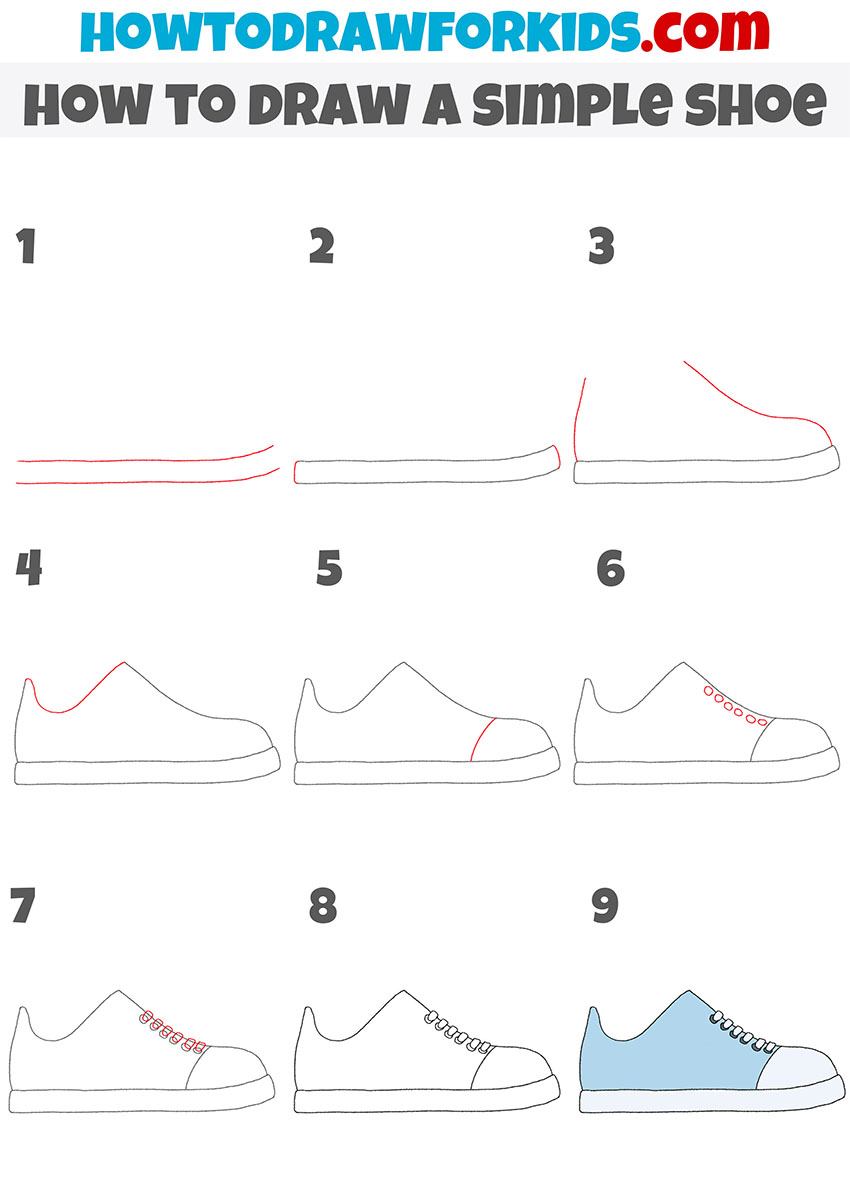
Here’s a simpler variation of the shoe drawing tutorial, made for beginners who prefer minimal detailing. The design is based on a classic sneaker shape, and the sequence of steps in this version is slightly different.
First, sketch a long horizontal line for the sole, then form the upper contour of the shoe with a smooth curve for the toe, a gradual slope for the top, and a dip where the ankle opening will be. Close the shape at the back with a short vertical line. Add a narrow strip along the sole.
Sketch a curved line from the side of the shoe toward the lace area, and then add another curved seam. Draw the small semicircles for the lace holes, connecting them with short lines to represent the laces. Trace the final outline neatly, erase extra lines, and color the shoe in your chosen shade, leaving the sole a lighter color.

How to Draw a Cool Sports Shoe
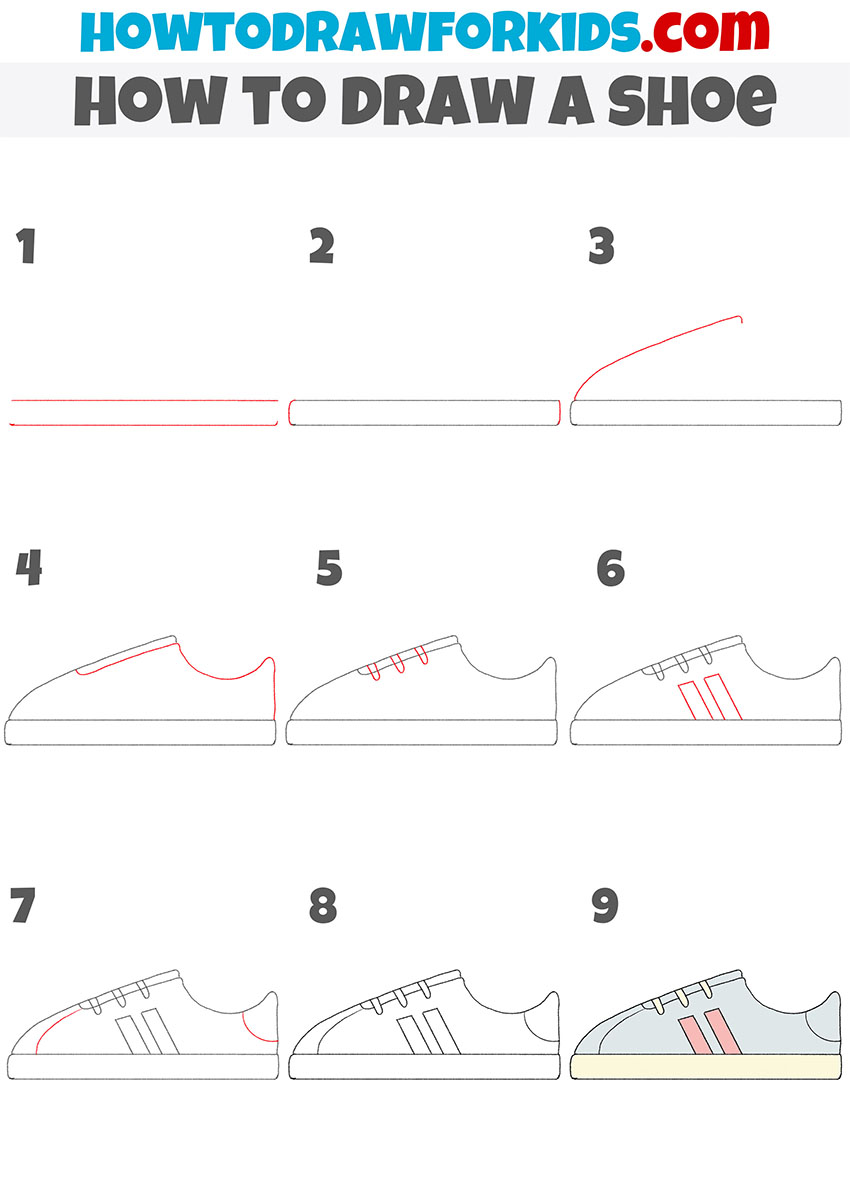
This sports shoe drawing tutorial differs from the previous shoe lessons in a few ways. The design is inspired by classic sports footwear, with two parallel side stripes as a main decorative element. It also includes a visible tongue area and seam lines at both the toe and heel.
Sketch two parallel horizontal lines for the sole, then connect them with short vertical edges. From the front of the sole, curve upward and extend a smooth sloping line for the top of the shoe, ending with a small dip where the ankle opening begins. Close the heel with a vertical curve.
Add a narrow curved section for the tongue, then mark a few short lines for the laces. Draw two long vertical stripes on the side to convey the sports shoe style. Add a curved seam along the toe and another at the heel. Clean the outline, remove extra marks, and color the shoe in light tones with contrasting stripes and a slightly darker or lighter sole.
Alternative Shoe Drawing Tutorial
This alternative shoe drawing tutorial demonstrates a different style from the previous ones. The outline has a slightly more casual shape, with a rounded toe cap and a visible seam separating it from the rest of the shoe. The lacing area is drawn with individual eyelets before adding the laces.
To draw this show, begin by creating two curved parallel lines for the sole, connecting them at the ends. Add a vertical line for the back of the shoe, then outline the toe and upper contour with a smooth curve that dips at the ankle opening.
Draw the top edge of the shoe. Mark a curved line for the toe cap seam, then place several small circles for the lace holes. Connect the circles with short diagonal lines to form the laces. Trace the outline neatly, erase any guidelines, and color the shoe with a any shade for the upper and a lighter tone for the sole and toe cap.
Conclusion
Shoes are an important detail when working on full-body drawings, and learning to draw them separately helps you get the shape and proportions right before adding them to a figure. As I mentioned earlier in the lesson, focusing on individual elements like footwear builds your confidence when combining them into more complex scenes.
Now that you’ve practiced a single shoe, the next step is to place it in context – on a person. Visit the person drawing tutorial to learn how to sketch a complete figure, and then use what you’ve learned here to add shoes to your characters.