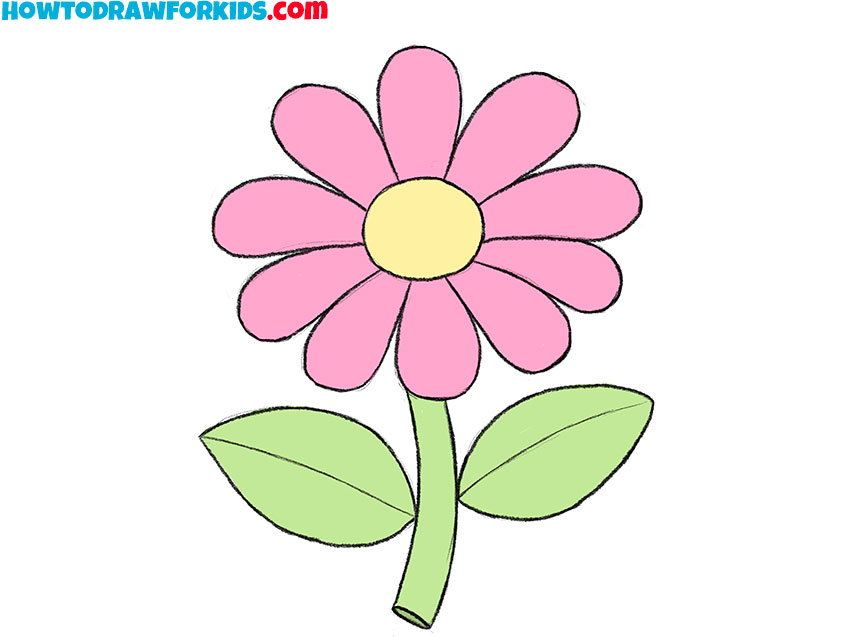
How to Draw a Vase
Welcome to a delightful exploration through art where I’ll guide you on how to draw a vase with gentle curves and a classic silhouette. This lesson breaks down complex shapes into simple, manageable steps, enabling anyone to create a graceful vase that stands as a testament to the beauty of simplicity.

How to Draw a Vase: Basic Information
Starting with a vision of symmetry and balance, today I guide you through a process as simple as it is satisfying – how to draw a vase. This tutorial is designed to be a gentle introduction for budding artists and a refreshing practice for those more experienced, demonstrating how with a few strokes, a vase takes shape.
In this tutorial, we’ll begin with the basic outlines that serve as the vase’s foundation, gradually building up its form. It’s fascinating how starting with just a circle and a couple of lines can evolve into an elegant vessel. Pay close attention to the subtleties in the curves – it’s these nuances that give your vase character and realism.
By the end of our session, the ability to draw a vase will be another feather in your artistic cap. The process is designed to be simple yet effective, ensuring that with each stroke, you gain more confidence and skill. So grab your tools, and let’s breathe life into a blank canvas, transforming it into a piece of art that celebrates form and emptiness in harmony.
Vase Drawing Tutorial
Materials
- Pencil
- Paper
- Eraser
- Coloring supplies
Time needed: 20 minutes
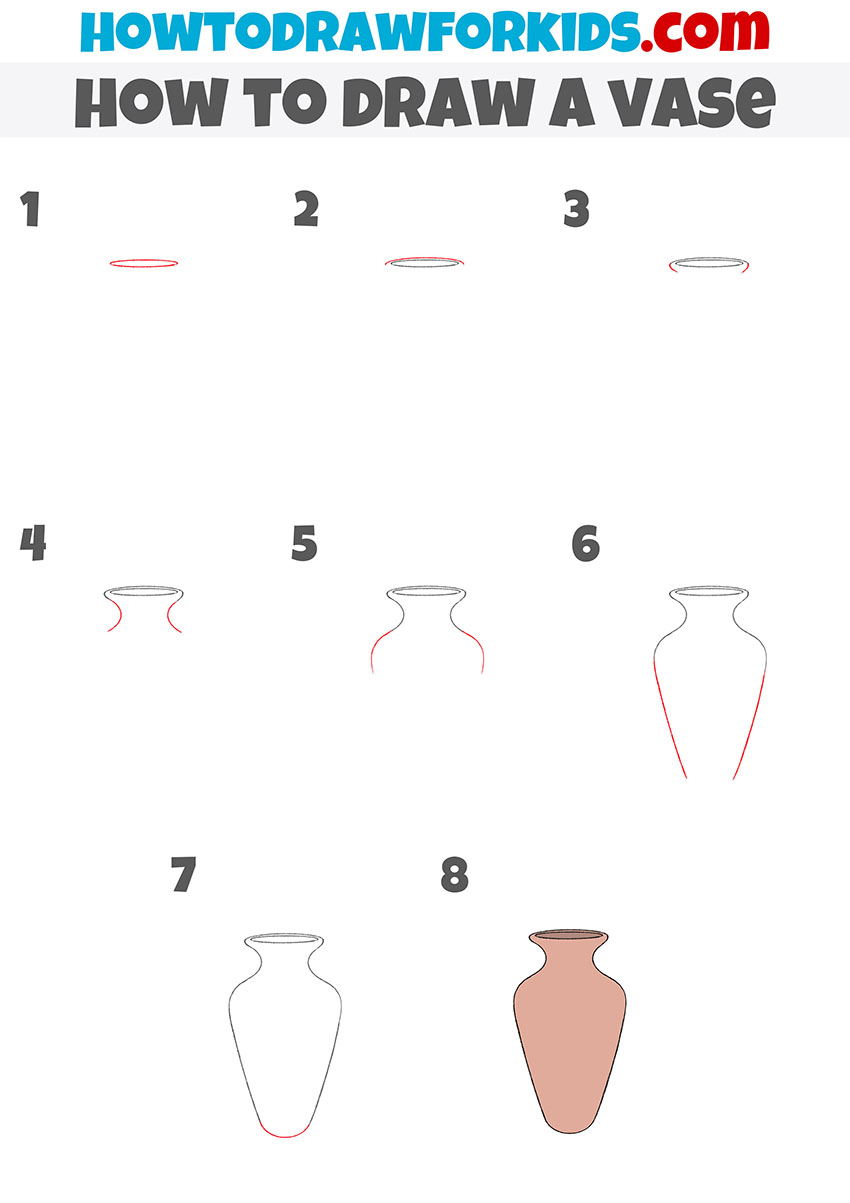
How to Draw a Vase
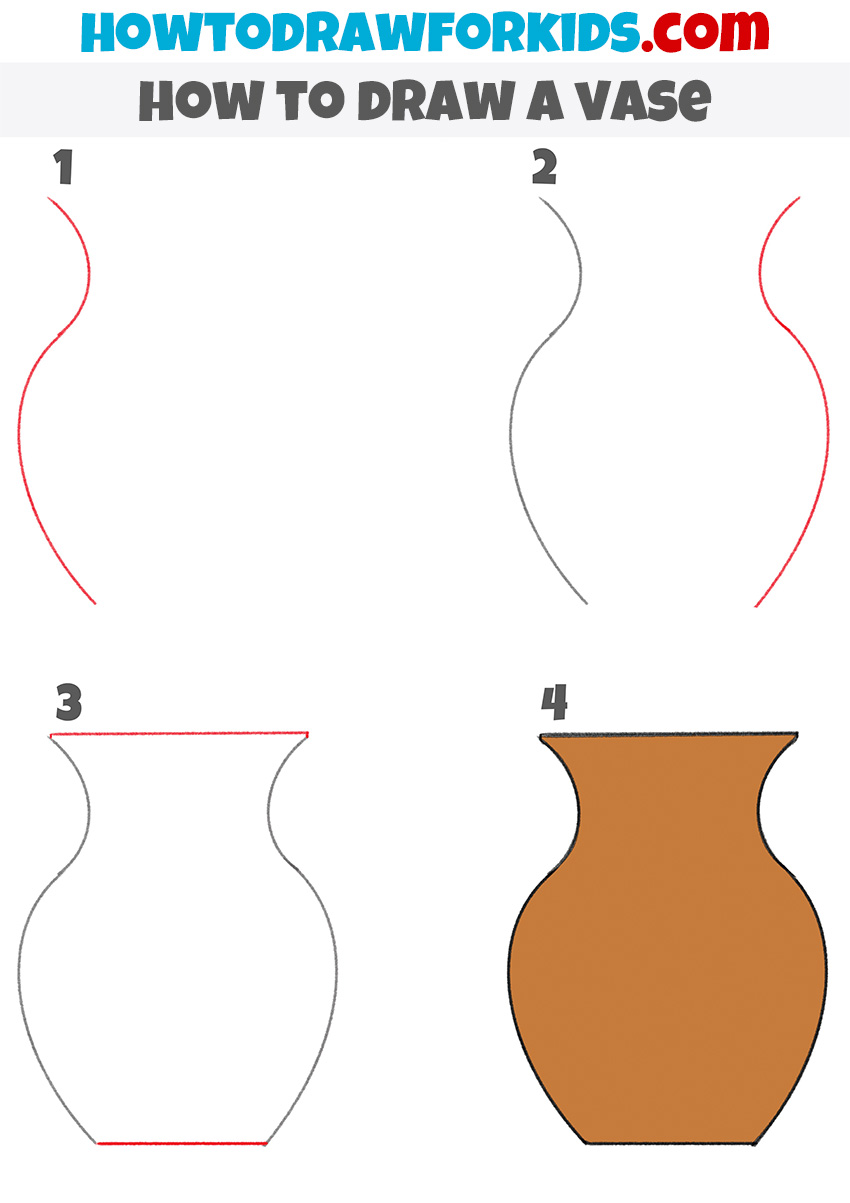
- Draw the top of the vase.
Depict an oval elongated in breadth to indicate the neck of the vase.

- Depict the top edge of the neck of the vase.
Above the oval, add a semi-oval with a slightly larger diameter than the previous one.

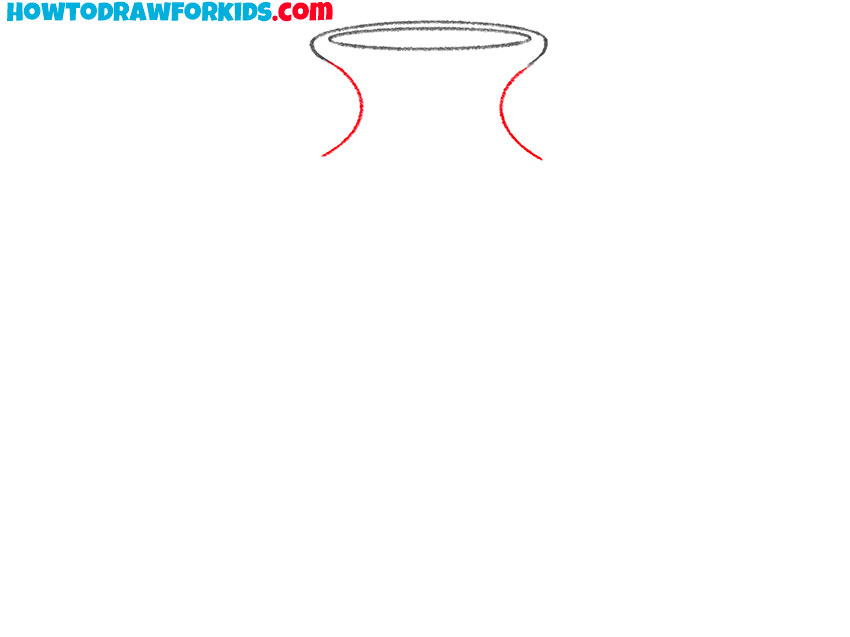
- Add the sides of the neck.
Draw two symmetrical curved lines from the two ends of the semi-oval.

- Add the narrow part of the neck of the vase.
Continue the two short lines previously drawn with two symmetrical arcs.
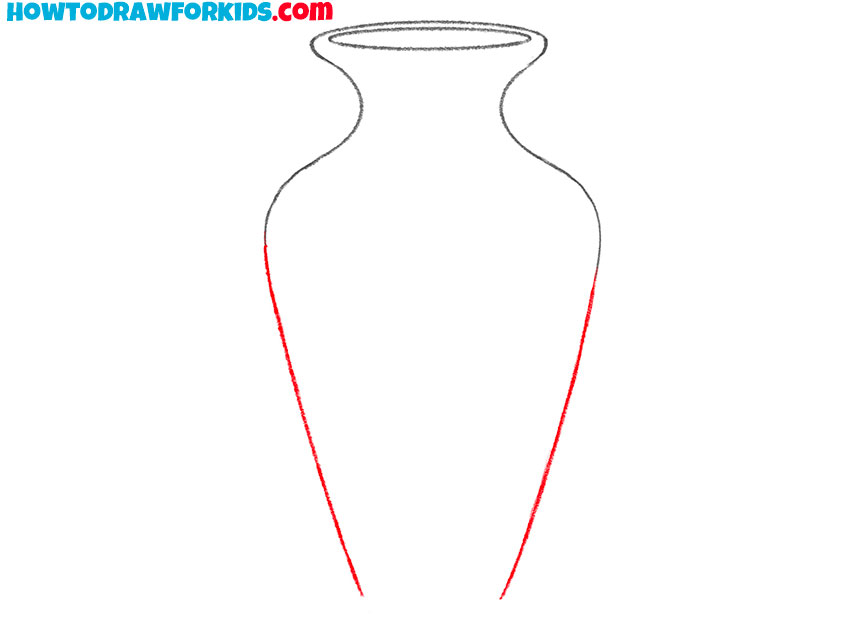
- Draw the wide part of the vase.
Continue the previously drawn arcs with two symmetrical curved lines of the same length.

- Sketch out the sides of the vase
To complete this step, depict two slightly curved lines of the same length.
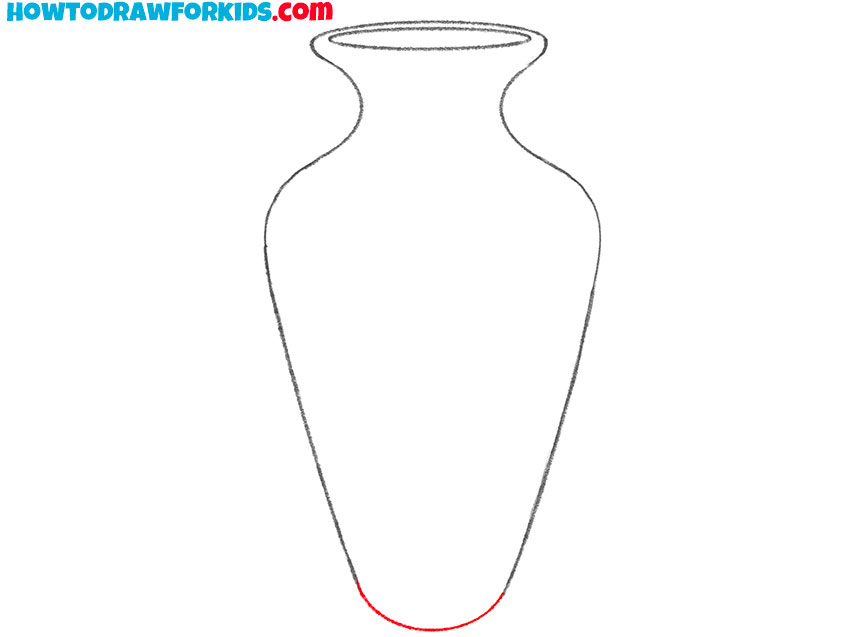
- Depict the bottom of the vase.
Now you need to connect the bottom edges of the previously drawn lines with a small arc.
- Color the drawing.
To color the vase you have drawn, use beige and brown.
Additional Content
To augment the foundational skills you’ve developed from our vase drawing lesson, I have prepared a special gift: a free PDF file that is a succinct companion to the tutorial. This abridged guide is designed to be at your fingertips anytime, providing additional artistic nourishment without the necessity of an internet connection.
Inside, you’ll discover a collection of drawing exercises tailored to refine your skills further. These exercises are focused on enhancing your ability to depict the subtle curves and contours of various vase designs, enriching your drawings with depth and precision.
Consider this PDF an artistic ally, a silent mentor that leads you through nuanced exercises. It’s structured to build upon each lesson, gradually elevating your proficiency and expanding your visual vocabulary in vase drawing. This resource is your next step towards mastering the elegance of still life drawing.
Alternative Drawing Techniques
In addition to the primary tutorial, I’ve crafted a simpler alternative technique to draw vases, ensuring you have ample practice to sharpen your artistic prowess. This fresh approach strips down the complexity, allowing you to focus on the essential contours and form of a vase without getting overwhelmed.
This new method is distilled into accessible steps, encouraging even the most hesitant artist to engage with confidence. It’s structured to build your skills progressively, starting with the vase’s base and working up to its neck, ensuring that every line contributes to the harmony of the whole.
By practicing with this alternative technique, you’ll develop a keen eye for proportion and symmetry – key skills for any aspiring artist. It’s a doorway to creativity, offering you a way to experiment with form and style while solidifying your understanding of the fundamentals.
How to Draw a Vase for Kindergarten
Drawing opens a door to new skills, and with this simple method, I present a four-step approach to drawing a vase that’s perfect for beginners and little ones. We start with a soft curve to create the side profile, setting a foundation for the entire vase. This initial step is gentle yet critical, as it shapes the future of the piece.
Moving to the second phase, we mirror the curve on the opposite side, ensuring our vase has a lovely, harmonious shape. It’s a simple yet effective way to teach the young minds the importance of proportion in art. This technique is especially designed to be easy for small hands to master, fostering confidence from the very first stroke.
To steps three and four, we see our creation come to life with the addition of the vase’s neck and base, and finally, its rich color. With each step, the children are encouraged to add their own touch, be it with patterns or shades, thus turning a basic drawing lesson into a personal masterpiece that’s brimming with creativity.
Steering Clear of Common Vase Drawing Mistakes
In refining the art of drawing, an awareness of common missteps can propel your progress. Here’s a curated list of frequent hiccups to be mindful of:
- Overlooking the importance of symmetry: A vase’s allure often lies in its balanced form. Practice drawing both sides with equal curvature.
- Rushing through the foundation: The initial outline dictates the vase’s proportion. Take your time to get this right.
- Exaggerating the curves: Subtlety is key. Extreme curves can distort the vase’s perspective.
- Ignoring the light source: Shadows and highlights give your vase depth. Remember to consider where your light is coming from.
- Inconsistency in thickness: The thickness of the vase’s walls should be uniform unless intentionally styled otherwise.
- Overcomplicating the shape: Simplicity is often the pathway to elegance. Avoid adding unnecessary details that can clutter the drawing.
- Forgetting to step back: Periodically step away from your work to gain a fresh perspective and see the overall balance.
This list is far from exhaustive, but it provides a scaffold upon which you can build your drawing skills. Through diligent practice and mindful observation, the common errors you may find in your initial attempts will become the powerful lessons that shape your future as an artist.
Background Ideas for Vase Drawings
When drawing a vase, placing it within different scenes can significantly enhance the final image. Consider these simple but impactful settings:
- Place the vase on a table against a white background. This highlights the vase’s shape and design, making it the artwork’s focal point.
- Draw the vase on a kitchen counter, surrounded by cooking ingredients and tools, to give it a homey and functional context.
- Situate the vase in a garden scene, with flowers or plants in the background, creating a natural and peaceful setting.
- Position the vase on a windowsill with the outline of a window frame behind it, suggesting a domestic interior scene.
- Set the vase against a backdrop of a living room with a couch and a lamp, to imply a comfortable, lived-in space.
- Sketch the vase in an art studio setting, with canvases and art supplies around, indicating a creative environment.
- Place the vase on a shelf among books and other decorative items, integrating it into a more complex and textured scene.
By choosing the right setting for your vase, you provide context and depth, turning a simple object into a piece that tells a story and fits into a wider world. These straightforward scenes allow the vase to shine and invite viewers to imagine the life around it.
Conclusion
With our vase drawing now complete, the canvas of learning remains wide open. Visit my website for an array of detailed tutorials, including lessons on how to draw a tulip or how to capture the delicate features of a manga face. Each guide is designed to build on the skills you’ve just honed, introducing new techniques and broadening your artistic scope.
To keep up with the latest tutorials and creative insights, follow my social media channels. Your engagement is invaluable – comments and feedback on the lessons help me tailor future content to meet your needs more effectively. Together, let’s continue to refine our artistic talents, enhancing each sketch with newfound knowledge and skill.