How to Draw an Anime Face
In continuation of the anime drawing lessons, here I will show you in detail how to draw an anime face for kids and beginners.

How to Draw an Anime Face: Introduction
The face is the most important part of any anime character, as it shows the expression, mood, and unique personality. Drawing an anime face is also one of the most common requests from beginners who want to understand the basics of this style.
The large eyes, simplified nose and mouth, and distinct hairstyle all come together to form a recognizable anime or manga look.
While drawing and anime face, it is important to pay attention to symmetry, especially when placing the iconic eyes. Small mistakes in alignment can change the whole expression. Also keep in mind the proportions of the head, as anime faces often have slightly larger foreheads and smaller chins.
To give you more flexibility, I will also include variations such as different eye shapes, hairstyles, and facial expressions. This way you can create not only a neutral anime face but also adapt it for different characters.
Anime Face Drawing Tutorial
Materials
- Pencil
- Paper
- Eraser
- Coloring supplies
Time needed: 20 minutes
How to Draw an Anime Face
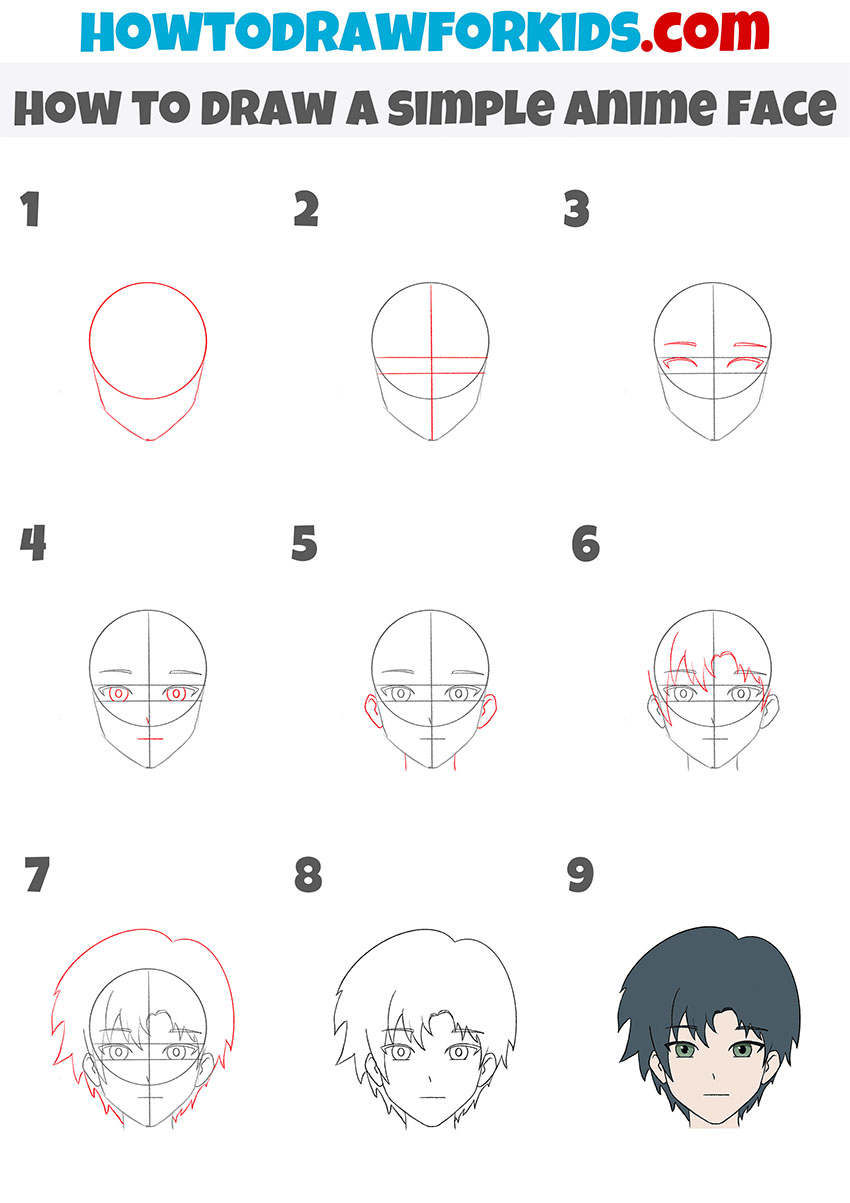
- Sketch the basic face shape.
To begin, it’s important to establish the foundation of the anime face with a simple outline. Draw a large circle for the top of the head, and then taper it down into a pointed chin to form the jawline. This should give you a shape that resembles an inverted egg. Keep your lines light and simple.
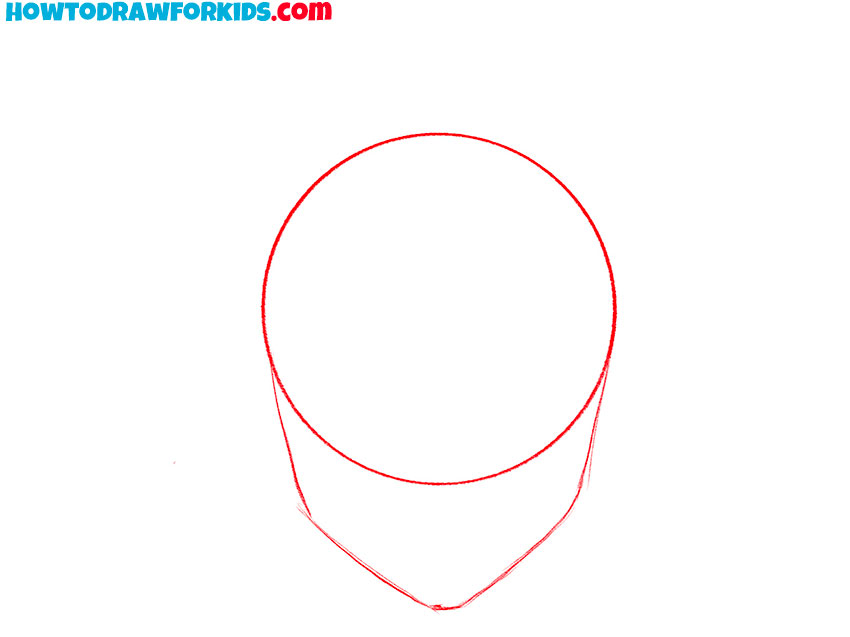
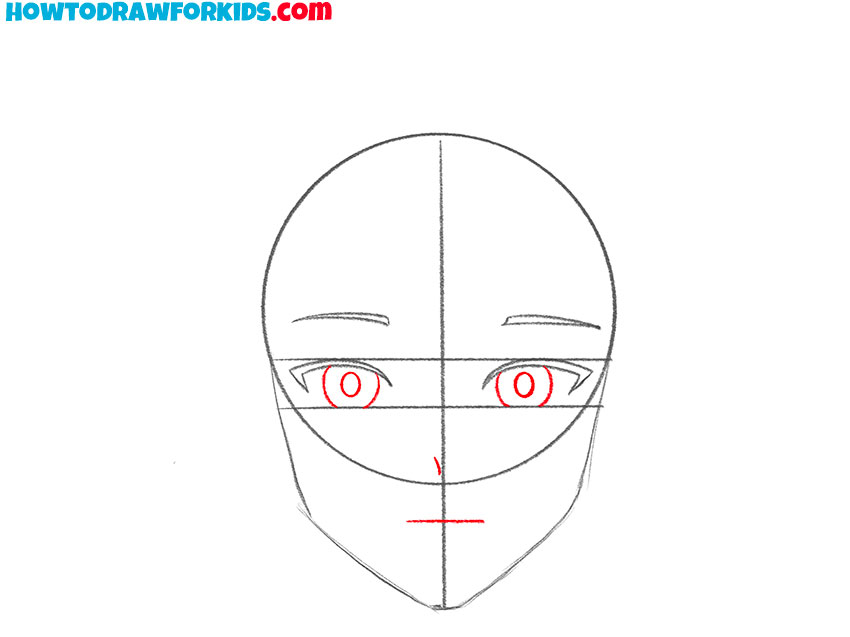
- Sketch symmetry guidelines.
Before placing any facial features, guidelines are crucial for accuracy. Draw one vertical line down the center of the face to help maintain symmetry on both sides. Then sketch two horizontal lines: one for the upper edges of the eyes and the second one for the lower edges.
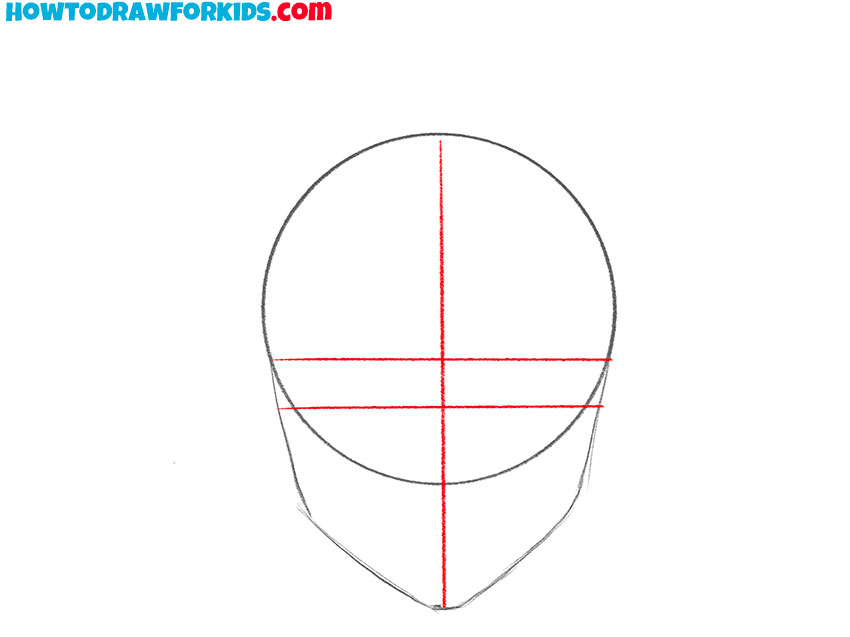
- Sketch the eyebrows and upper eyelids.
With guidelines in place, you can now sketch the placement of the eyebrows and the upper shapes of the eyes. Draw two curved lines above the eye line to indicate eyebrows. Just below them, illustrate the upper eyelids with long, slightly curved strokes, extending them out toward the sides.
- Sketch the irises, pupils, nose, and mouth.
Now it’s time to illustrate the defining features and draw anime eyes. Inside the spaces marked earlier, draw large circular or oval shapes for the irises. Add small inner circles for pupils. Below the eyes, place a very simple short line for the nose. Then sketch a straight or gently curved line for the mouth.
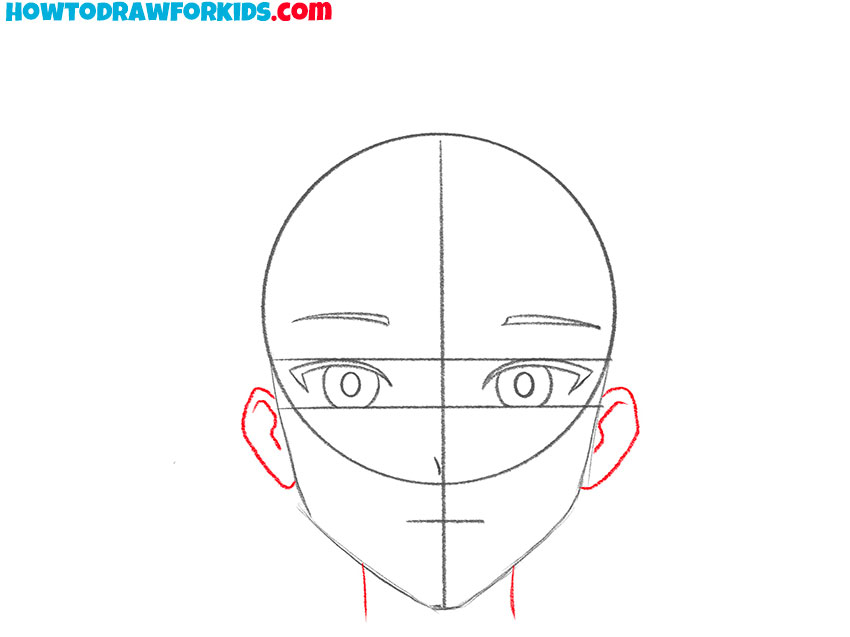
- Sketch the ears and neck.
Once the main facial features are sketched, the next step is to sketch the neck and ears. Draw two vertical lines extending down from the sides of the jaw to form the neck. These should not be too wide, since anime styles often favor a slender neck. Then sketch the ears on the sides of the head.
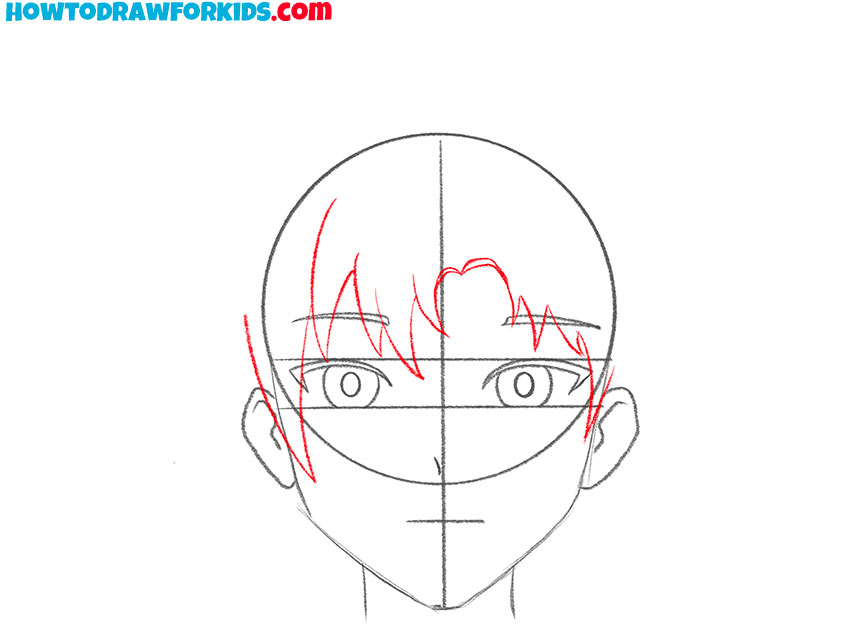
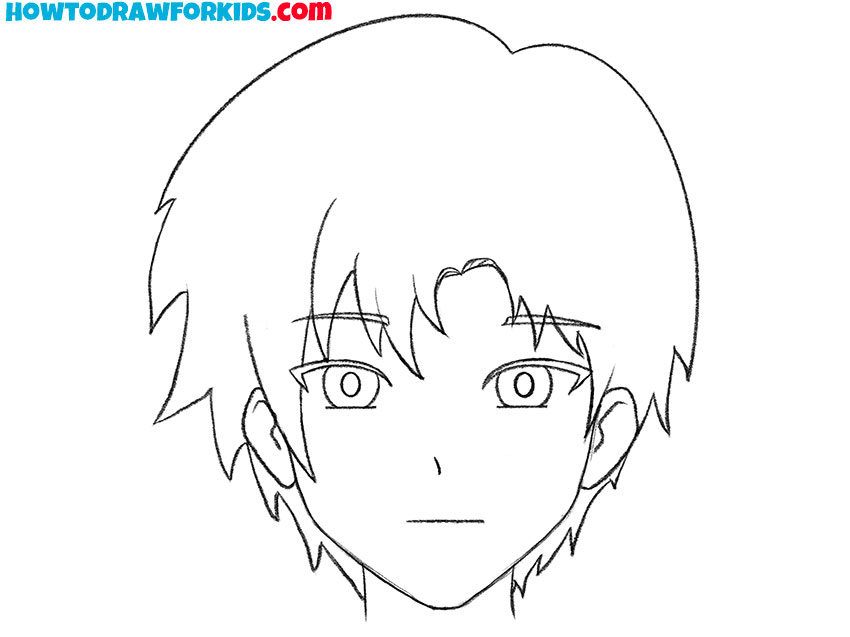
- Outline the front hair strands.
The hair is one of the most expressive elements in anime drawing, so outlining the inner portions first helps structure the hairstyle. Sketch light, jagged lines across the forehead to represent the bangs. Keep the strokes pointed and uneven, as natural anime hair rarely follows perfect symmetry.
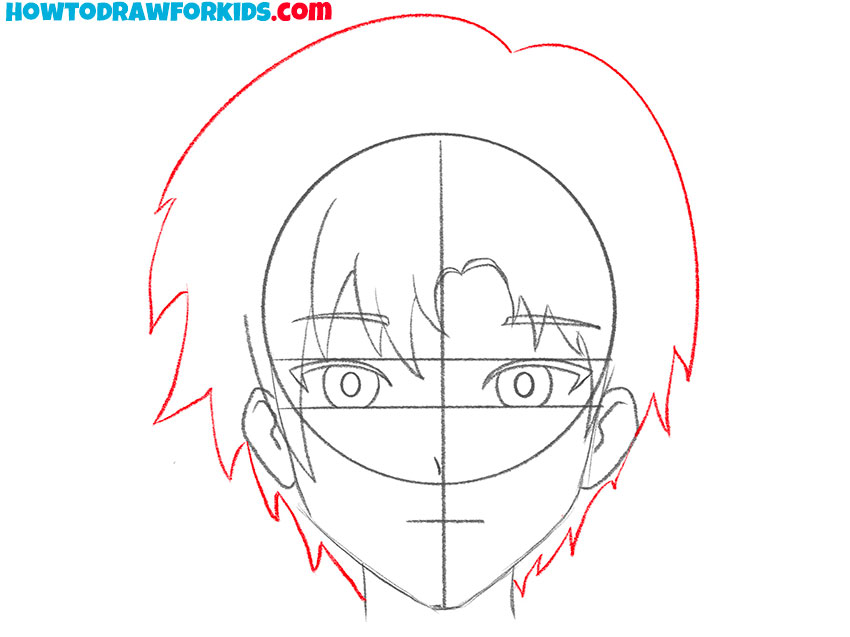
- Draw the outer hair contour.
With the inner bangs in place, continue the hairstyle to complete the look. Use larger, curved strokes that go around the head, creating the bulk of the hair. These lines should add volume and is never completely flat against the skull. Keep the strands spiked or curved, depending on the chosen style.
- Remove the construction marks.
After sketching all main parts, it’s time to finalize the drawing. Erase the unnecessary guidelines that were used for symmetry and construction. Carefully trace over the important lines, making them smoother and clearer. Also, you can adjust the proportions and add some small details.
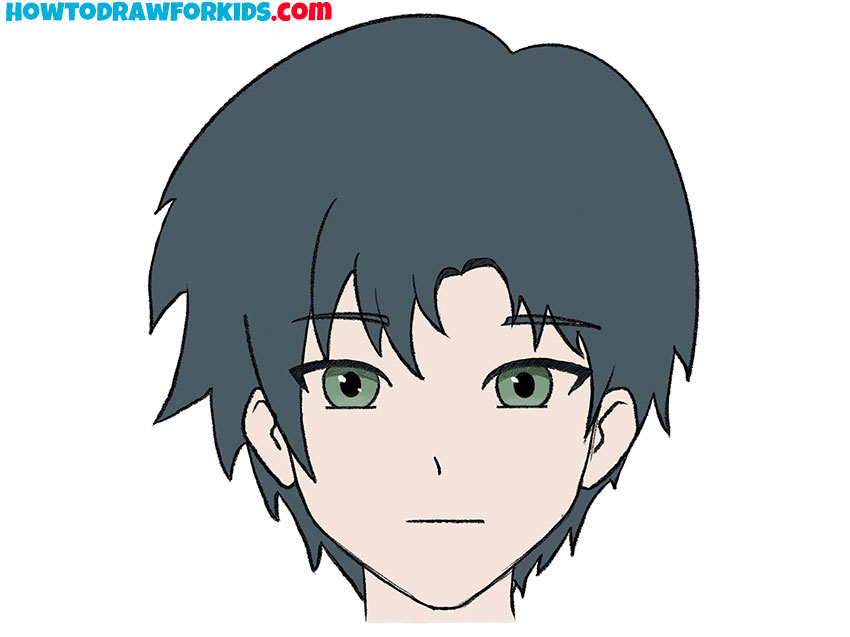
- Color the eyes, skin, and hair.
And now, let’s finalize the sketch and fill the hair with a solid shade. Color the eyes with a bright tone, adding darker shading at the top and lighter near the bottom to create some shine. Use skin tones for the face, neck, and ears.
Additional Content
And as in many of my drawing tutorials, I want to present a PDF version of this guide, where I’ve combined the main steps in a clear, simplified format for offline use. It also includes additional materials, like a coloring page, a tracing worksheet, and a grid drawing worksheet. Of course, it is completely free to download and can be used anytime, even without an internet connection.
Alternative Techniques
If you would like to try other variations beyond the main tutorial, there are several additional methods of drawing an anime face that you may find helpful. These techniques use the same simple format but demonstrate slightly different details.
Working through these additional methods will allow you to compare different approaches and see how changes in hairstyle, eyes, and jawline can alter the character’s appearance.
How to Draw an Anime Head
To create an anime head in this style, it is necessary to first mark the lower outline with a pointed chin and smooth jawline. Add spiky hair strands across the top and sides, using sharp angles.
Once the outer frame is drawn, position the eyes, shaping them as large ovals with inner circles for the pupils. Place small eyebrows above, then add a small curved nose and a short mouth below. Continue working on the hair by filling in additional strands.
Draw extra lines in the hair to show texture and direction. When coloring, use strong tones for the hair, lighter shades for the skin, and darker accents around the eyes to complete the anime look.

Simple Anime Face Drawing
This method shows an even more simplified version with 6 steps. Define the lower half of the head with a pointed chin and smooth jawline. Mark the eyes with wide ovals, placed low on the face, and draw irises with inner circles. Add short eyebrows slightly above, then place a small curved nose and a short line for the mouth.
Position the ears on the side, aligning them with the eye level. Next, sketch the hair by using pointed segments around the head, creating the strands of different size.
Continue the outer edges to frame the face with locks. Check the symmetry and clean up the outlines. Use light tones for skin, even lighter colors for the hair, and bright shades for the eyes.

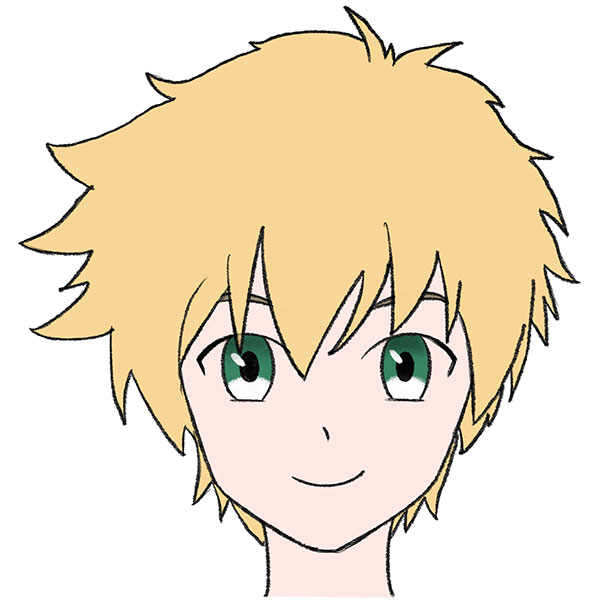
How to Draw an Anime Boy Face
Finally, the third alternative technique presents a more youthful anime boy face with even simpler features. To draw an anime boy face in this style, it is important to sketch the head shape first, as this will guide the placement of all other features.
Outline the jawline with smooth curves, then place the ear to one side as a simple oval. Add two large oval eyes across the lower half of the face. Draw a short eyebrow above each eye and add a small mouth positioned low. Shape the hair by sketching curved locks falling across the forehead.
Continue the top and back of the hair to complete the head. Once the face and hair are complete, trace the drawing, adjust the outlines, and color the details of the face using pastel tones.

Conclusion
For further practice, see the anime character drawing tutorial to learn how to draw a face of a person in a very simple style.
You can also check the anime girl drawing tutorial to compare different approaches.
To practice your coloring skills and gain a deeper understanding of color relationships in anime, I recommend you visit my collection of anime coloring pages.
Share your results, leave your comments, and visit again for more drawing lessons. Don’t forget to follow me on social media so you’ll never miss out on the latest drawing tutorials.
How to Draw Boy anime
You can find a full tutorial on how to draw an anime boy right on the site, it explains every step.
This is a great tutorial for kids! It’s easy to follow and the results look great.
Thank you! I’m glad you found the tutorial easy to follow.
bro I cant do this
Don’t give up, Korey. Try sketching again and again – you’ll get it.
Really helpful content. I love ❤️ it. Helped me improve alot
Thank you, Jessica. I’m happy the tutorial helped you progress. Keep practicing and you’ll see even more improvement.