How to Draw Queen Bee
In this artistic guide, I invite you to join me as we learn how to draw Queen Bee, capturing her essence with pencil and paper. This character, with her bold and captivating style, becomes approachable with my straightforward drawing method. We’ll begin with the foundation and add layers that compose her superhero persona.
How to Draw Queen Bee: Basic Information
Welcome to this creative session where we will master how to draw Queen Bee in her adorable chibi form. In designing this lesson, I intended to make the process as sweet and straightforward as the honey she adores. Our journey starts with basic circles and lines, gradually crafting her heroic stature.
As we progress, you’ll see how her sleek, costumed silhouette and endearing facial expressions emerge from simple beginnings. My method introduces you to each aspect of Queen Bee’s design, focusing on translating complex shapes into friendly strokes that anyone can achieve with a little practice.
By the end of this lesson, the ability to draw Queen Bee will be yours, complete with her charmingly exaggerated chibi proportions. This guide is my offering to you, a chance to create and share in the magic of drawing characters that embody both strength and sweetness. Let’s put pencil to paper and capture her miniature majesty.
Queen Bee Drawing Tutorial
Materials
- Pencil
- Paper
- Eraser
- Coloring supplies
Time needed: 30 minutes
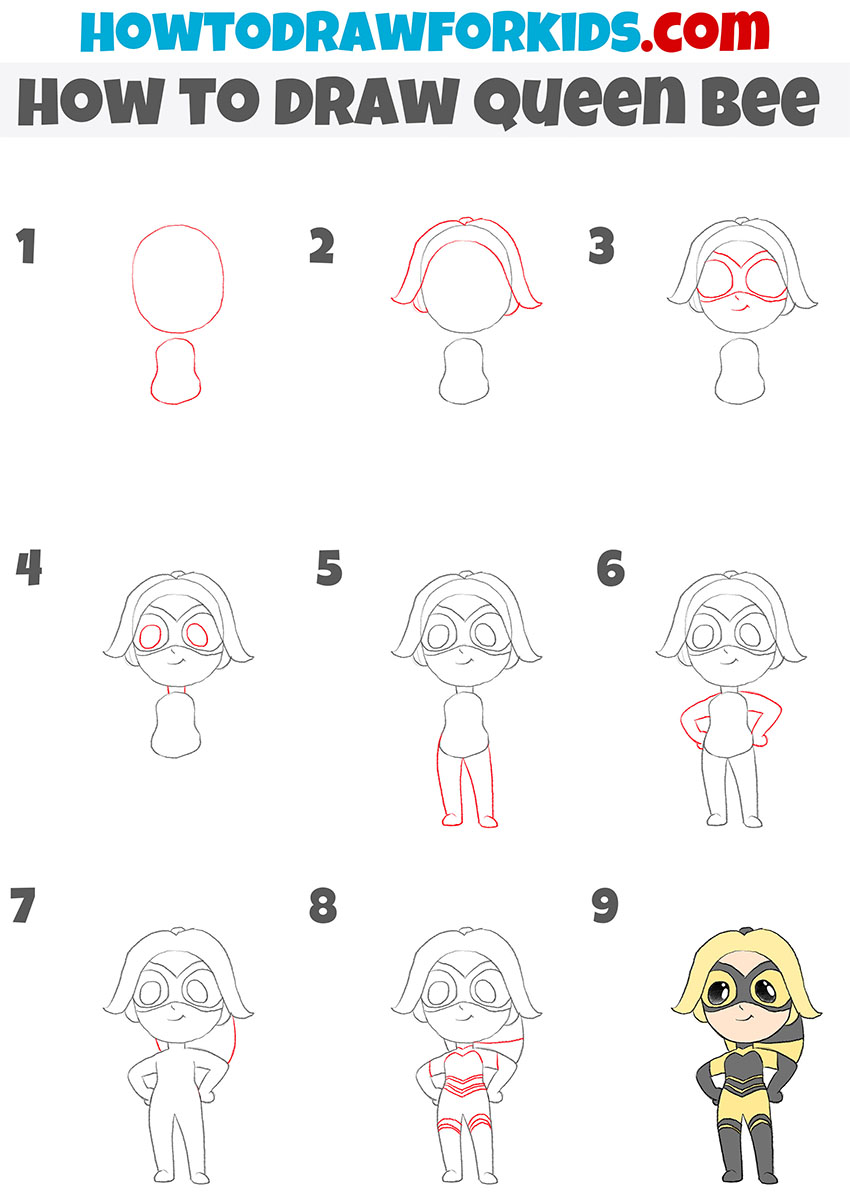
How to Draw Queen Bee
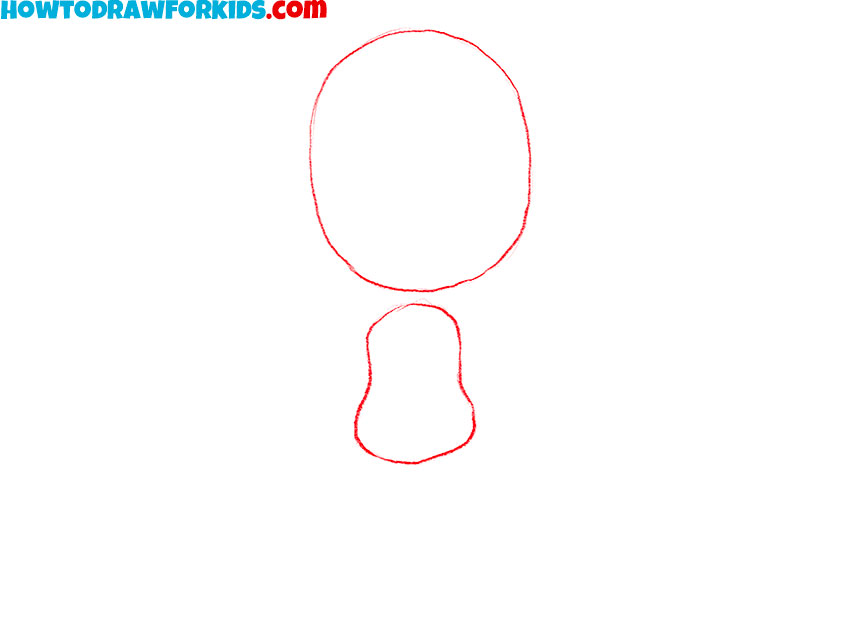
- Sketch the body and head.
Begin by sketching a large oval shape for the head and a smaller, slightly elongated oval for the body. This will serve as the fundamental guideline for your character’s proportions and structure.
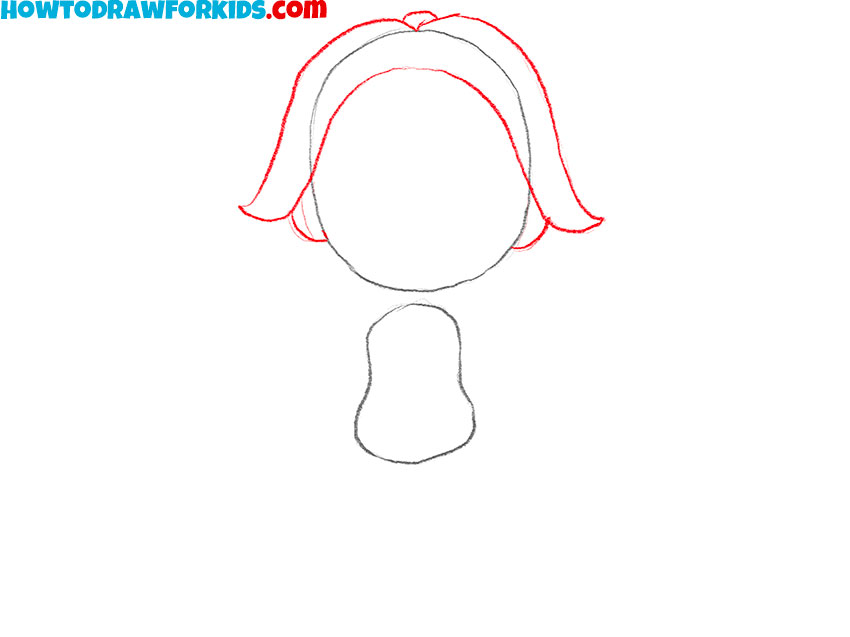
- Add Queen Bee’s hairstyle.
Draw the hairstyle by drawing a shape that resembles a bell over the head. This outlines the hair’s volume and basic style. Don’t focus on the details—just capture the general shape of the hair.
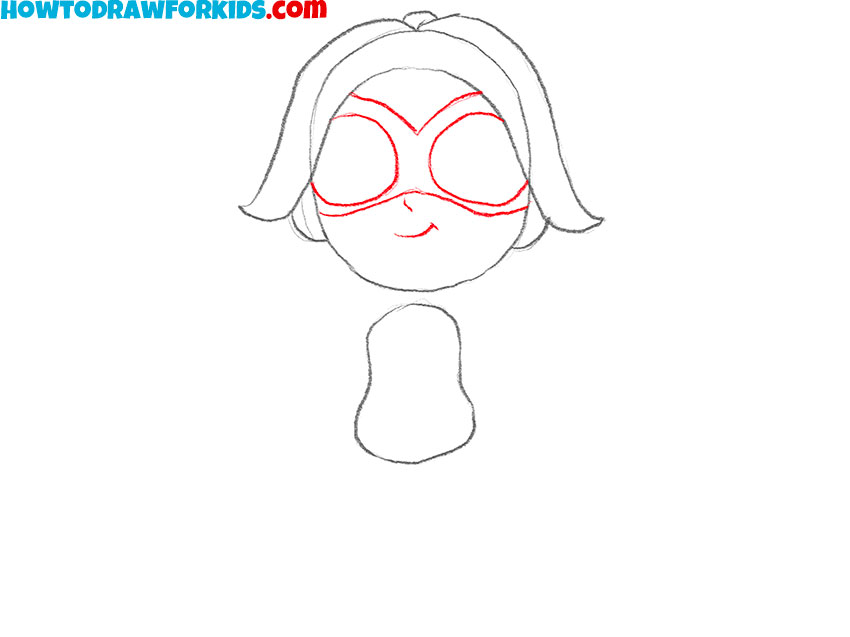
- Draw the Queen Bee mask and facial features.
Sketch two arches over the top half of the face then add two large circles beneath them for the mask. Use short strokes to outline the nose and mouth.
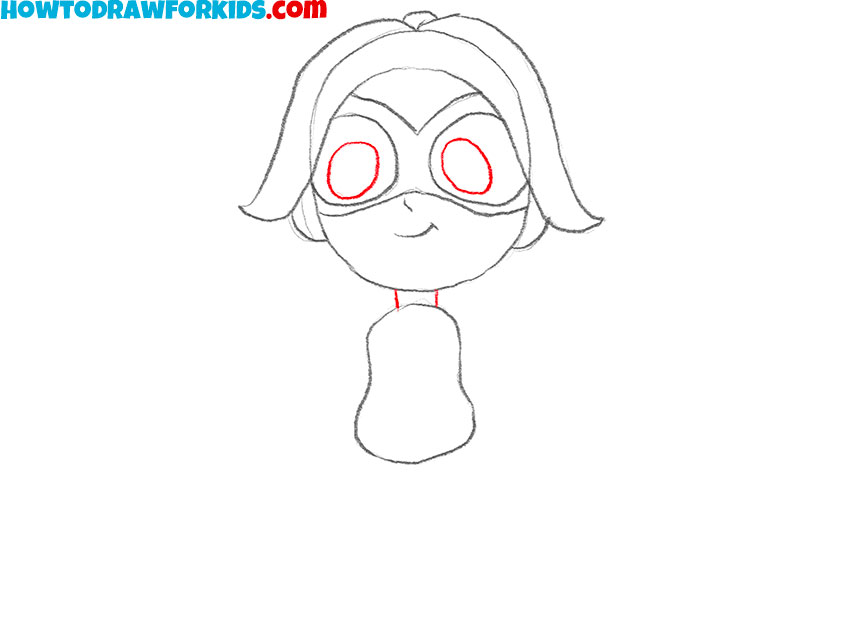
- Draw eyes and neck.
So, add two short vertical lines between the torso and the head for the neck. Next, draw two large, asymmetrical eye ovals inside the mask circles from the previous step.
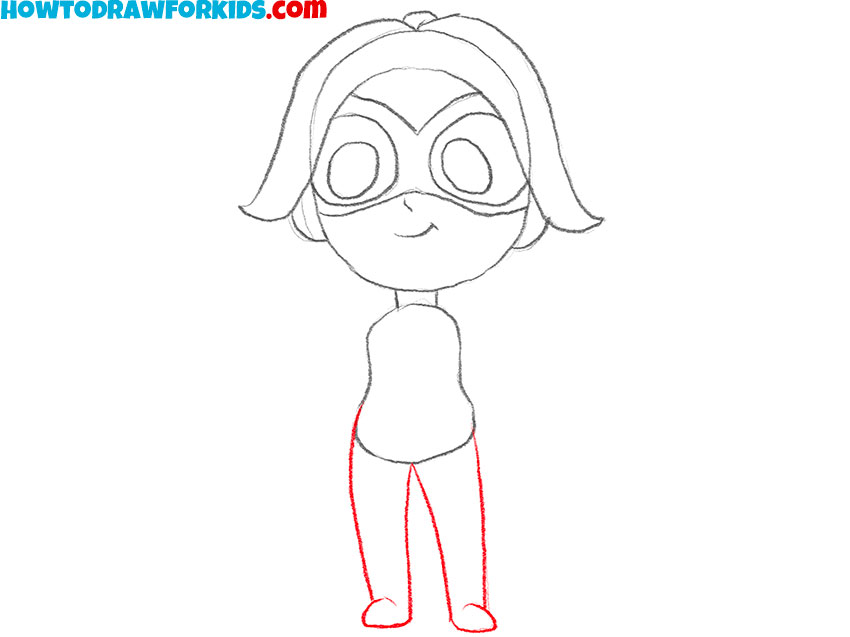
- Add the character’s legs.
To complete this step, create the outline of the legs to be smooth, yet powerful and stable. Add short, rounded outlines of the feet at the bottom.
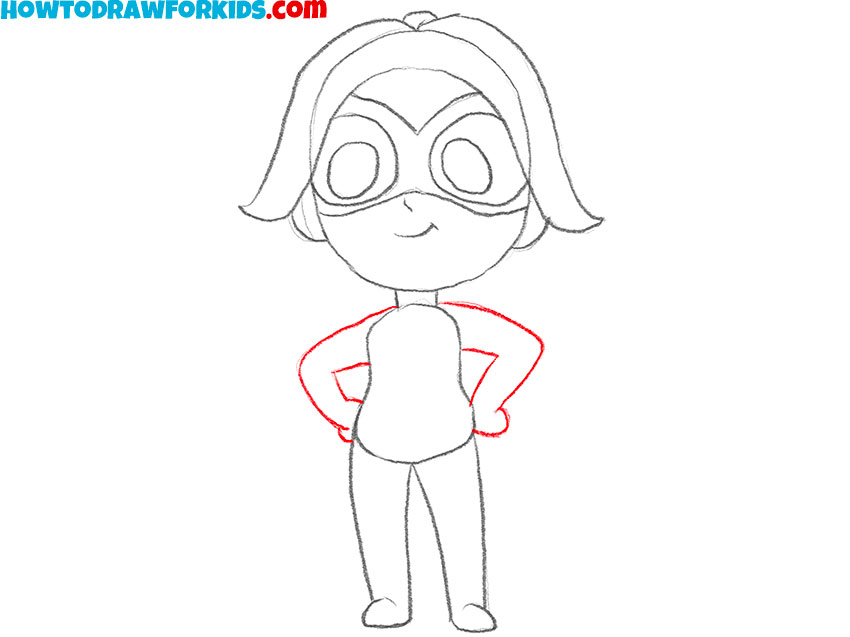
- Draw the arms of the queen bee.
At this stage, you’re capturing the general shape and pose of the arms, so consider the character’s gesture and how the arms will interact with the other elements of the drawing.
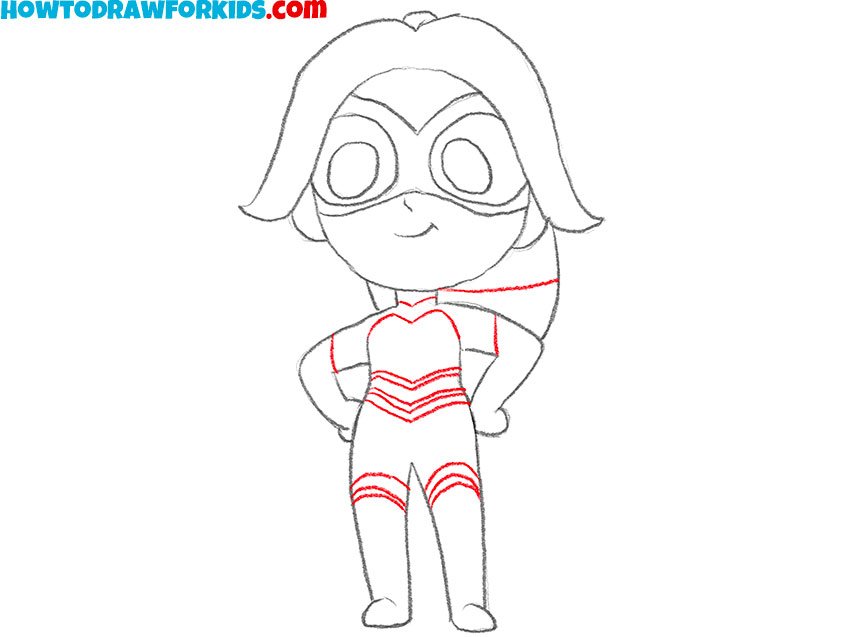
- Sketch the back of the hairstyle.
To complete our heroine’s figure, add a rounded, large outline to the back of her hair. It should look very asymmetrical relative to the neck and shoulders.

- Draw the lines of the suit.
Add the outlines of the suit stripes, which will be filled in with black in the next step. This gives the character’s clothing a sense of realism and texture, which is essential for the superhero outfit.
- Color the drawing.
Color the costume in the character’s signature colors, carefully staying within the lines to maintain a professional appearance.

How to Draw Queen Bee: Video Tutorial
Additional Content
In complementing our drawing journey, I’ve compiled a free PDF file for this lesson, designed to help you draw Queen Bee in her chibi glory. This condensed guide captures the essence of the tutorial, making it perfect for on-the-go practice, anytime, anywhere. Easy to download, it’s your pocket-sized companion for art.
This PDF distills the tutorial to its core, offering you a quick reference that fits neatly into your creative life. It’s been crafted for convenience, so whether you’re without Wi-Fi or simply prefer a hard copy, your progress needn’t pause. Queen Bee’s chibi charm can unfold with just a flip of a page.
Having this PDF means you can enjoy the art of drawing Queen Bee wherever your day takes you, connectivity aside. It’s like having me there with you, guiding each stroke and turn of the pencil. So take this little guide, download it onto your device, and let your creativity buzz freely in the palm of your hands.
Pro Tips for Drawing Queen Bee
As we place the final touches on our chibi Queen Bee, let’s pause to reflect on the journey. I’ve gathered some tips and tricks to enhance your drawing experience, aiming to smooth the path for your future artistic endeavors. These pearls of wisdom are drawn from the well of experience, meant to refine your techniques.
- Start with Soft Lines: Begin with light, erasable lines to lay down the basic shape of Queen Bee. This allows for easy adjustments as your drawing progresses.
- Focus on Facial Features: In chibi art, the face carries the character’s emotion. Spend extra time perfecting those large, expressive eyes and the sweet smile of Queen Bee.
- Use References: Keep a picture of Queen Bee at hand. Observing her outfit and posture can help you capture her essence more accurately.
- Practice Symmetry: For the mask and eyes, ensure symmetry to maintain the adorable chibi balance. Drawing guides can be helpful for this.
- Shade with Purpose: Add depth to your drawing with shading, especially under the hair and around the edges of her arms and legs, to bring out the three-dimensionality.
- Layer Your Colors: If coloring, build up from lighter shades to darker ones to create a vibrant, lifelike quality in your artwork.
- Take Breaks: Step back from your work occasionally. Returning with fresh eyes can help you spot areas that may need improvement.
These tips and tricks are your allies, equipping you to forge ahead with confidence in your drawing journey. Each piece of advice is a tool waiting to be used, ready to bring your artistic vision closer to the heart of Queen Bee. With these in hand, continue to sketch, create, and most importantly, have fun as you bring more characters to life on your canvas.
Queen Bee Drawing: Common Mistakes to Avoid
Capturing the whimsical essence of chibi Queen Bee is an enchanting challenge, fraught with common missteps that many artists encounter. Below, I have laid out some of the typical errors that you might face and how to steer clear of them, ensuring your drawing journey is as smooth as silk.
- Oversizing the Body: Remember, chibi characters have heads larger than their bodies. Keeping the body too large can lose the chibi charm.
- Overcomplicating the Shape: Chibi characters are all about simplicity. Too many curves or angles can complicate the figure, so stick to simple shapes.
- Ignoring the Eyes: Eyes are the window to the soul, especially for chibi characters. Not giving enough attention to the eyes can result in a lack of expression.
- Uneven Limbs: Chibi limbs are short and stubby. Making them too long or thin can take away from the iconic stoutness.
- Flat Coloring: Without proper shading, chibi characters can look two-dimensional. Use light shading to bring out the volume and cuteness.
Awareness of these common errors will arm you with the foresight to avoid them. With these tips in mind, your next chibi Queen Bee will not only be free of these common mistakes but also imbued with the depth and personality that make the chibi style so beloved.
Conclusion
Now that you’ve mastered the charming chibi Queen Bee, the adventure doesn’t end here. My website is a treasure trove of tutorials, from the sunny vibrance of drawing an orange to the intriguing challenge of an octopus. Each lesson is designed to broaden your skills and bring more joy to your artistic journey.
Stay connected and up-to-date with all things creative by following my social media channels. And if there’s a particular subject or character you’d love to draw next, don’t hesitate to drop a comment below. Your feedback is the compass that guides our creative voyage, shaping future lessons to your interests.