How to Draw a Laptop
In this simple lesson, we will learn how to draw a laptop and explore the basic skills needed to depict familiar electronics.
How to Draw a Laptop: Introduction
We often draw various types of electronics, whether it’s computers, tablets, smartphones, and more. In this lesson, we will focus on learning how to draw a laptop, a familiar electronic device we all use. If you’ve already studied my lesson on how to draw a phone, this laptop drawing tutorial will likely seem much easier and won’t pose any difficulties.
However, like any drawing, there are still nuances to consider, and we’ll be sure to explore them together. This lesson will involve drawing many straight lines, both parallel and perpendicular. It’s important to pay attention to these details as they contribute to the overall accuracy and structure of the drawing.
In addition, this lesson will introduce basic principles of perspective and proportions. Understanding these concepts is key to creating more realistic and visually accurate drawings. By applying these rules, you’ll improve your overall drawing technique.
If you follow all the instructions carefully in this tutorial on how to draw a laptop, you will significantly enhance your foundational understanding of these basic aspects of visual art. These skills are very important in developing your abilities and will be valuable in future projects.
Laptop Drawing Tutorial
Materials
- Pencil
- Paper
- Eraser
- Coloring supplies
Time needed: 30 minutes
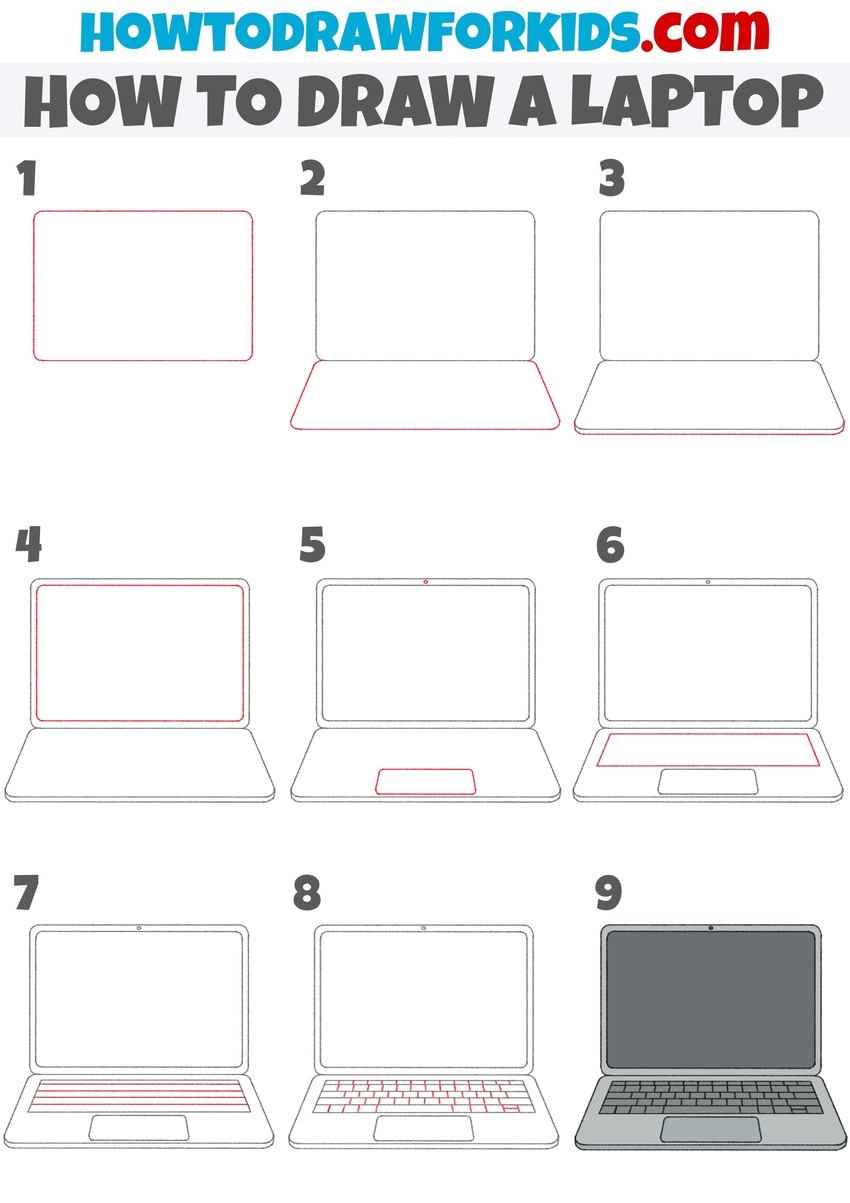
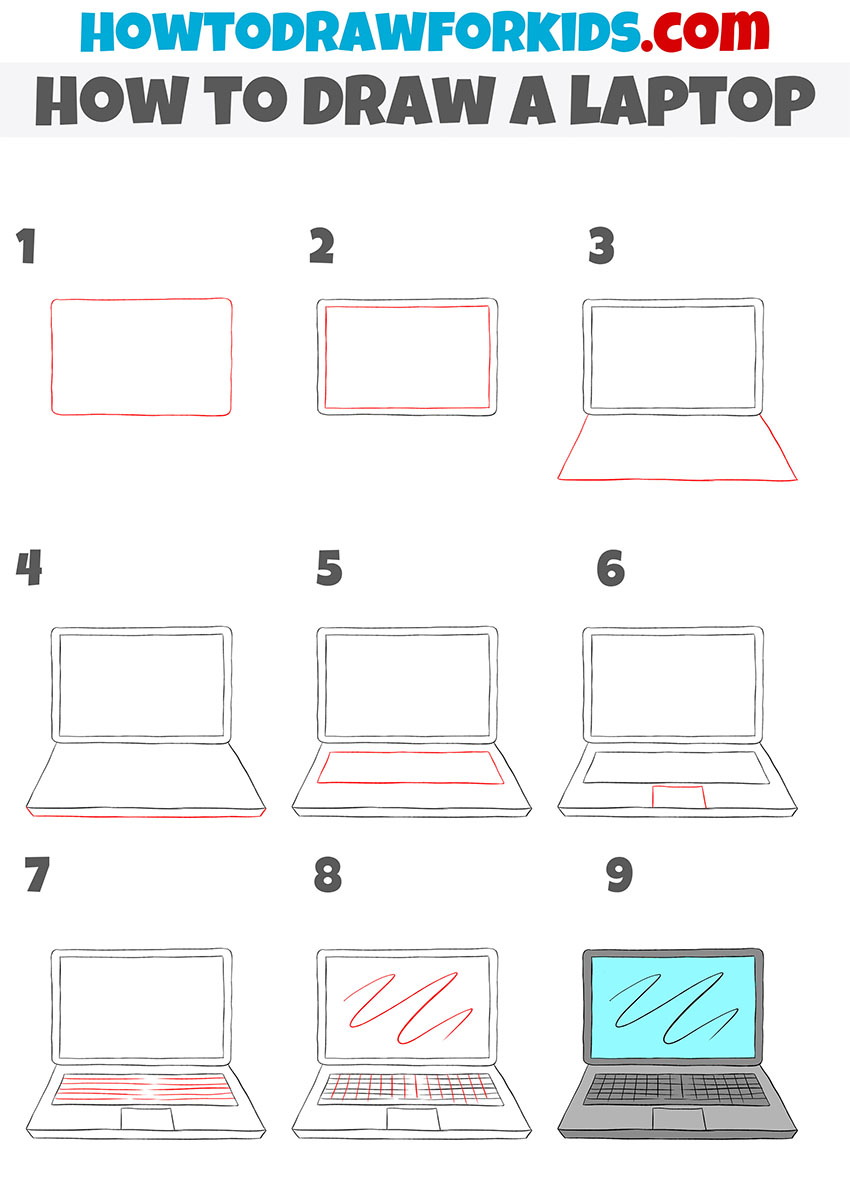
How to Draw a Laptop
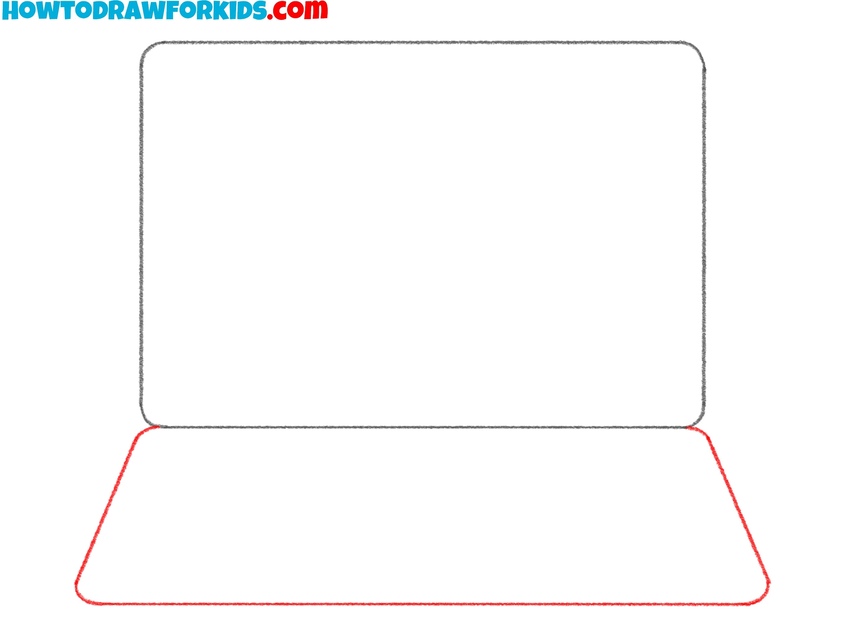
- Draw the cover of the laptop.
Begin drawing a laptop by sketching a rectangle to outline the cover of the laptop. This shape should be slightly wider than tall. Make sure the corners are rounded for a smooth, realistic look, as laptop bodies typically have curved edges.

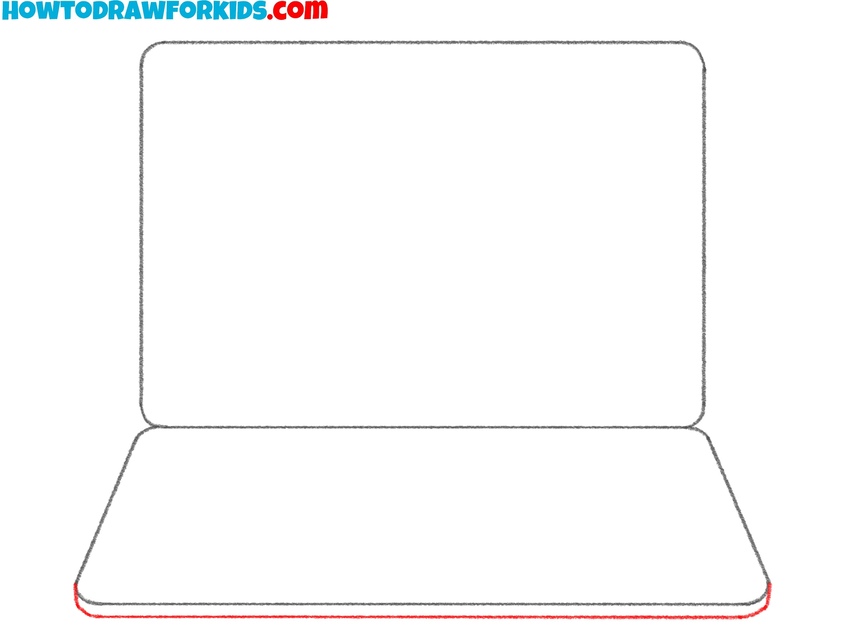
- Draw the bottom part of the laptop.
Now, draw a trapezoidal shape underneath the rectangle, which will form the bottom portion of the laptop, where the keyboard and touchpad will be placed. The top edge of this trapezoid should align with the bottom of the rectangle you drew in Step 1.
- Shape the bottom edge the device.
Now, draw a horizontal line at the very bottom of the lower part of the laptop to add more dimension. This line represents the front edge of the laptop. It should follow the shape of the bottom edge, with the left and right ends curved for a more realistic appearance.
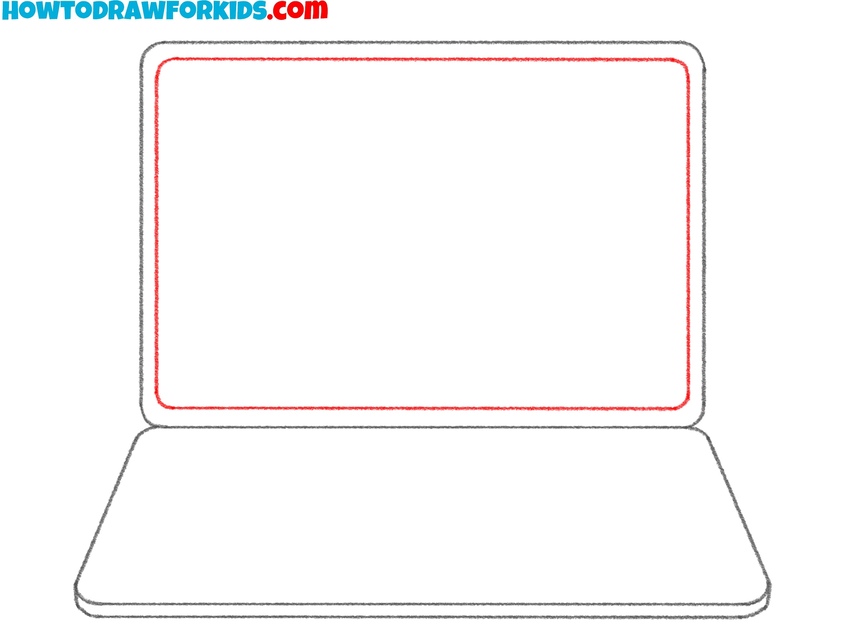
- Draw the laptop screen.
Add another rectangle inside the cover area to represent the laptop’s screen. This simple detail will make your laptop drawing look more realistic. The new rectangle should follow the shape of the outer screen, leaving a small border between the two.
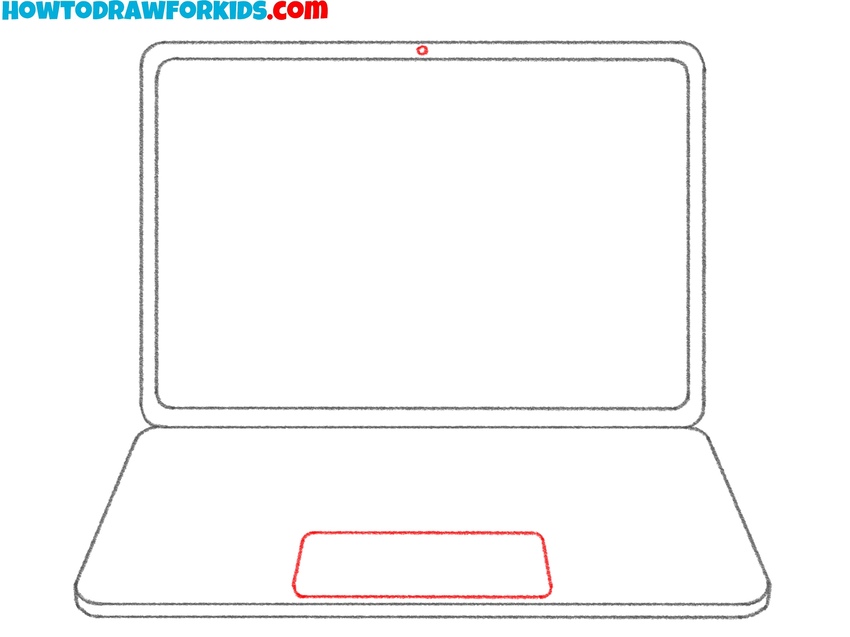
- Add the webcam and touchpad.
Now, at the bottom of the lower part of the laptop, draw the touchpad. Make the lines of the touchpad parallel to the outlines of the laptop for correct liner perspective. At the top center of the laptop screen, draw a small circle to represent the webcam.
- Outline the keyboard section.
Below the laptop screen, draw a rectangle inside the bottom part of the laptop. This will represent the keyboard section. Make sure to center it in the upper half of the trapezoid you drew earlier. The edges should be smooth, and the lines should be parallel to the outer edges of the laptop.

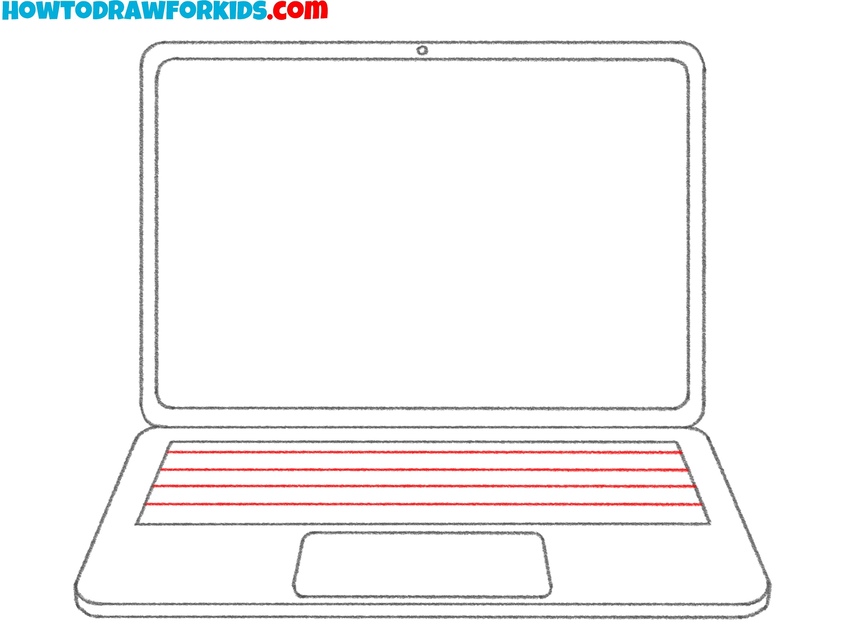
- Add keyboard layout
Next, draw the horizontal lines for the keyboard. Begin by sketching a set of lines across the bottom part of the laptop, just above the touchpad. These lines will serve as the outline for the individual keys. Keep the spacing consistent between each line to maintain a neat and organized look.
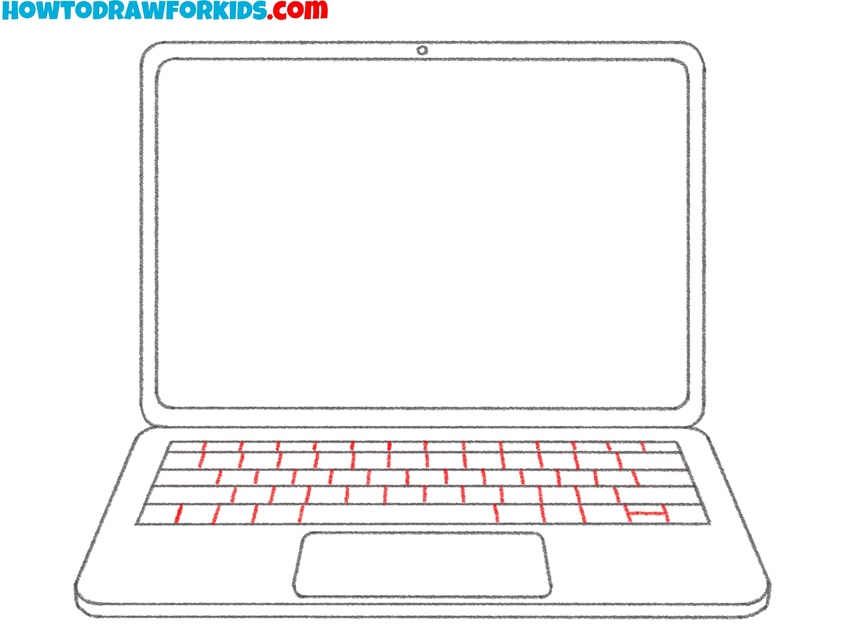
- Finalize the keyboard.
Now, complete the keyboard by adding vertical lines to create individual keys. Use a set of vertical lines across each horizontal line you drew in Step 7. This will give the keyboard a more detailed appearance, with the individual key sections clearly defined.
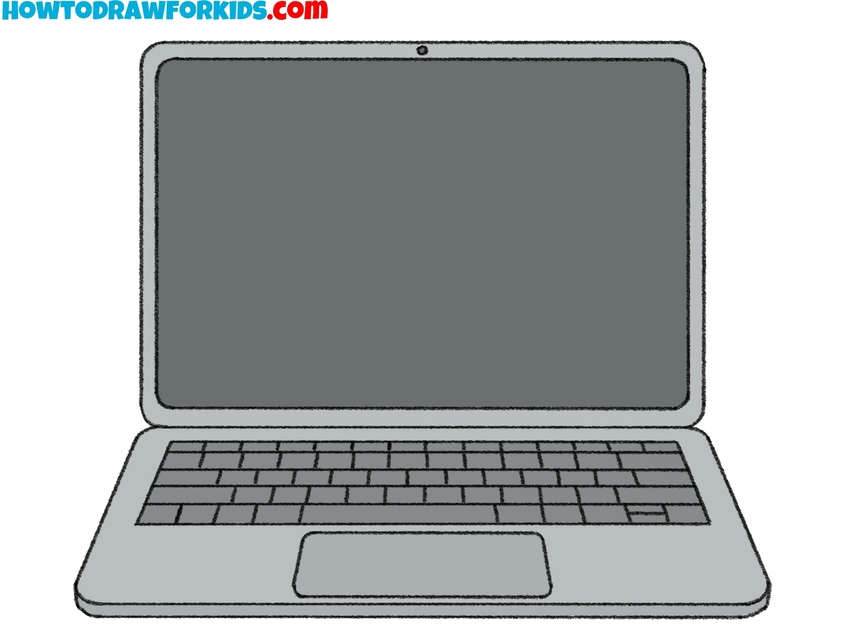
- Add color to the laptop.
For the final step, darken the outlines of your laptop to make the drawing sharp and clear. Erase any unnecessary guidelines from previous steps. Once the outlines are clean, you can add color. Typically, the laptop screen can be shaded gray or black, while the body and keyboard can be a lighter color.

Simple Laptop Drawing Tutorial
This tutorial on drawing a laptop is more focused on a simple design without additional complexities like specific angles or shadows. Also, this instruction has a different sequence of steps and more colorful coloring scheme.
To learn how to draw a laptop in this simple way, sketch a rectangle for the cover. After that, draw another rectangle inside for the screen. Then, draw a trapezoidal shape underneath to form the body of the laptop, where the keyboard and touchpad will sit. The trapezoid’s top edge should align with the bottom of the rectangle to keep the proportions correct.
Then, add a small rectangular shape on the bottom to represent the laptop’s touchpad. Next, draw horizontal lines across the body to mark the keyboard layout, followed by vertical lines to complete the individual keys. For the screen, add some simple scribbles to show activity on the laptop. Finally, erase any unnecessary lines and add colors to the body and screen.
Conclusion
Two simple methods for drawing a laptop have been covered, and the art of working with straight lines has been sharpened. Now, it’s time to focus on further developing our skills. I highly recommend exploring other lessons from my electronics category.
Through these truly simple lessons, you can learn how to draw a computer, a relatively easy subject to master without difficulty. Alternatively, you can learn how to draw a robot, which will provide a fun challenge for your artistic skills.
Also, be sure to check out my other categories for equally interesting drawing topics and my entertaining and educational coloring book collections. You’ll find content that suits your taste on a variety of subjects.


THANKS IT HELPED ME A LOT
Very good, Mary!