How to Draw a Suitcase
In this step-by-step tutorial I will show you how to draw a suitcase and give you some practical tips on how to do it like a real pro.
In addition, I will tell you how the process of drawing this object will help a young artist hone his skills in art.
How to Draw a Suitcase: Basic Information
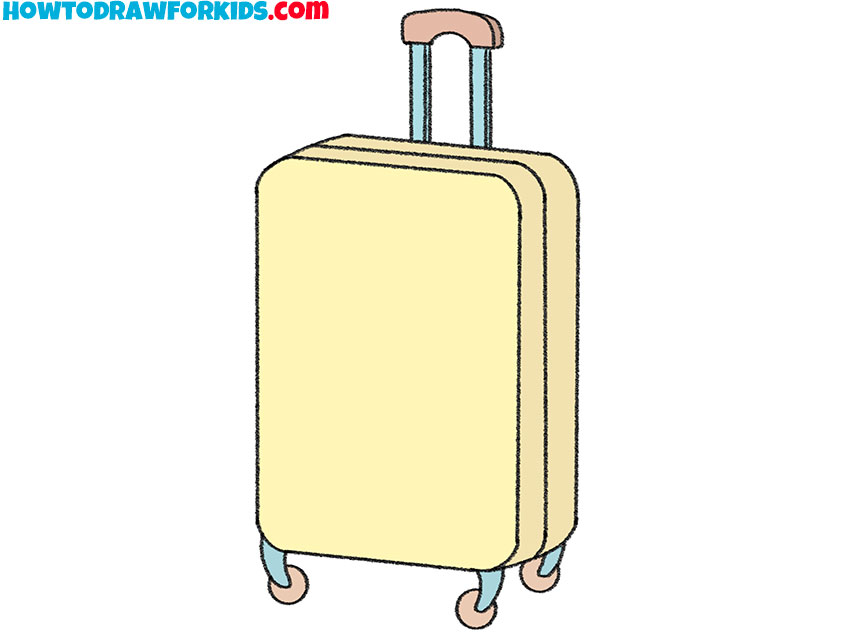
All aboard the art express! Today, we’re going to learn how to draw a suitcase, that trusty travel buddy that’s been to more places than we can count. So, this suitcase is an extraordinary, custom-designed travel essential; it’s about to come to life under your pencil.
This lesson is your ticket to mastering suitcase illustration. With clear-cut steps, you’ll see how each line and curve adds up to a suitcase that’s sturdy and stylish. As you follow along, you’ll create a suitcase that looks like it could pop right off your page, complete with wheels for zipping through airports and a handle for easy carrying.
We’ll take it step by step to ensure that by the end, you know exactly how to draw a suitcase that’s ready for your next great adventure – or at least ready to be proudly shown off in your art collection. So let’s grab those tools of the trade and design an item that could be the envy of any traveler!
Suitcase Drawing Tutorial
Materials:
- Pencil
- Paper
- Eraser
- Coloring supplies
Time needed: 30 minutes
How to Draw a Suitcase
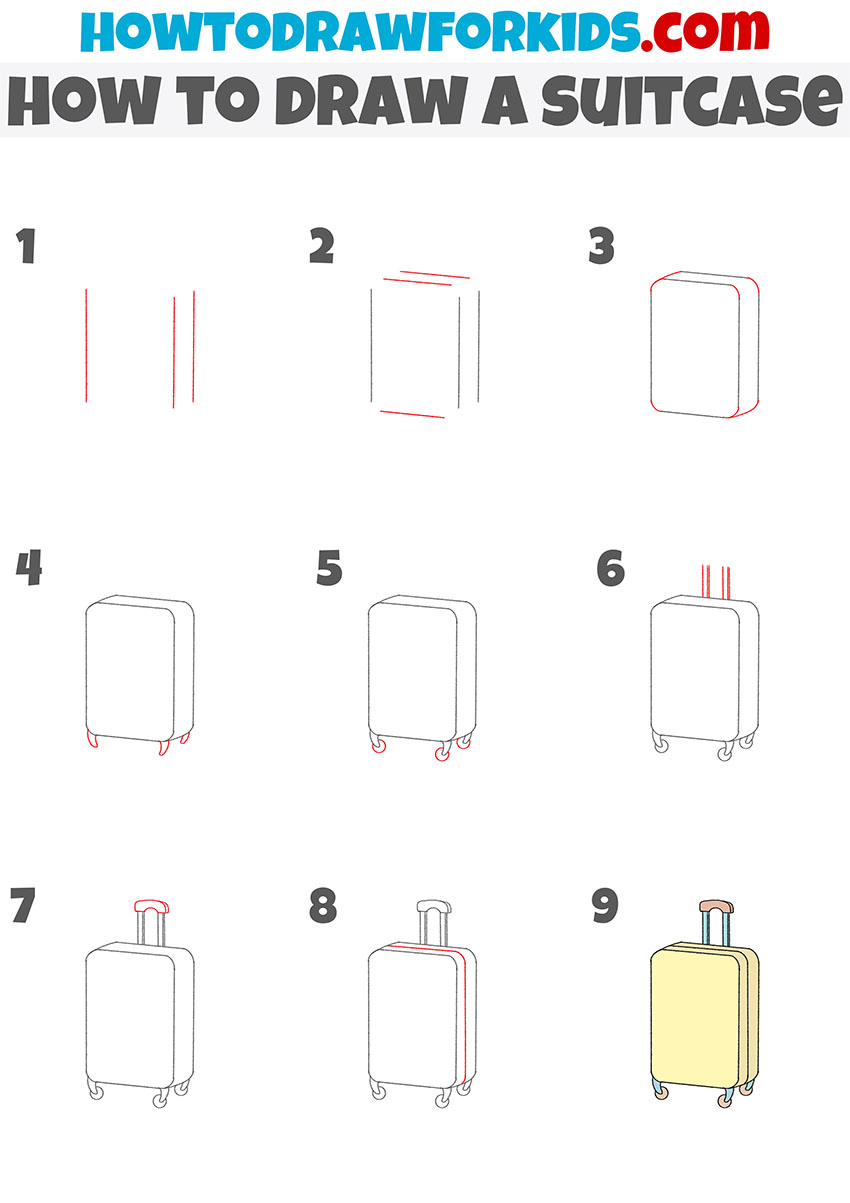
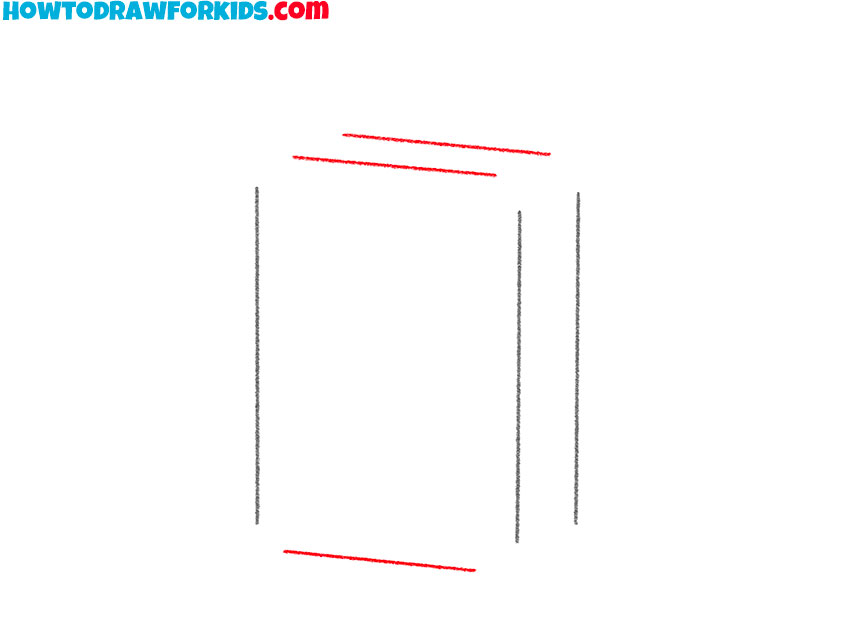
- Sketch the side edges of the suitcase.
Place two vertical lines parallel to each other towards the left side of your paper. These lines should be straight and of equal length. They will form the leftmost edge of the suitcase. Next, add depth to your suitcase with another line on the right side of the drawing.

- Add the top and bottom edges.
Next, add the top and bottom edges to connect the side edges you drew in step 1. These lines should be parallel to each other and perpendicular to the side edges, completing a basic rectangular shape that outlines the main body of the suitcase.
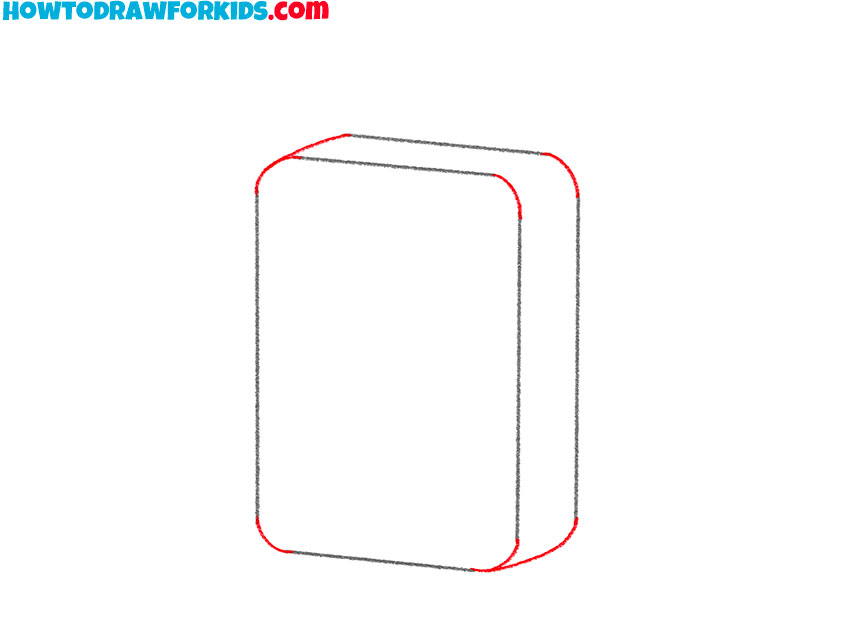
- Draw the corners of the suitcase.
Connect the vertical and horizontal lines from previous steps with curved lines on each corner, creating the rounded edges of the suitcase for a three-dimensional effect. It is very important that all corners are approximately the same size and have the same bend.
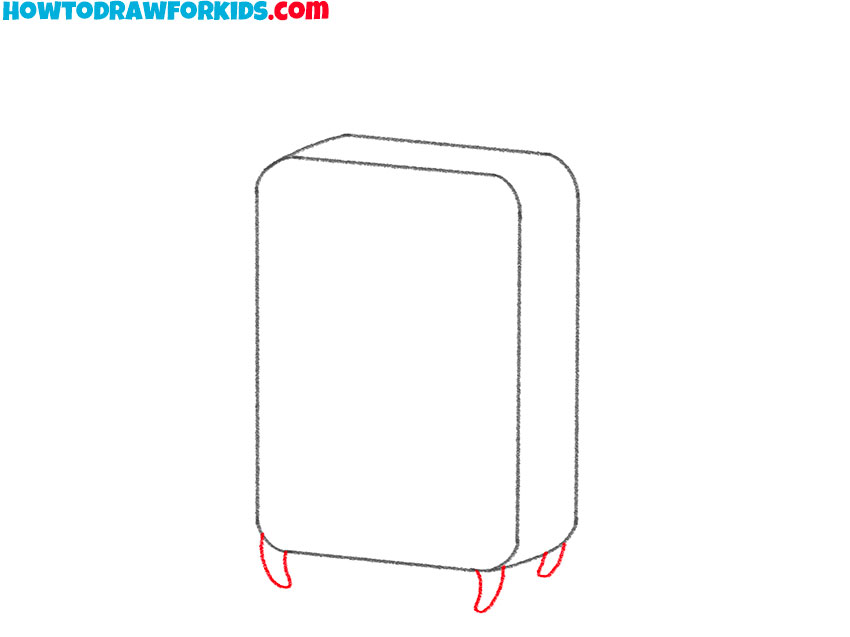
- Sketch the legs.
Add the small legs for the wheels at the bottom of the suitcase. Just below the bottom edge, draw two small, vertical lines on each side of the suitcase. These should be slightly curved inward to suggest a slight protrusion where the wheels will be attached.
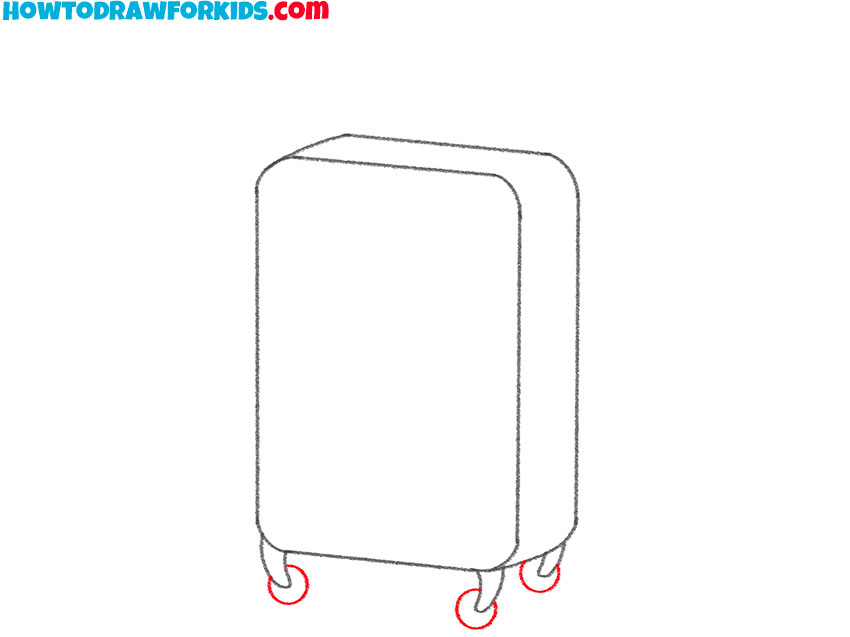
- Draw the wheels.
Sketch four small, circular shapes beneath the lines drawn in step 4, representing the wheels. Ensure the wheels are uniform in size and shape. To learn how to draw perfectly round wheels, I strongly advise you to check out my circle drawing tutorial.
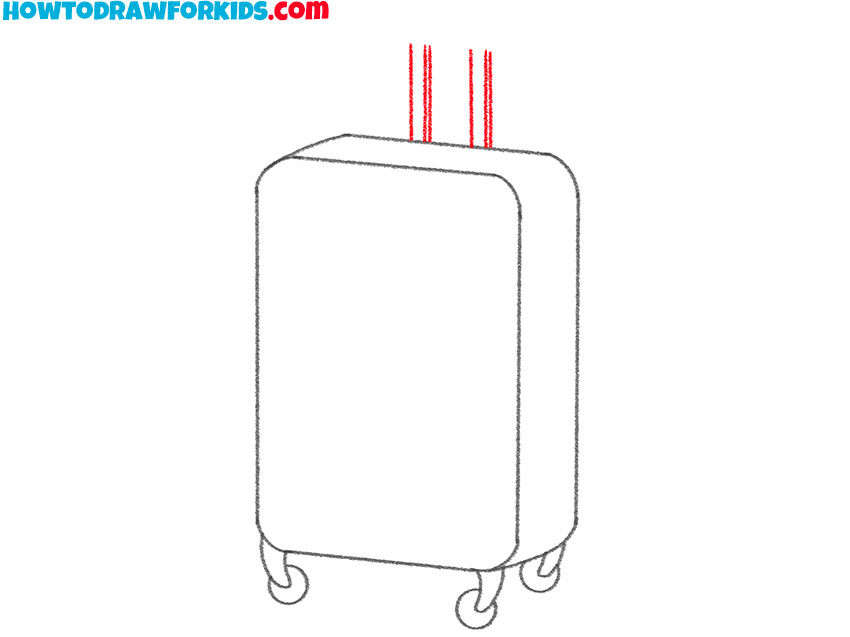
- Start drawing the handle.
Add the main part of the telescopic handle. First draw four vertical lines for the front edges of the telescopic part of the handle. Then add volume using two more lines to the right of those drawn earlier. The handle should protrude evenly from the top center of the suitcase.
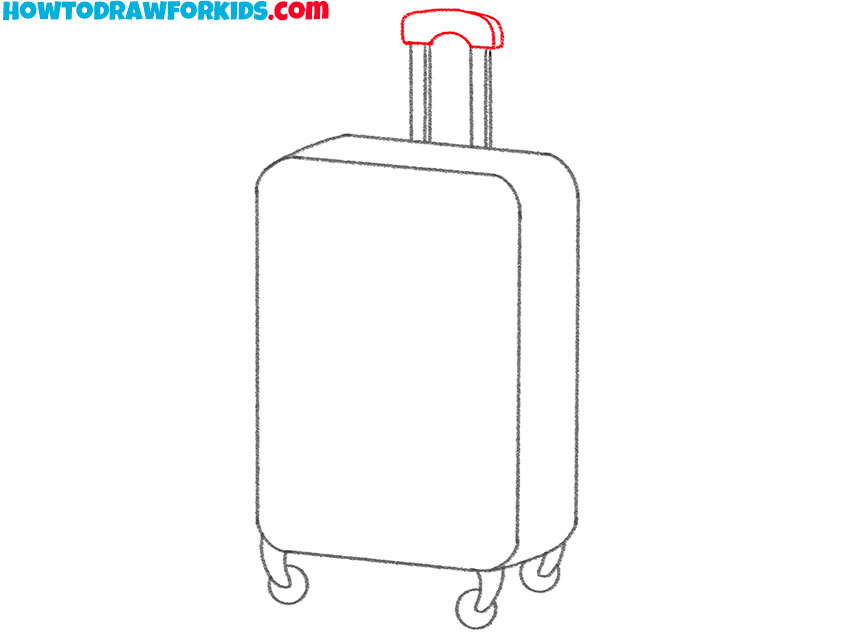
- Draw the top of the handle.
Add the main part of the telescopic handle. At the top of the vertical lines drawn in step 6, connect them with a couple of curved horizontal lines. The handle can have a simple shape like in my example or a more complex one.
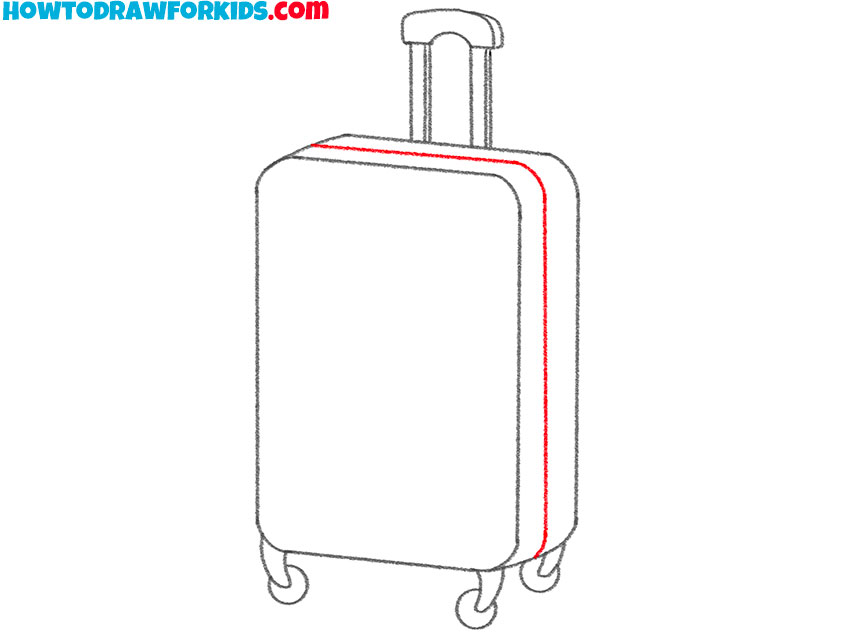
- Detail the side of the suitcase.
Now, between the horizontal and vertical lines from the first two steps, draw a zipper that exactly follows the outline of the side surface of the suitcase. In addition, at this stage you can add design elements such as a lock or recesses on the front surface.
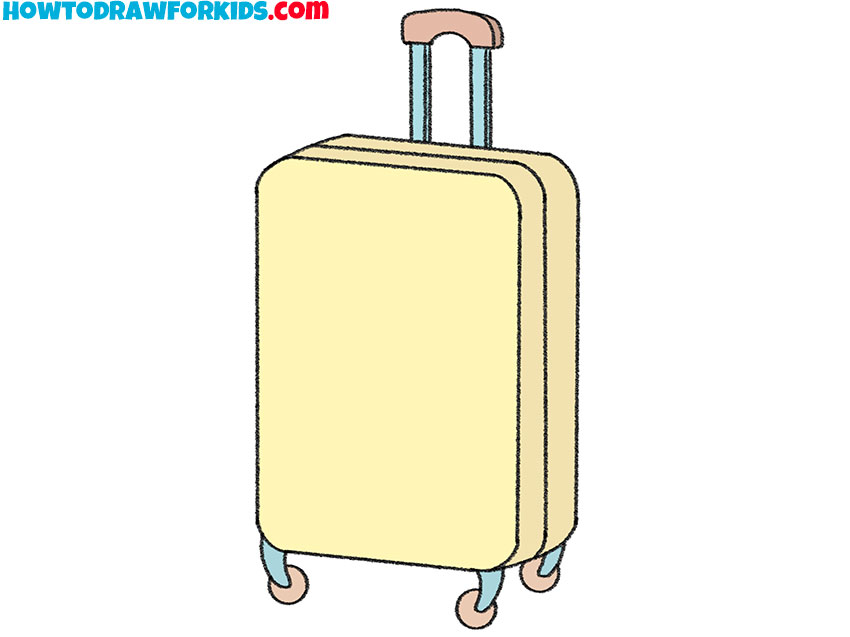
- Color your suitcase drawing.
Fill in the main body of the suitcase with a solid color of your choice, leaving the wheels and handles emphasized with either lighter or darker shades to highlight these features. Choose a realistic suitcase color like yellow, black, grey, or navy, or opt for a vibrant hue to make your drawing pop.
Additional Content
Especially for you, I have prepared a special offer – a PDF file with a short version of my drawing lesson about suitcases! And it’s absolutely free! You can download it and take it with you on anywhere. Whether you’re out in the park or cozied up in your favorite drawing spot at home, it’s yours to use.
With this simple guide, you can practice drawing suitcases anytime, anywhere – no internet needed. How cool is that? So, get your copy now and keep the art fun going wherever you are!
Learn How to Draw a Suitcase Even Better
There is always room for improvement and refinement. Drawing, a skill honed through practice and study, can always be enhanced with the right techniques and approaches. As we turn our focus to a specific subject, such as a suitcase, I would like to offer some practical tips to aid in developing your drawing skills.
These suggestions are designed to introduce complexity and precision into your work, helping you to render more detailed and accurate depictions.
You can add realistic textures such as a leather grain, fabric weave, or a metallic shine to emulate different materials. Use artistic techniques like cross-hatching, stippling, or scumbling to achieve depth and complexity in the texture.
Decorate the suitcase with an array of stickers or decals that tell a story of travel. Draw everything from vintage hotel labels to modern travel logos or flags from various countries. This personalizes the suitcase, making it look like it was numerous airports and cities.
Rethink the design of the suitcase handle. Imagine ergonomic designs that are molded for comfort or elaborate designs featuring ornate details or futuristic elements. The handle can become a striking feature of the suitcase, drawing attention and adding uniqueness to the overall design.
Illustrate the suitcase in motion to bring some dynamic energy to your drawing. Show the wheels in a turned position, perhaps on a slight angle, with motion lines that suggest it’s rolling along a surface.
Challenge traditional color schemes by using an unconventional color palette. Experiment with pastels for a soft, inviting look, neon for a bold, eye-catching effect, or a monochromatic scheme with varying shades of the same color for a sophisticated feel.
Add realistic accessories like a luggage tag with a fictional name and address, a colorful handle wrap for easy identification, or a secure belt strap that wraps around the suitcase.
Situate the suitcase within a detailed environment to set the scene. Whether it’s a busy airport terminal, a quiet train carriage, or a bustling street outside a hotel.
Conclusion
And just like that, you’ve zipped up this suitcase drawing lesson with flying colors! You’ve created something awesome and stepped up your artistic skills.
Curious about what to sketch next? I have a whole bunch of drawing tutorials for you! Why not wear the artist’s crown with pride and learn to draw a royal crown next?
Or try to master drawing anime and manga with my lesson on how to draw an anime girl. You can find these lessons and more on my website.
Finally, be sure to follow me on social media to get the scoop on the latest tutorials. It’s like having a front-row seat in the coolest art class ever. So, give me a follow, and you’ll never miss out on the chance to draw something new and exciting.

