How to Draw a Tank Top
All right, young artists, grab your pencils and get ready to learn how to draw a tank top, a basic yet stylish piece of clothing.

How to Draw a Tank Top: Basic Information
This tutorial on how to draw a tank top serves as a basic introduction for anyone who want to learn the basics of sketching clothing. As a simple and fundamental garment, the tank top provides an excellent starting point for budding fashion illustrators.
The shape and structure of the tank top are essential elements. Focus on how the garment fits around the body, shaping the natural curves and lines. This step helps you understand how clothing conforms to the human form.
By observing and replicating these nuances, you will improve your ability to depict realistic clothing in your artwork, training your overall drawing skills.
The construction of a tank top includes various seams, such as side seams, armhole seams, and neckline seams. Accurately depicting these seams can add a some realism to your drawing.
By the end of this tutorial, I will demonstrate how to add unique touches to your tank top drawing, boosting its individuality. These tips and techniques will help you personalize your artwork, making it stand out and reflect your style.
Tank Top Drawing Tutorial
Materials
- Pencil
- Paper
- Eraser
- Coloring supplies
Time needed: 30 minutes
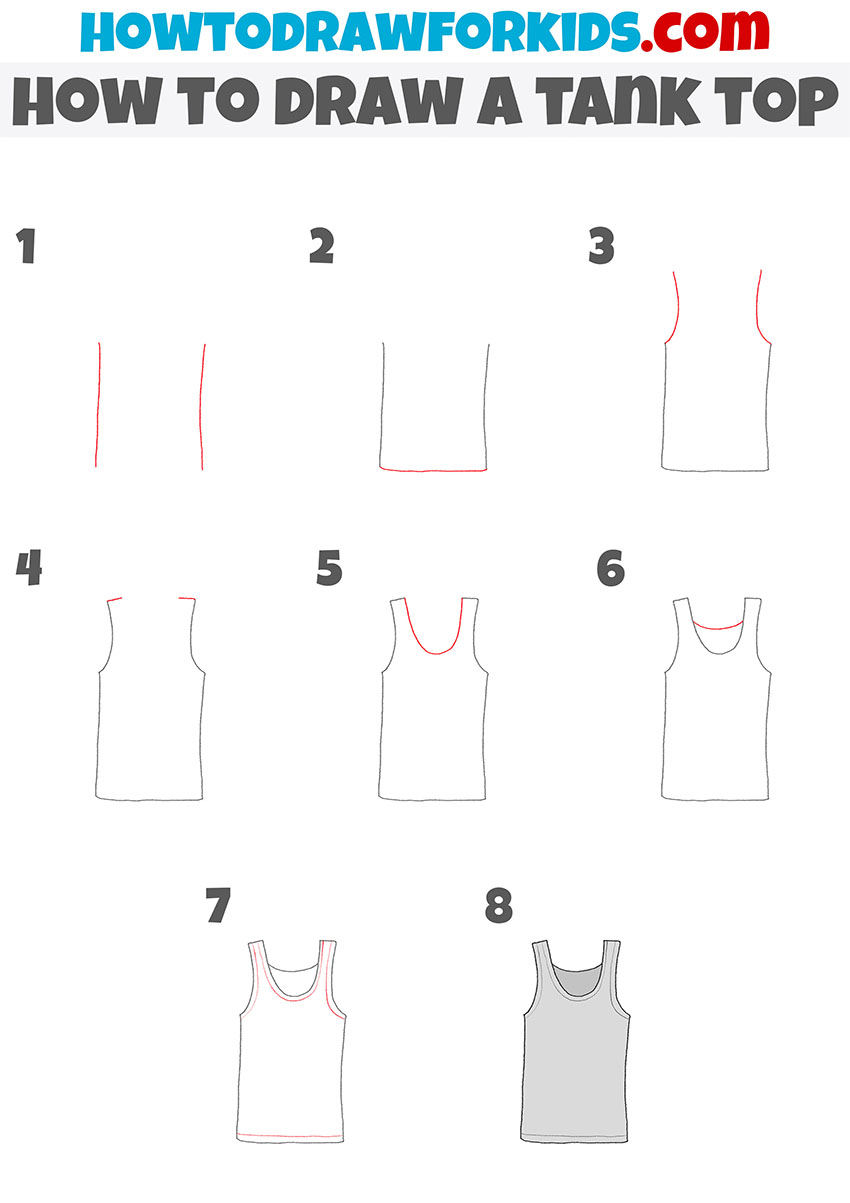
How to Draw a Tank Top
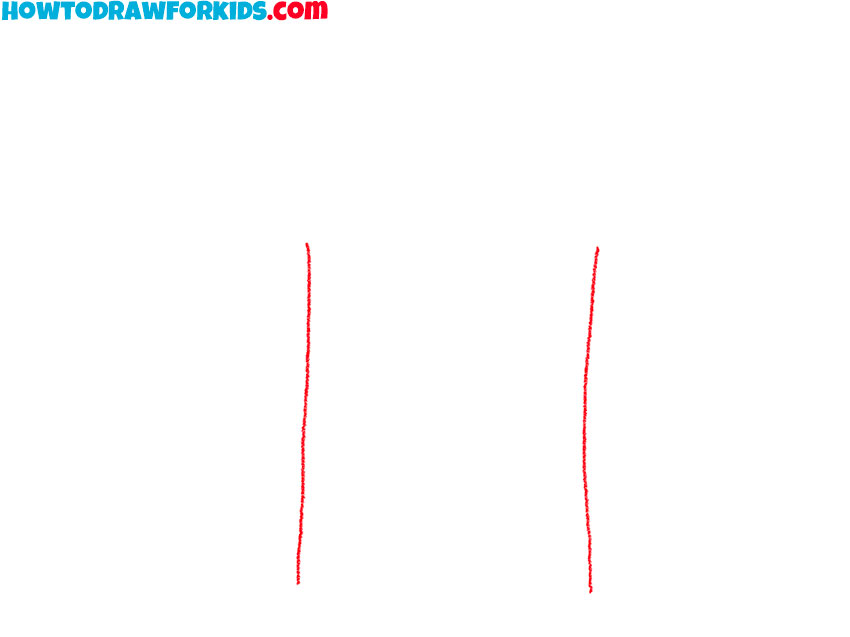
- Draw the sides of the tank top.
Start by drawing two vertical lines parallel to each other. These lines will form the sides of the tank top. It’s important to make sure the lines are slightly curved inward to represent the natural shape and fit of the garment. The length of these lines will determine the overall height of your tank top.
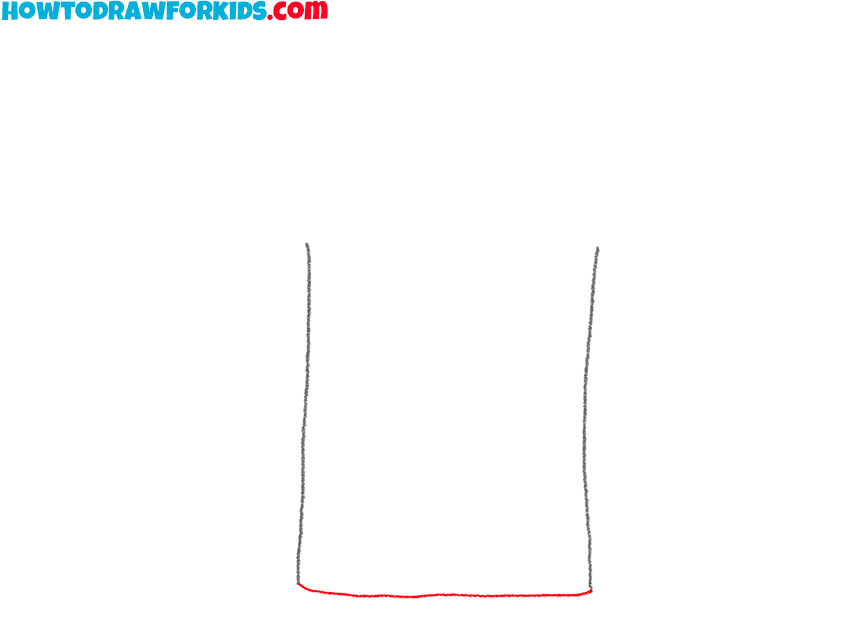
- Connect the bottom of the tank top.
To create the bottom edge of the tank top, connect the two vertical lines by drawing a horizontal line at the bottom. This line should be straight and even. Make sure the line is perpendicular to the vertical lines. This step helps create the basic rectangular shape of the tank top.
- Add the armholes.
Now, add curves to the top of the vertical lines to create the armholes. Start by drawing slightly curved lines that start from the top of each vertical line and curve inward and then outward. The curves should mimic the natural shape of a sleeveless top.
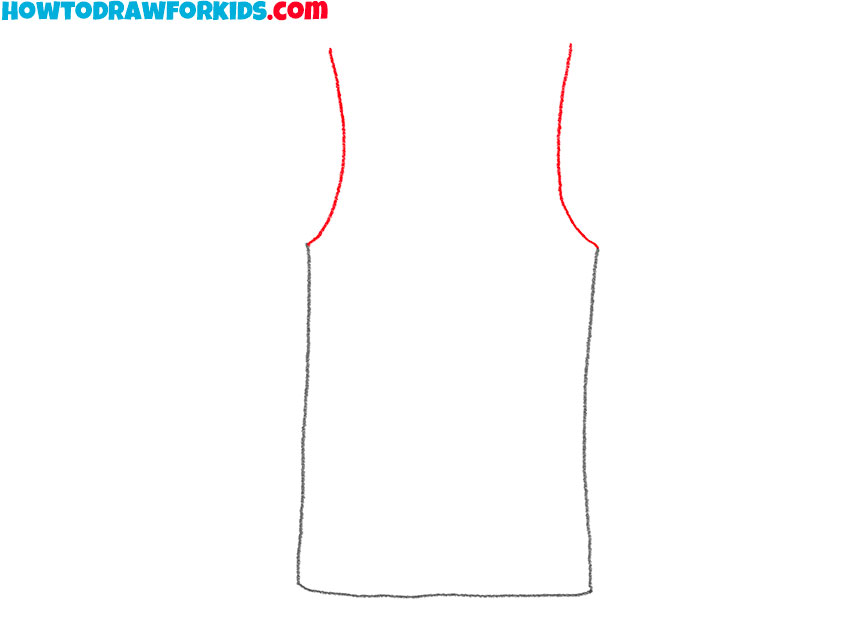
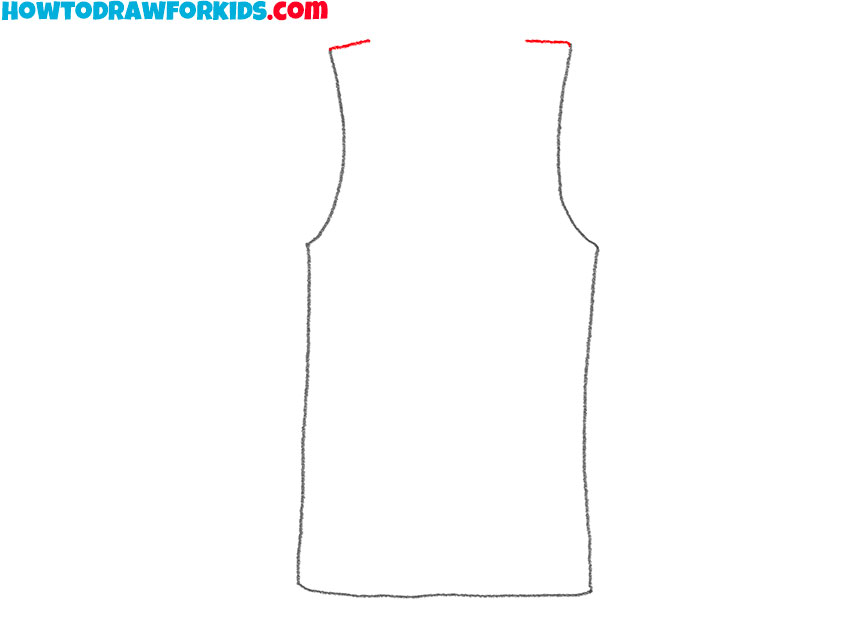
- Shape the shoulders.
Connect the top ends of the armhole curves with short, slightly curved horizontal lines to form the shoulders of the tank top. This step helps define the upper part of the tank top and sets up the placement for the neckline in the next step.
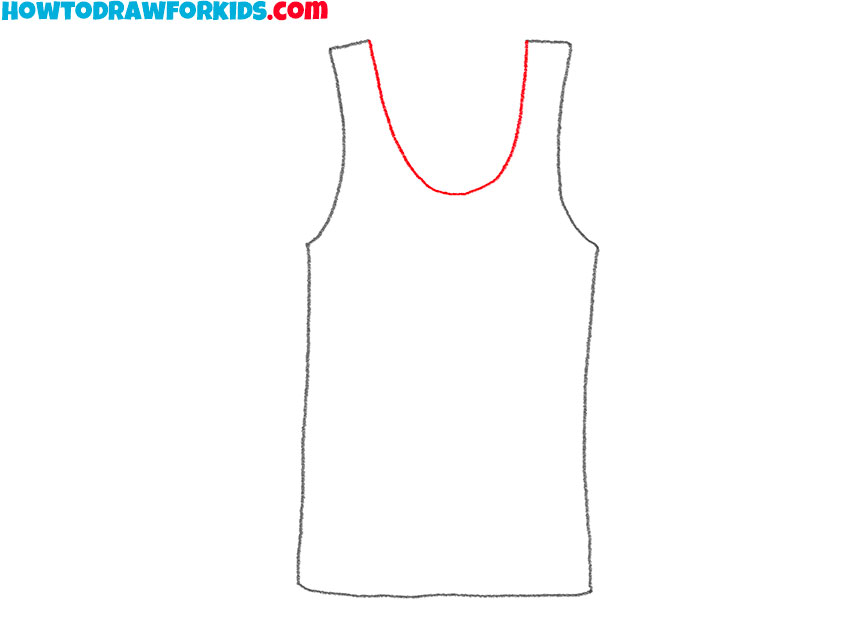
- Draw the neckline.
Start from the inner top edges of the armholes and draw a U-shaped curve connecting them. This neckline should be centered and symmetrical. The depth of the curve can vary depending on your preferred tank top style, whether it’s a deep scoop or a more modest curve.
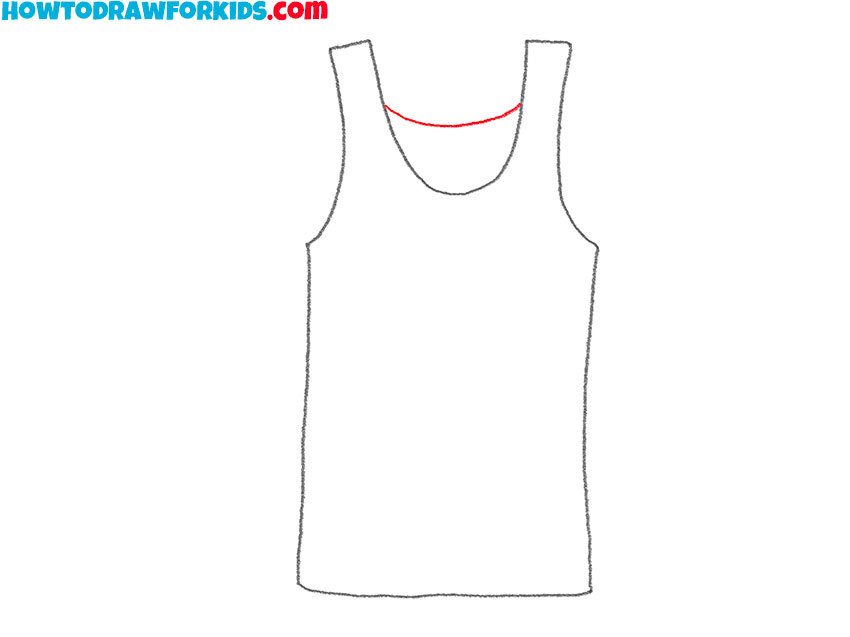
- Illustrate the back of the neckline.
To depict the back part of the neckline, add a second curved line above the initial neckline curve. This line should follow the same U-shape but be slightly smaller and sit just above the front neckline. This line can also have different shapes, from almost straight to strongly curved.
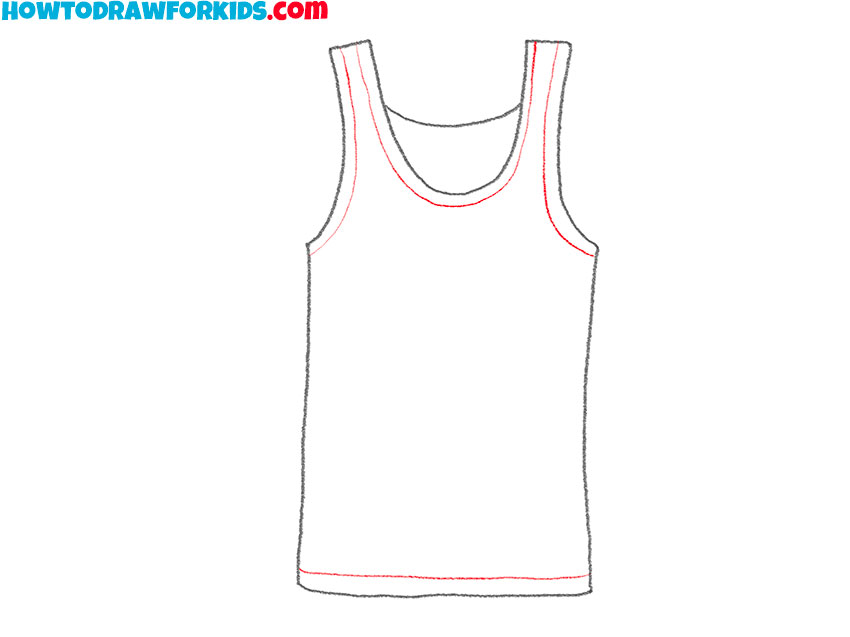
- Detail the tank top.
Add details to the bottom hem, neckline and armholes by drawing parallel lines. These lines must exactly repeat the indicated edges and be at an equal distance from them. This is the stitching or the tank top. You can add small dashed lines to simulate stitching, giving the drawing a more detailed and realistic look.
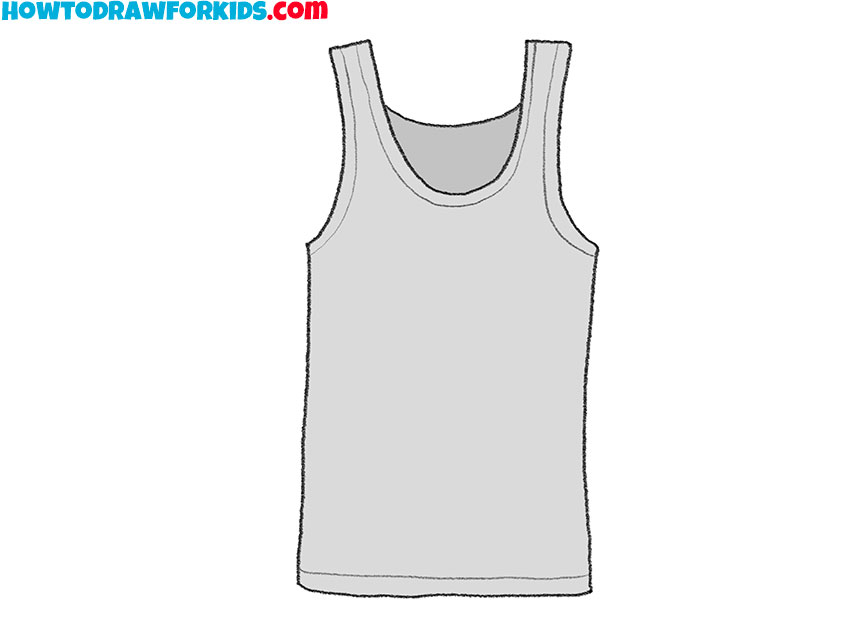
- Color the tank top.
Finally, add colors, shading and any additional details to your tank top. This could include creases, folds, or fabric texture to give the drawing a more realistic and three-dimensional appearance. You can use light and shadow to highlight the form and shape of the tank top, making it look more lifelike.
Additional Content
Below, you will find a PDF file that includes illustrations of the tutorial steps, a coloring page, a tracing worksheet, and a grid drawing worksheet. This PDF is designed to provide you with a convenient way to practice and train your drawing skills.
The step-by-step illustrations will guide you through the process, while the coloring page allows you to experiment with different color combinations. The tracing worksheet helps you build confidence in your lines, and the grid drawing worksheet is great for training your proportions and accuracy.
How to Draw a Tank Top: Create a Unique Design
Your tank top drawing is looking fabulous, but why stop there? Let’s add some extra fun and make it truly one-of-a-kind! Here are some creative ideas to make your tank top more unique and interesting:
- improve your tank top drawing by incorporating various patterns and prints. Consider stripes, polka dots, floral designs, or geometric shapes. Experiment with different colors and arrangements to create a visually interesting design. This practice will help you understand how patterns interact with the shape and movement of fabric.
- Use different color combinations to make your tank top stand out. You can go for bold, contrasting colors or soft, complementary shades. Experimenting with colors helps you learn about color theory and how different hues work together.
- Add embellishments such as buttons, lace, or sequins to give your tank top a unique and personalized look. These small details can significantly improve the overall appearance of the garment. Practicing this will train your ability to draw intricate elements and understand their placement on clothing.
- Try different neckline shapes and strap styles to see how they change the tank top’s look. From scoop necks to V-necks, and from thin spaghetti straps to wider straps, these modifications can create entirely new designs. This helps you understand how minor changes can impact the garment’s style and fit.
- Incorporate functional elements like pockets or decorative logos to make your tank top design more interesting. Adding these features teaches you about balance and placement in fashion design. Pockets and logos can serve as focal points, drawing attention.
- Adorn your tank top with beautiful floral designs such as roses, daisies, or your favorite flowers. These patterns can add a touch of elegance to your tank top. Experiment with different types of flowers and arrangements to create a unique and personalized look that reflects your style.
- Add a wild touch to your tank top with tiger or zebra stripes. These animal-inspired patterns can make your design bold and eye-catching. Play with the thickness and direction of the stripes to create a dynamic look that stands out.
Conclusion
Mastering the tank top design helps build a strong foundation for illustrating various types of clothing. The techniques you have learned here, such as creating smooth curves for armholes, detailing hems, and incorporating unique design elements, will serve you well in your drawing practice.
Keep experimenting with different designs and styles to make each tank top drawing unique. The skills you’ve gained here can be applied to a wide range of drawing projects, for example when you will draw a t-shirt. Continue to practice, and soon you’ll see significant improvements in your ability to create realistic and stylish clothing designs.