How to Draw a Waterfall
I’m here to unveil a simple path on how to draw a waterfall, capturing its dynamic beauty in your artwork. Tailored for novices, this guide promises an enjoyable process into sketching the peaceful allure of cascading water. With easy-to-follow lines, you’ll smoothly navigate through each stage of the drawing process.
How to Draw a Waterfall: Basic Information
I’m delighted to share with you an easy way to draw a waterfall. This lesson is designed with beginners in mind, allowing anyone to recreate the tranquil beauty of a waterfall. Breaking it down into simple shapes and lines, I’ll guide you through each step, making the process as comprehensible as the waters we’re about to depict.
We begin with the basic outline that will lay the groundwork for our waterfall. Notice how each segment is thoughtfully crafted to build upon the previous one, forming a rocky basin for the falling water. This lesson is focused on creating structure before we add the dynamic flow of the water, ensuring that the final drawing is balanced and vibrant.
By the end of this lesson, you’ll be able to draw a waterfall with a sense of motion that breathes life into the scene. We’ll add the final touches that replicate the swift water and the calm pool below. So, let’s grab our pencils and let the creative current lead us to a beautifully drawn waterfall.
Waterfall Drawing Tutorial
Materials
- Pencil
- Paper
- Eraser
- Coloring supplies
Time needed: 30 minutes
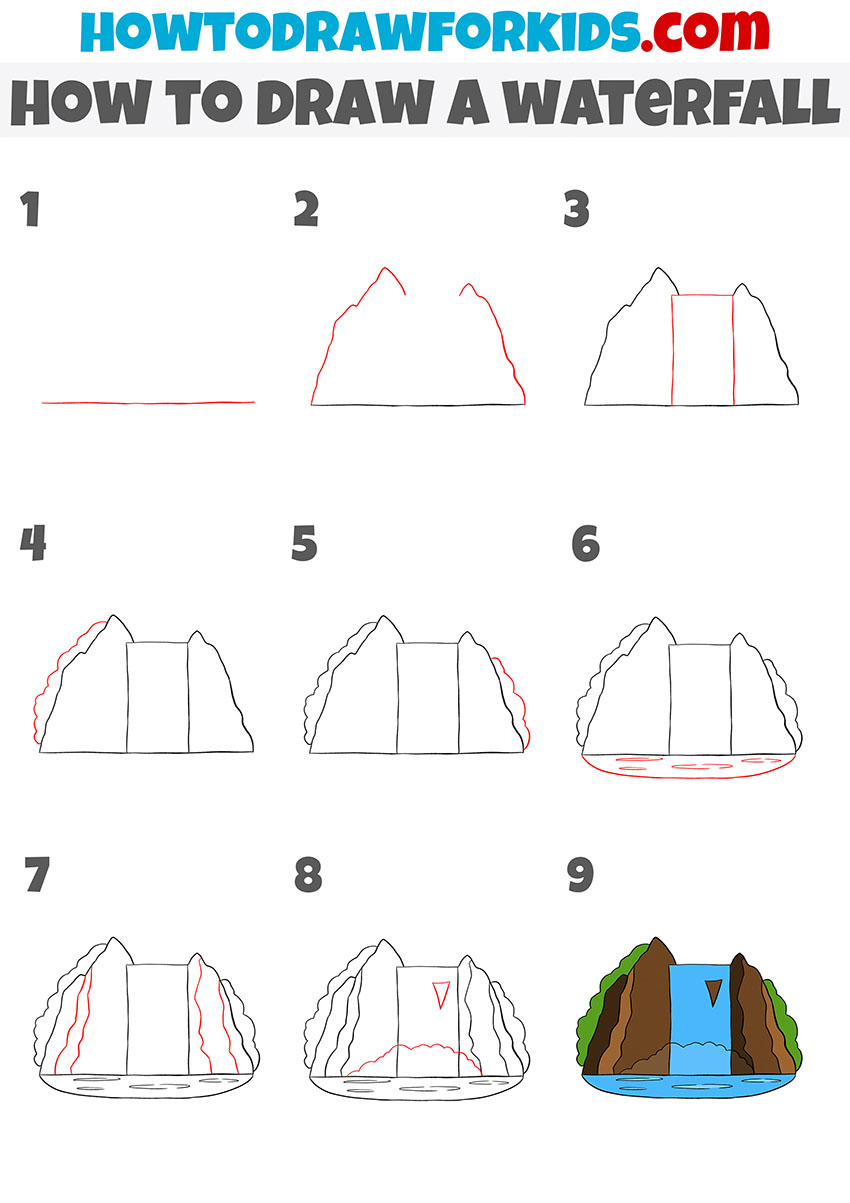
How to Draw a Waterfall
- Draw the surface of the water.
To complete this simple step, you need to draw one straight, horizontal line.

- Add the outlines of the rocks.
From the two ends of the drawn straight line, draw two curved lines of different lengths.

- Depict the outline of the waterfall.
Now you need to draw the water pouring from top to bottom using three straight lines.

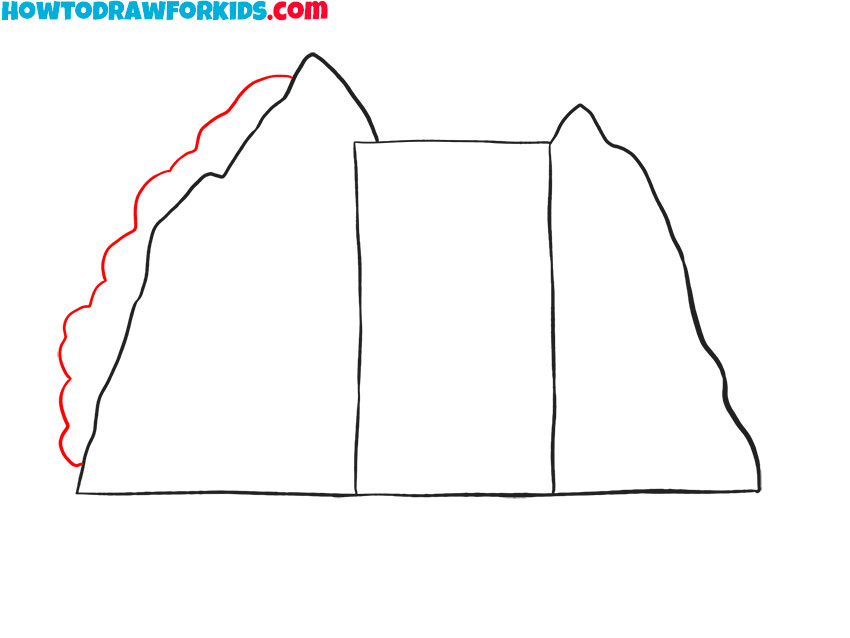
- Sketch out the plants on the rock.
To draw the plants on top of one rock, draw a curved line.
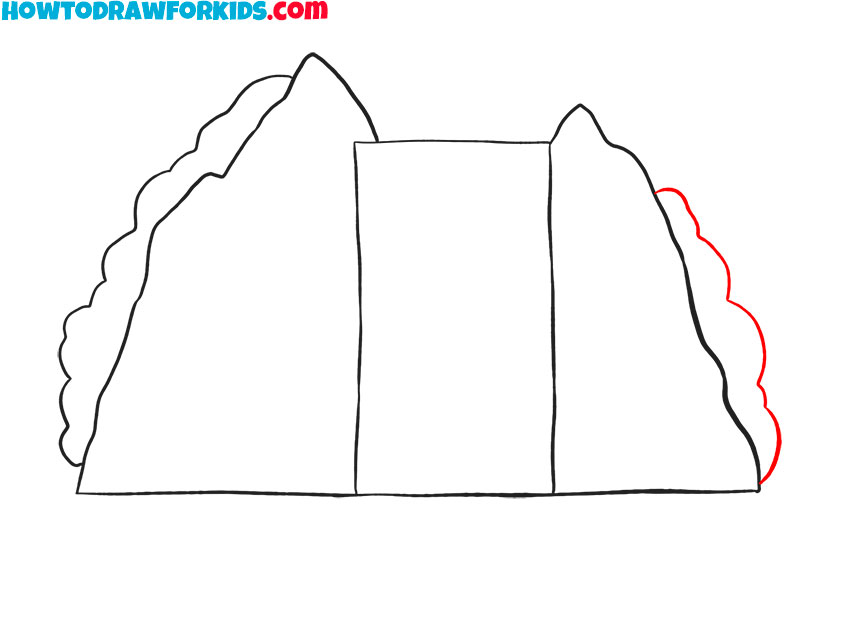
- Add the rest of the plants.
Now add the plants on the rock on the right, also using a curved line.
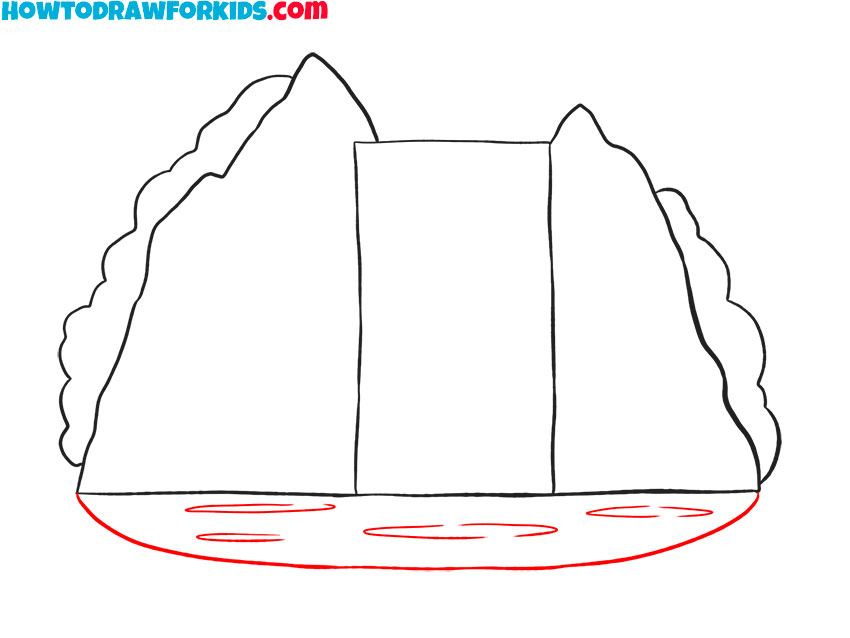
- Draw the water.
Add one arc, as well as several curved lines to depict incomplete ovals.
- Sketch out the rock relief.
Depict two curved lines on the right and left sides of the waterfall.
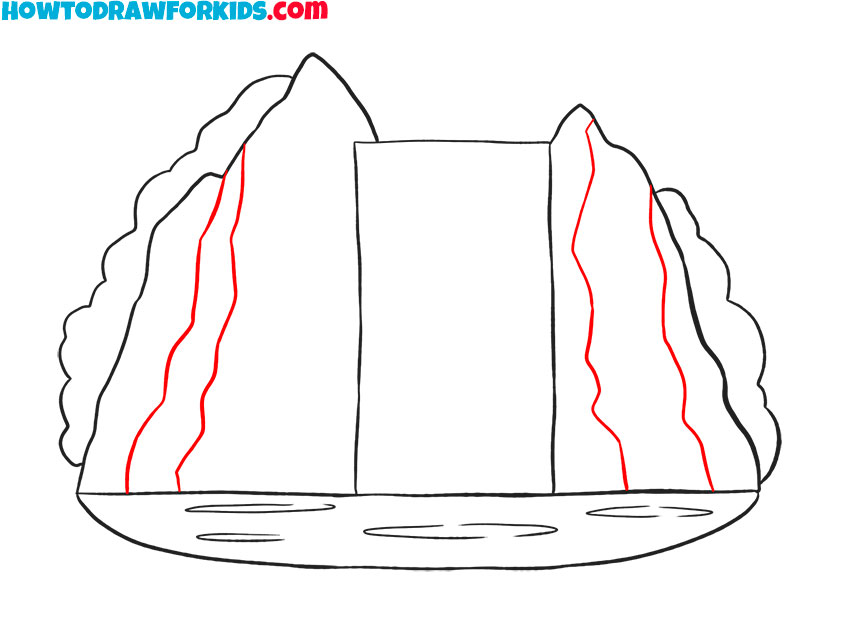
- Add details.
Draw a triangle and a long, curved line to add the rest of the rock relief.

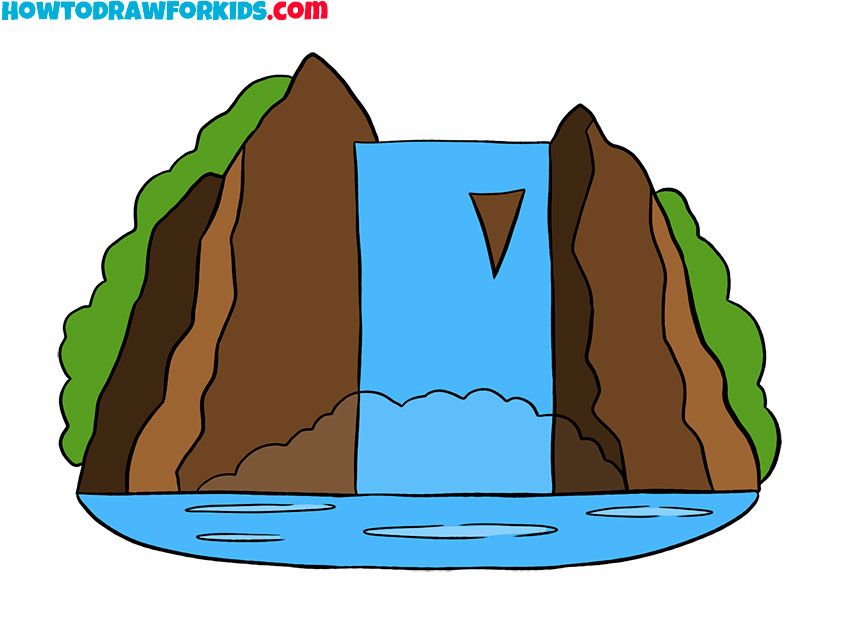
- Color the drawing.
To color the waterfall, you should use green, shades of blue, and shades of brown.
Additional Content
For artists looking to deepen their craft, I’ve compiled a comprehensive PDF file as a supplement to our waterfall drawing lesson. This compact version is equipped with a wealth of additional material aimed at enhancing your drawing skills, available for download to support your progress even when offline.
Inside the PDF, expect to find exercises that push your abilities further, designed to solidify the skills you’ve started to develop. It’s an assortment of advanced tips and extended practices that will challenge you, encourage precision, and help to perfect the flow and detail in your waterfall drawings.
As you move beyond the basics, this PDF becomes an invaluable tool, guiding you through nuanced aspects of drawing that the initial lesson may not cover. It’s structured to foster growth, designed to propel you from practicing basic forms to capturing the very essence of flowing water in your artwork.
Alternative Drawing Technique
In addition to the primary lesson, I’ve developed another technique for drawing waterfall, designed to help you practice more and enhance your artistic abilities. This alternative method simplifies the process by focusing on fundamental shapes and lines, allowing you to quickly capture the essence of a waterfall without intricate details.
This new approach deconstructs the waterfall into even simpler elements, providing a step-by-step guide that’s easier to follow. It’s ideal for sharpening your skills, enabling quick repetition and the reinforcement of essential drawing principles in a more straightforward manner.
It’s intended to complement your learning, offering a different perspective on the subject that reinforces your understanding and application of drawing techniques. With consistent practice, you’ll find these methods becoming instinctive, enhancing not just your waterfalls, but all facets of your artistic expression.
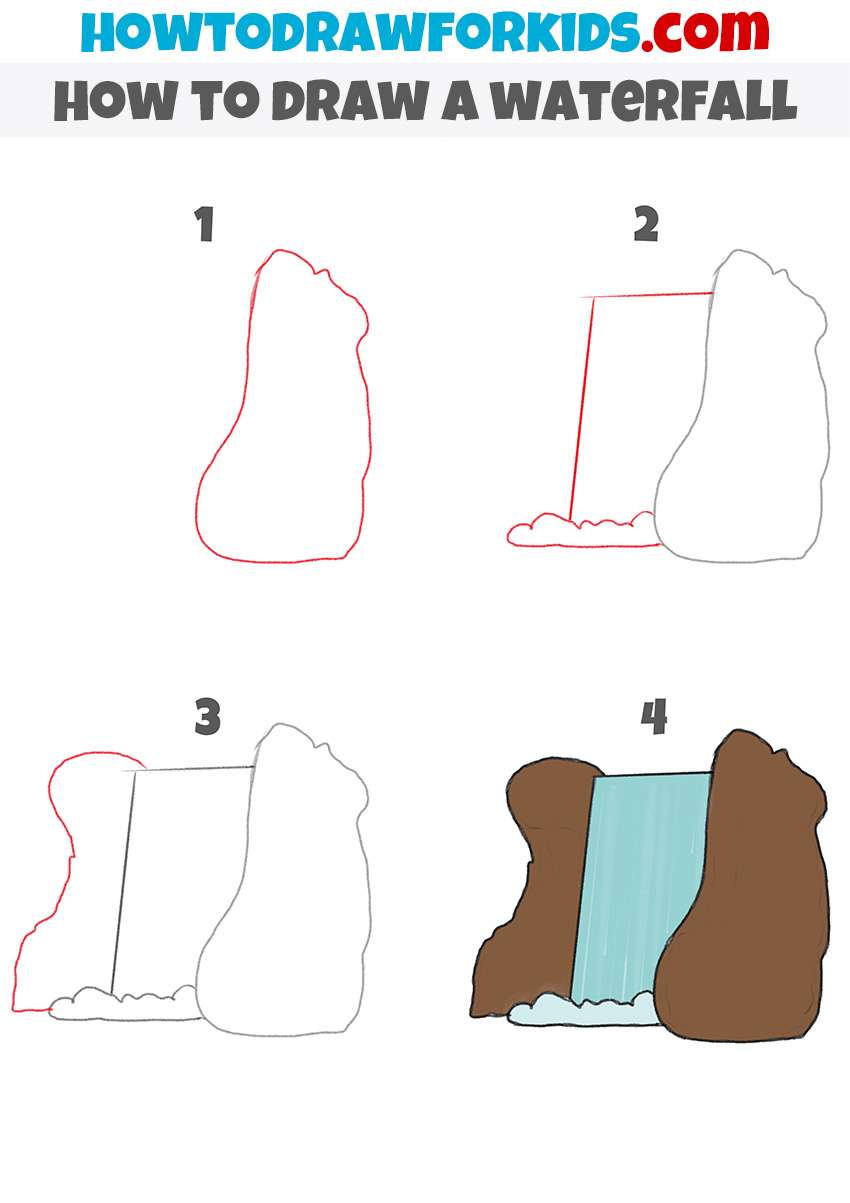
How to Draw a Waterfall for Kindergarten
This streamlined, four-step approach to drawing waterfall is perfect for young learners in kindergarten. First, we sketch out an irregular shape for the cliff, like a lumpy bean – it’s playful and sets the boundaries for our waterfall. This is where the water will magically tumble down, so we make it nice and wide.
Next, we draw a straight line from the top of our cliff to the base, dividing our bean shape. This line represents the water’s drop, providing a guide for the flow. Then, we outline the top and bottom of the waterfall, giving shape to where the water starts and where it splashes down.
Finally, we color our waterfall, filling in the rock with earthy tones and the water with shades of blue. The contrast between the two brings our drawing to life, emphasizing the rush of the water. With just a few simple steps, even the youngest artists can create a picturesque scene.
Drawing Dynamic Waterfalls: Techniques for Depth and Movement
With our waterfall drawing complete, let’s reflect on ways to elevate your skill set. Here are detailed tips to refine your technique and enhance the overall quality of your drawings:
- Line Variation: Use different line weights to create depth; lighter lines for distant features and bolder lines for closer details.
- Observation Skills: Study real waterfalls or photos to understand how water flows and splashes, then try to replicate that fluidity in your drawings.
- Color Blending: Practice blending colors to create a more realistic water effect, gradually transitioning from white to shades of blue and green.
- Rock Textures: Experiment with various pencil strokes to mimic the rough textures of rocks, giving your scene a more rugged and natural look.
- Reflection and Refraction: Learn how water reflects and bends light to add realism to the pool at the base of your waterfall.
- Movement and Energy: Convey the motion of falling water by varying the direction and curvature of your lines.
- Layering: Build up layers of color and shading to create volume in the water and rocks, making them appear three-dimensional.
Dedication and attention to these refinements will transform a simple drawing into a piece that truly resonates with viewers. Your waterfall drawings will improve and come to life, filled with motion and natural beauty.
Nature’s Canvas: Waterfall Scenes for Every Artist
When it comes to showcasing waterfalls in your drawings, the setting is just as important as the cascade itself. Here are several scene ideas that could serve as a backdrop for your waterfall, enriching the story you want to tell through your art:
- Tropical Paradise: A hidden waterfall in a lush, green jungle, complete with exotic plants and wildlife.
- Autumn Forest: A scenic waterfall surrounded by trees with leaves in vibrant shades of red, orange, and yellow.
- Sunset Vista: A waterfall silhouetted against a sky painted with the warm hues of a setting sun.
- Spring Meadow: A gentle waterfall flowing into a river that meanders through a field of wildflowers.
- Cave Entrance: The mouth of a cave partially concealed by a waterfall, sparking curiosity about its hidden depths.
- Seaside Cliff: A dramatic scene where a waterfall plunges directly into the ocean, with waves crashing around it.
- Nighttime Oasis: A waterfall bathed in moonlight, its waters shimmering under a starry sky.
In drawing any of these scenes, you have the chance to experiment with a range of elements that can accentuate the beauty of your waterfall. The surrounding environment can change the mood of the piece, add complexity, and challenge you to integrate various natural features.
Conclusion
Having completed our waterfall drawing lesson, I hope you’re ready to explore more artistic endeavors. On my website, you’ll find an array of lessons on varied subjects, from capturing the dynamic bounce of a soccer ball to the playful mischief in a monkey‘s gaze.
I encourage you to connect with me on social media for all the freshest content and creative tips. Your comments and wishes for future lessons are invaluable; they help in sculpting our learning path. Let’s keep creating art that resonates and shares a story, piece by piece, drawing by drawing.