How to Draw Zenitsu
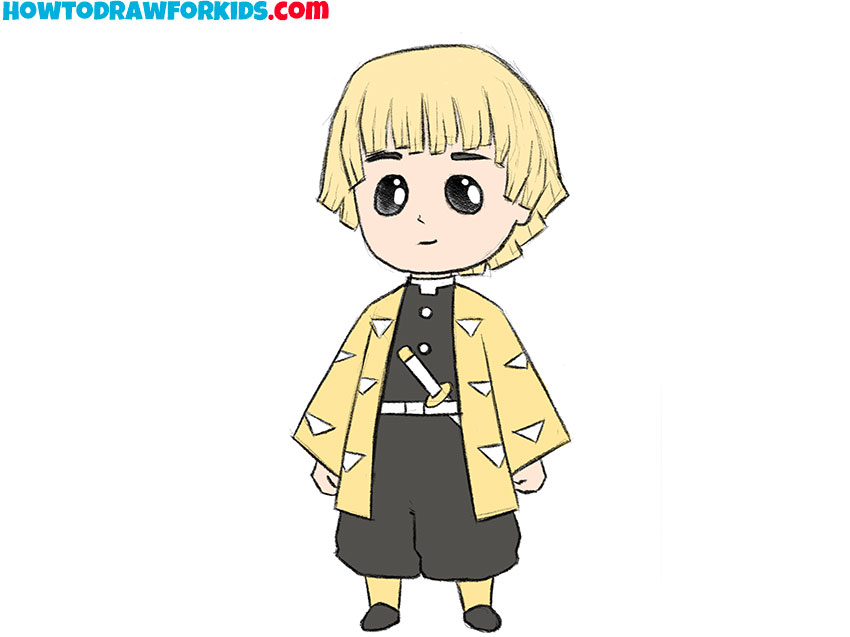
I created this tutorial on how to draw Zenitsu Agatsuma from the anime Demon Slayer, especially for anime and manga fans.
How to Draw Zenitsu: Basic Information
This Zenitsu drawing tutorial will be particularly interesting and useful for anime and manga lovers, as I’ll be demonstrating the fundamental techniques that anime and manga artists use in their creations.
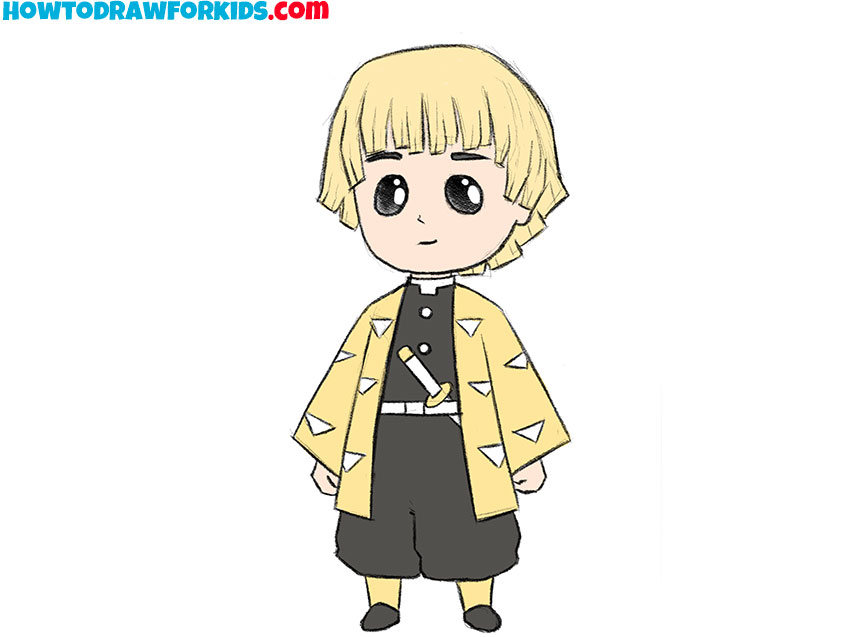
In this tutorial, I aimed to illustrate the essential features of Zenitsu – his large eyes, the distinctive thunder-like pattern on his kimono, and his signature hair. Each detail is simplified to its core, ensuring the character remains recognizable even in a minimalistic chibi style.
Alongside the main lesson, this page also includes an additional tutorial on drawing Zenitsu, advanced tips for illustrating this character, and answers to questions related to the lesson.
Zenitsu Drawing Tutorial
Materials
- Pencil
- Paper
- Eraser
- Coloring supplies
Time needed: 50 minutes
How to Draw Zenitsu
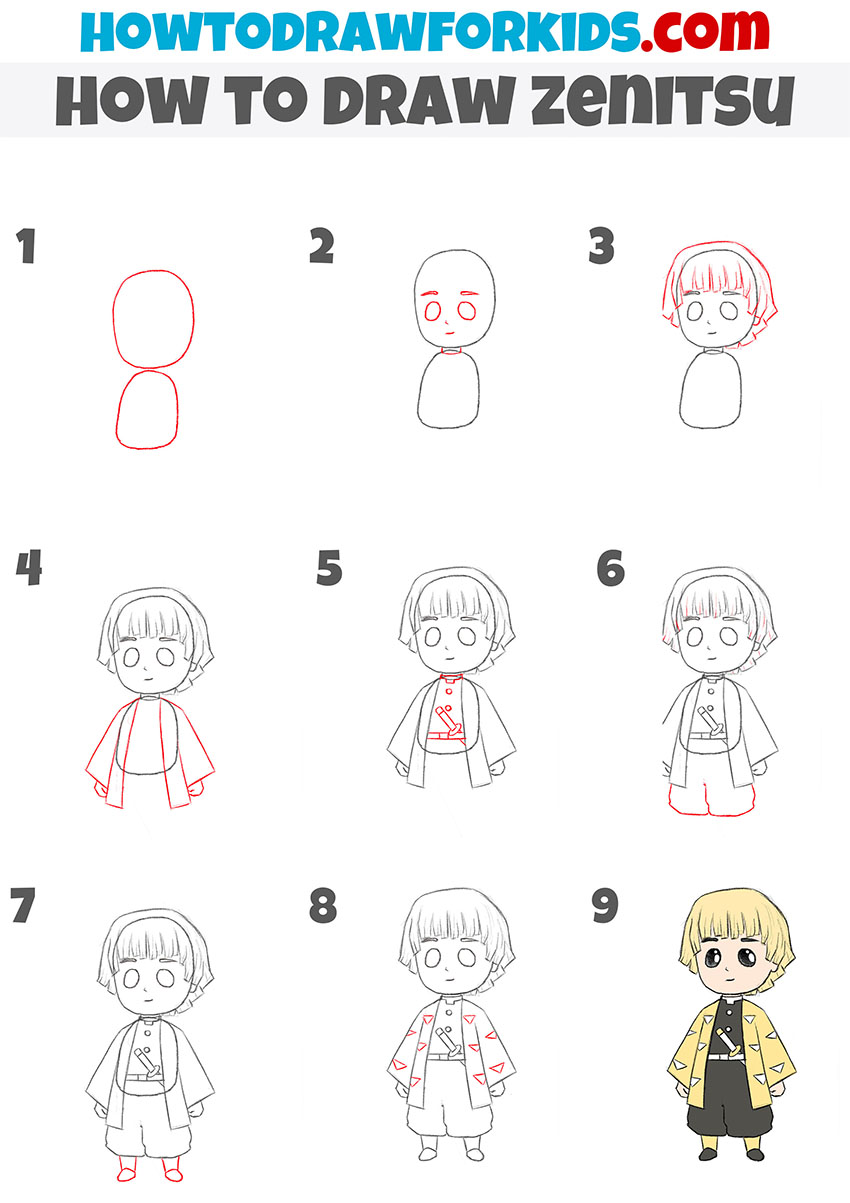
- Draw the basic body shapes of Zenitsu.
Start by sketching the basic shapes that will form Zenitsu’s body. Draw an oval for the head and a smaller oval for the torso, placing it slightly below the head. These shapes serve as the foundation for the character’s proportions.

- Add the facial features and neck.
Draw two large, oval shapes for the eyes. You can add smaller circles to represent the pupils, and include a tiny dot within each pupil to indicate light reflection. Below the eyes, sketch a small curved line for the mouth. Lastly, add two small, curved lines above the eyes to represent Zenitsu’s eyebrows.

- Draw Zenitsu’s hair outline.
Begin by sketching the bangs that fall over his forehead, using curved lines to create the distinctive, layered look. Extend the lines on both sides of the head to form the sides of the hair, making sure they slightly curve outwards. Complete the hair by drawing the back, following the curve of the head.

- Sketch the basic outline of the Kimono.
Begin by sketching two wide, flaring sleeves that extend from the shoulders of Zenitsu. These sleeves should be slightly wider at the bottom, with a gentle curve to represent the fabric’s flow. Draw the hands and simple shapes. Connect the sleeves to the torso with a simple line and illustrate the front of the kimono.

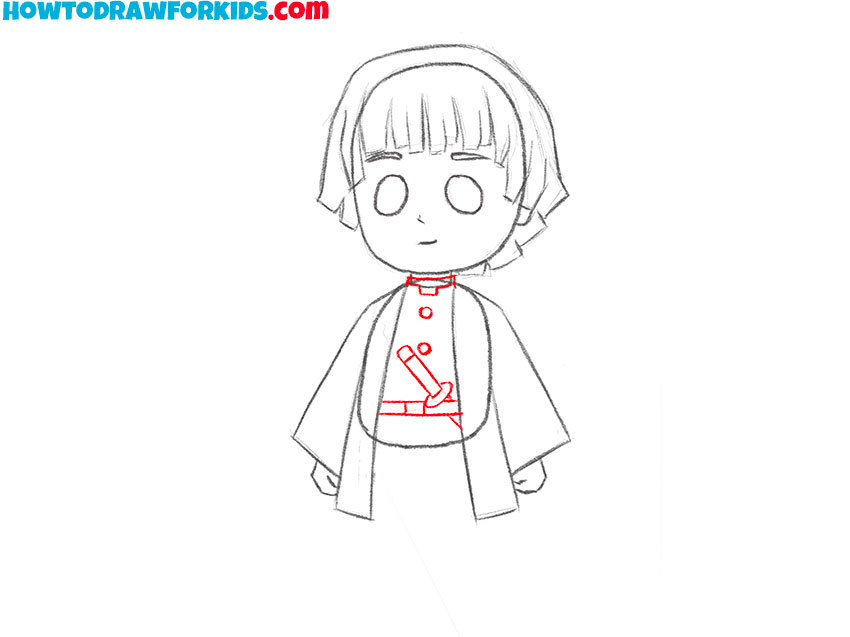
- Detail the clothes and add the katana.
Draw a rectangular shape near the neck to represent the collar, making sure it overlaps slightly with the torso. Add a few simple lines within the kimono to indicate the folds and layers of the fabric. At this stage, you can also begin sketching the sword handle peeking out from the left side of the torso.
- Draw Zenitsu’s pants.
Sketch two slightly baggy pants that start just below the kimono, using curved lines to indicate the folds in the fabric. The pants should taper slightly towards the bottom, where they meet the ankles. You can make the pants of Zenitsu more realistic adding some folds.

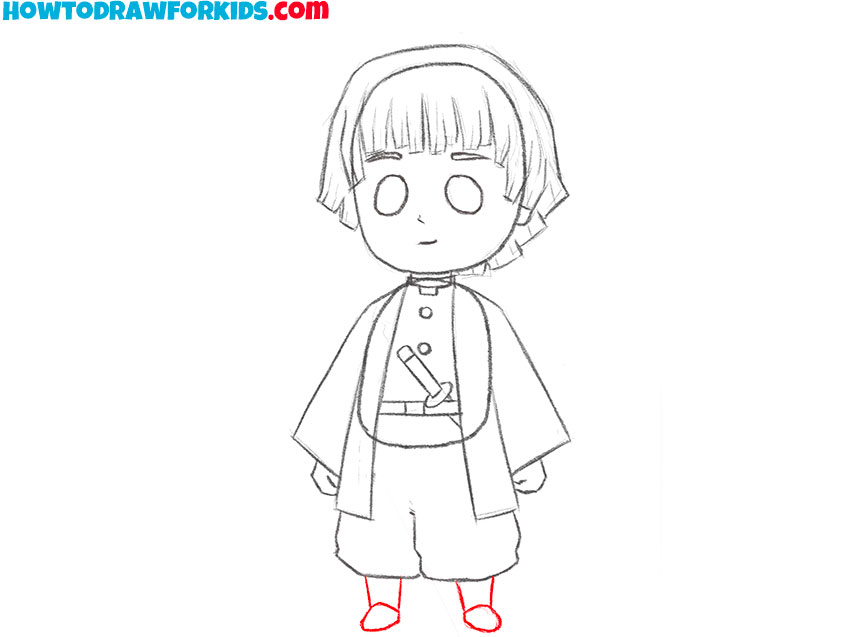
- Illustrate the legs of the anime character.
In this step, focus on drawing Zenitsu’s feet to complete the lower portion of the character. Start by sketching the outlines of his shoes at the bottom of the pants. The shoes should be small and slightly rounded at the toes, with a subtle curve that suggests the shape of traditional Japanese footwear.
- Erase the guidelines and add the pattern to the kimono.
Now, focus on adding the final details to Zenitsu’s kimono. Draw the triangular patterns that adorn the kimono, placing them evenly across the fabric. Add a few more lines to illustrate the folds and creases in the kimono and pants, improving the overall look of the outfit.

- Color Zenitsu Agatsuma.
Start by coloring the hair a bright yellow, which is one of Zenitsu’s most distinctive features. Use a pale skin tone for the face and hands, and black for the eyes. The kimono should be colored in shades of yellow and orange, with the triangular patterns in a contrasting shade. The pants and shoes are typically dark.
Additional Content
In those moments away from the screen, it might be helpful to continue practicing. I’ve created a companion PDF for this lesson that you can use offline. It’s a simple and cool summary of the lesson, created to assist you wherever you are.
This PDF is a set of exercises aimed at helping you improve your anime, manga and chibi drawing skills. Without detailed instructions, it allows you to practice and refine what you’ve learned. Simply download it and use it to build on the basics, training your skills with each attempt.
How to Draw Zenitsu: Alternative Technique
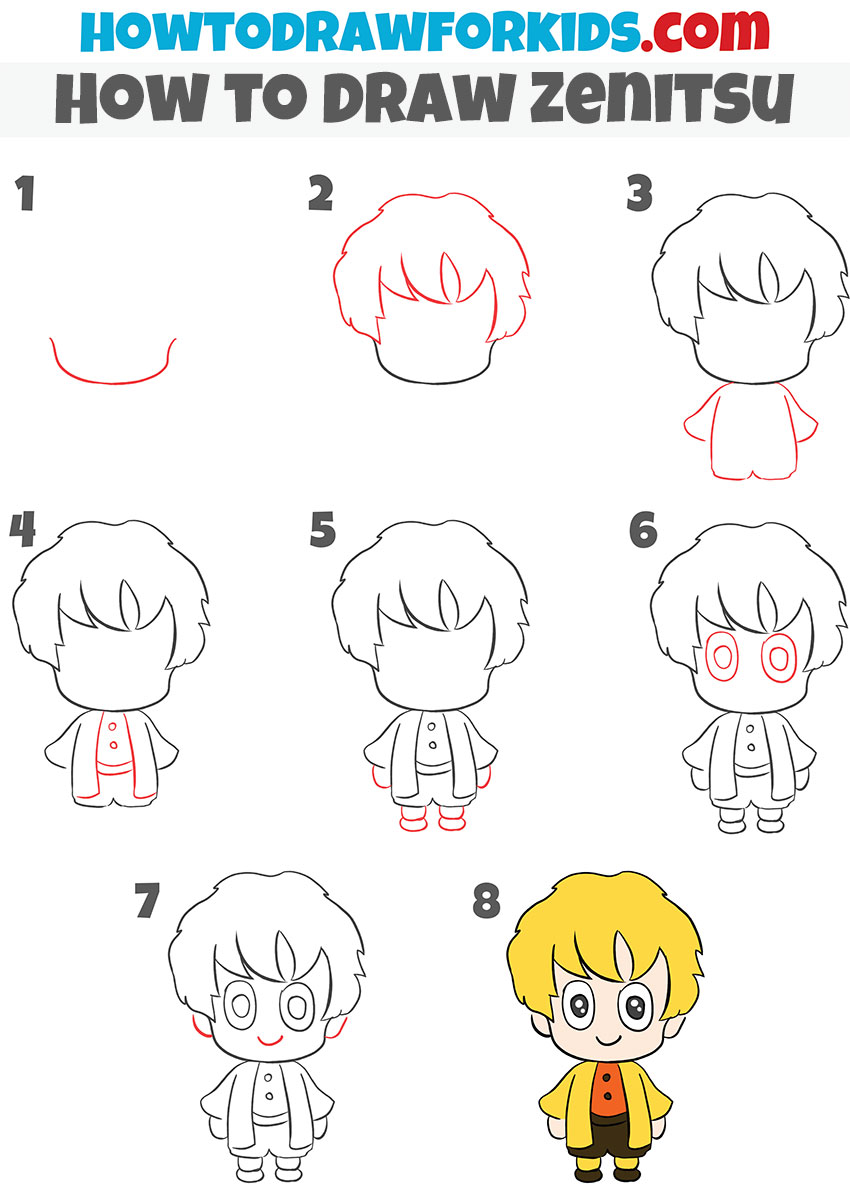
This additional tutorial offers a simpler and more stylized approach to drawing Zenitsu compared to the main tutorial. While the main tutorial focuses on illustrating a bit more detailed elements of Zenitsu, such as his intricate haori pattern and more realistic proportions, this version emphasizes a more rounded, cartoon-like Chibi style with less complexity. The steps are more simple, making it ideal for beginners or those who prefer a quicker, less detailed version of Zenitsu.
Start by drawing a curved line to form the lower part of Zenitsu’s face, establishing the basic outline. Then, move on to drawing his hair by creating a large, rounded shape that frames the face, adding sharp points for the bangs that cover his forehead. Continue by sketching his simple, wide-sleeved shirt and pants, giving his body a compact, chubby appearance typical of Chibi characters.
Next, refine the outfit by adding a few basic details, such as buttons on his shirt and the outline of his pants. Draw small, rounded feet beneath the pants. Once the body is complete, focus on the face. Draw large, circular eyes with smaller circles inside them to represent the pupils. Add a simple, wide smile below the eyes, and small curved lines for the ears on either side of his head.
Finally, add color to the drawing. Fill in Zenitsu’s hair with a bright yellow, and use orange for his shirt and brown for his pants and shoes. Keep the colors bold and flat to maintain the simplified, cartoonish style.
How to Draw Zenitsu: Advanced Tips and Tricks
As we finish our Chibi Zenitsu drawing, the process doesn’t have to stop at this point. I’ve compiled some tips and tricks to help improve your drawing skills further. These practical suggestions are meant to boost your abilities.
- Start with a light sketch: Begin with faint lines to outline the basic shape, allowing for easy adjustments as you go.
- Focus on the eyes: In Chibi art, eyes are really important for expressing emotion. Take your time to get them right.
- Be patient with patterns: Zenitsu’s haori pattern involves triangles. Approach it carefully, drawing each shape step by step.
- Use shadows wisely: Shadows add volume and realism, even in Chibi art. Apply them sparingly to give your character volume.
- Utilize the eraser: The eraser isn’t just for corrections. Use it to soften lines, blend shadows, and create highlights as needed.
Conjuring Answers to Your Zenitsu Sketching Spells
After our Zenitsu drawing session, you may have some questions, which is perfectly normal. To assist you, I’ve compiled a list of the most frequently asked questions to help address any uncertainties you might have.
Zenitsu’s hairstyle is characterized by its straight bangs and distinct layers. Start by drawing the basic shape of the hair, focusing on the bangs first. Then, add the side and back layers, making sure to keep the lines smooth and slightly curved to represent the hair’s softness.
If Zenitsu’s drawing doesn’t turn out as expected, take a step back and assess which areas need improvement. It could be proportions, facial features, or the overall composition. Redraw those areas with light sketches, or try starting over with a different approach to refine your technique.
To draw Zenitsu’s lightning abilities in Chibi style, use simple, jagged lines around his figure to represent lightning bolts. These lines can be added in the background or around his body to illustrate his power, keeping them minimal to maintain the simplicity of the style.
Common mistakes include misproportioning his features, overcomplicating the details, and losing the Chibi style’s simplicity of you draw Zenitsu in chibi style. Avoid making his head too small or his body too large. Keep details like his hair and haori pattern simple and focused, ensuring the drawing remains cute and proportionate.
As you go through these FAQs, use them as guidance in your drawing practice. Each question you answer adds to your growing skills.
Conclusion
With Zenitsu now complete on the page, there’s more to learn in drawing. My digital library offers a variety of lessons, from drawing anime and manga to illustrating the details of clothing folds. These tutorials are opportunities to boost your skills.
To stay updated with new content, follow me on social media. I also encourage you to share your ideas and requests for future lessons in the comments below. Let’s continue to draw, learn, and grow together as artists.

this aint zenitsu