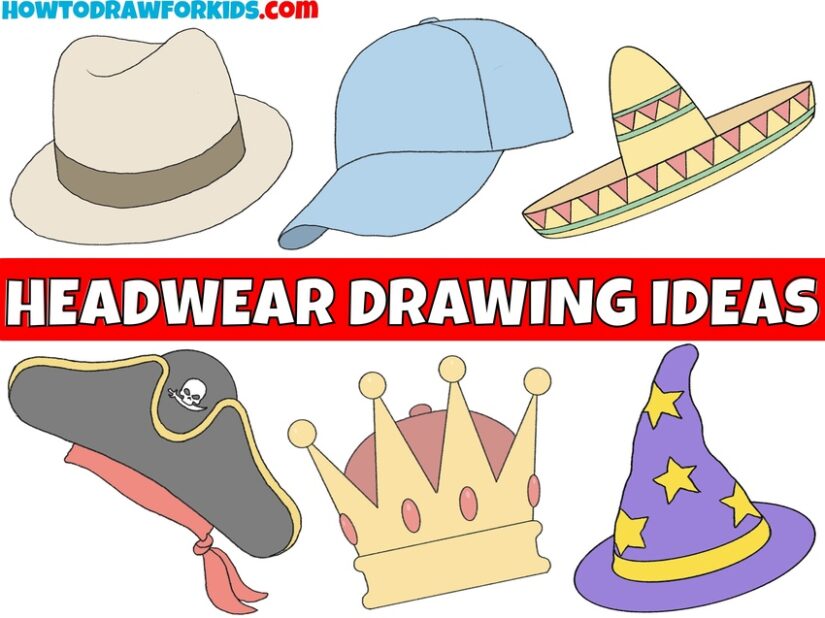
Headwear Drawing Ideas
I present to you a collection of headwear drawing ideas that includes many different hats, caps, helmets, and other similar objects.
Headwear Drawing Ideas: Introduction
Headwear appeared around the same time people realized they needed clothing to protect themselves from the environment and to look presentable.
Over thousands of years, headwear has had many different functions and appearances. Some types were created mainly for practical protection from weather conditions, such as rain or strong sunlight.
Others had a more ceremonial or symbolic purpose, including tiaras, crowns, and wreaths. There were also types designed for protection, such as helmets.
In this collection of headwear drawing lessons, I decided to bring together all the types I personally use in my offline drawing lessons and introduce them here as well.
Collection of Headwear Drawing Ideas
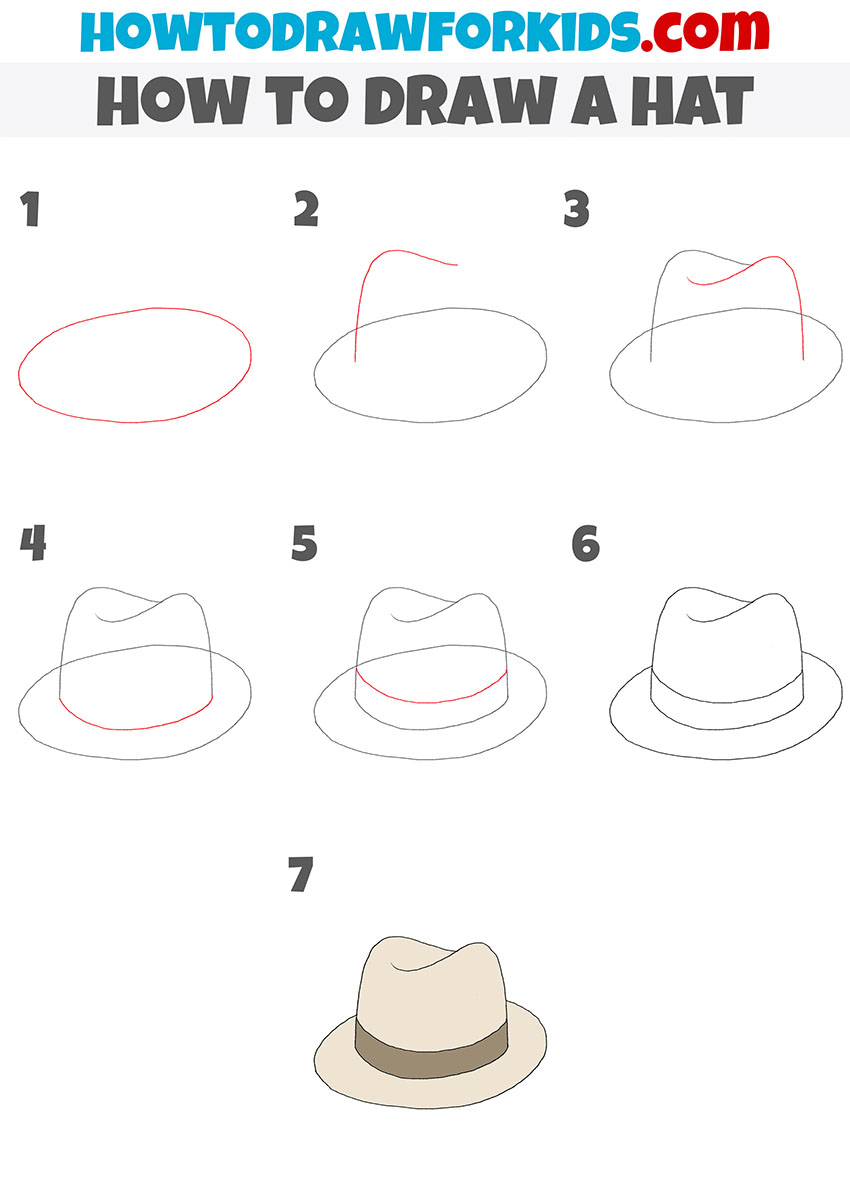
Hat
Let’s begin this collection of headwear drawing ideas with the most basic option – a simple hat.
This example shows a clean shape with a rounded crown and neat brim, drawn in a very simplified style.
To draw this type of hat, start by outlining the top part as an elongated oval, then add the brim using smooth, even lines. After that, slightly refine the contours and fill the drawing with a simple, solid color.
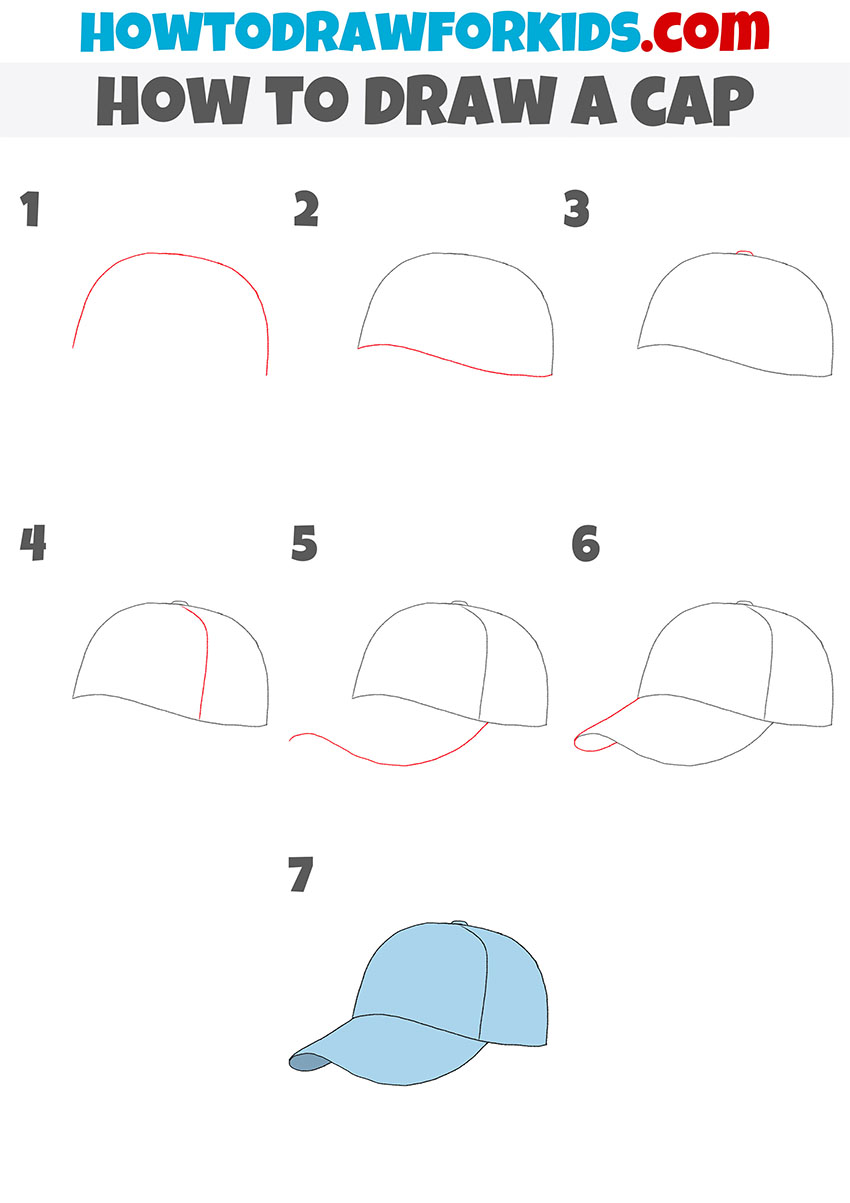
Cap
The next drawing lesson demonstrates a cap, one of the most common types of headwear. In this example, the cap is shown with a simple crown and a classic visor.
Begin by sketching the overall shape of the crown, then add the visor extending forward. Once the main form is set, adjust the lines if needed and color the cap in any suitable shade.
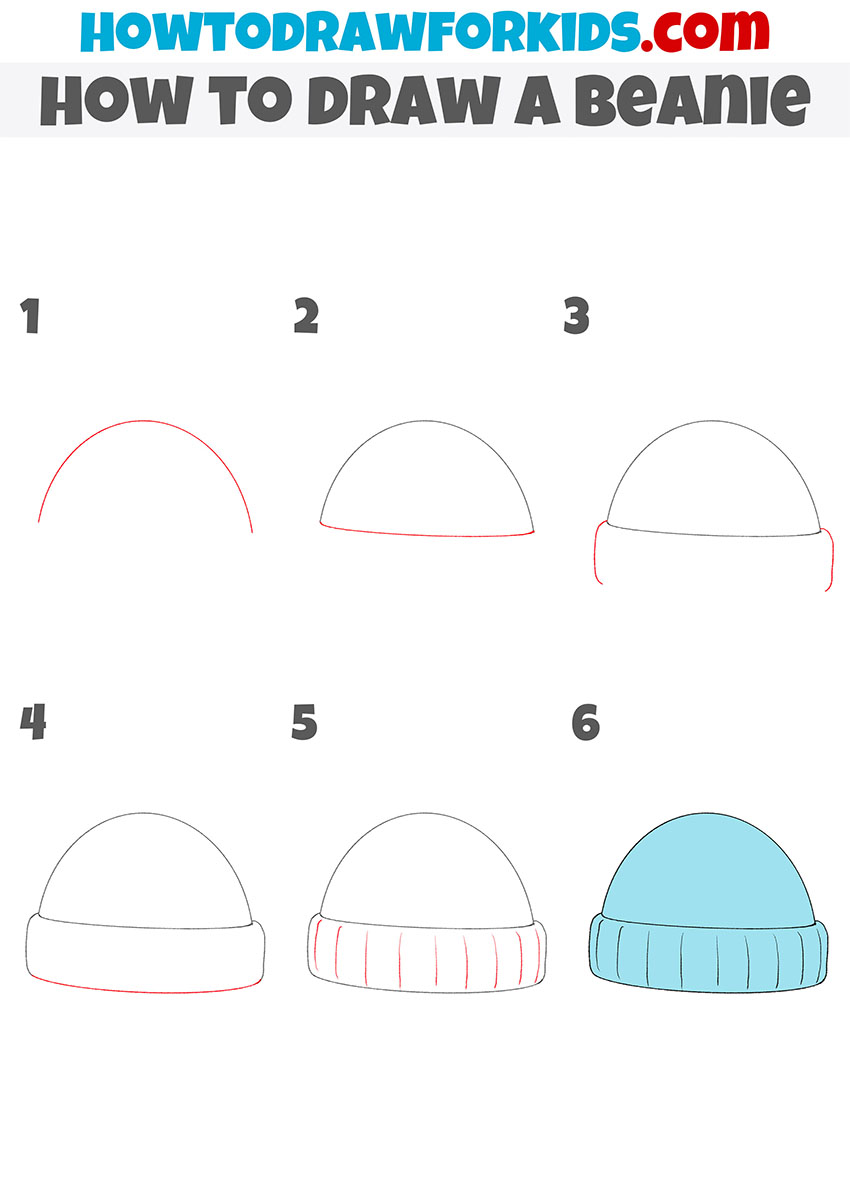
Beanie
Now let’s move on to a simpler option – a beanie. This type of headwear is useful for practice because it is built almost entirely from smooth, rounded lines.
First, outline the general shape of the beanie, then add the lower edge. You can include a very light texture or leave the surface smooth and finish the drawing with basic coloring.
Sombrero
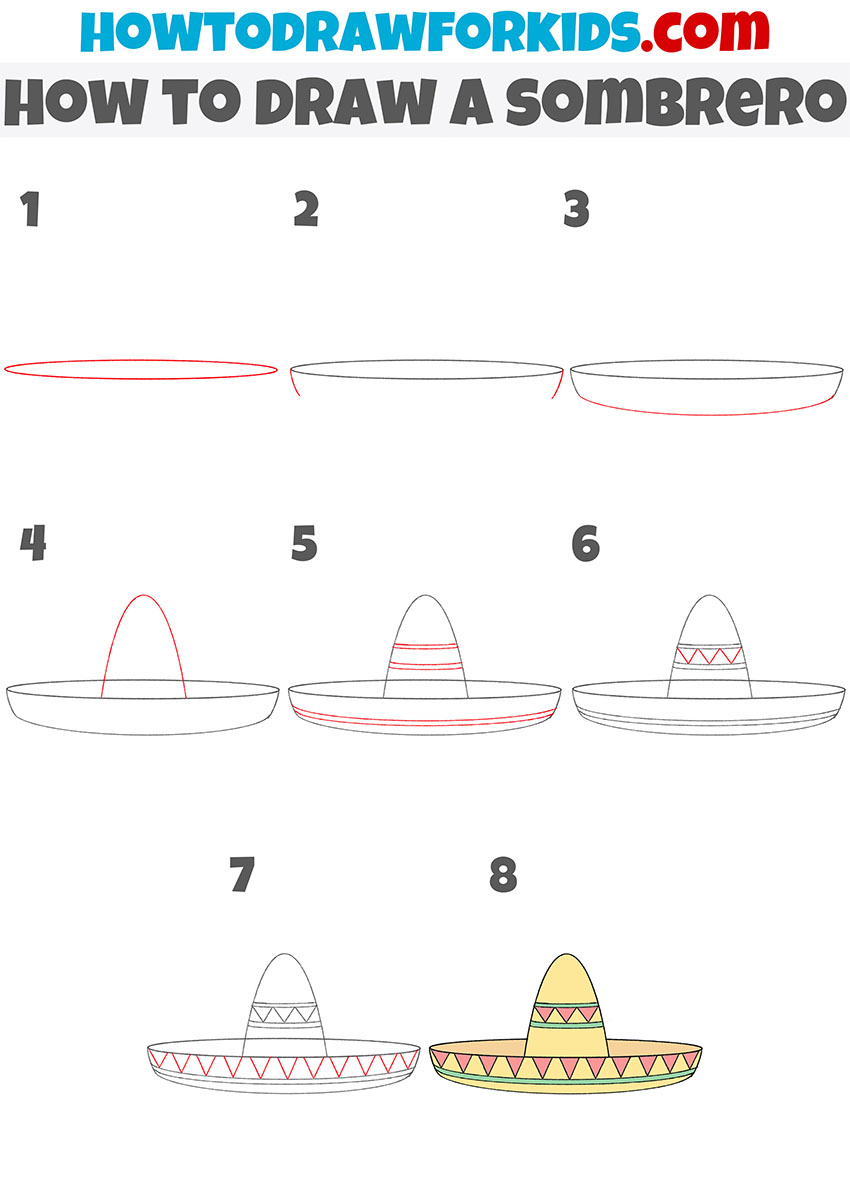
This headwear drawing idea shows how to sketch a sombrero – a hat with wide brims and a low crown. Despite its distinctive shape, the drawing process remains quite straightforward.
Start with a long oval to indicate the brim, then add the central part of the hat. After that, refine the edges and include minimal decorative details if desired.
Bucket Hat
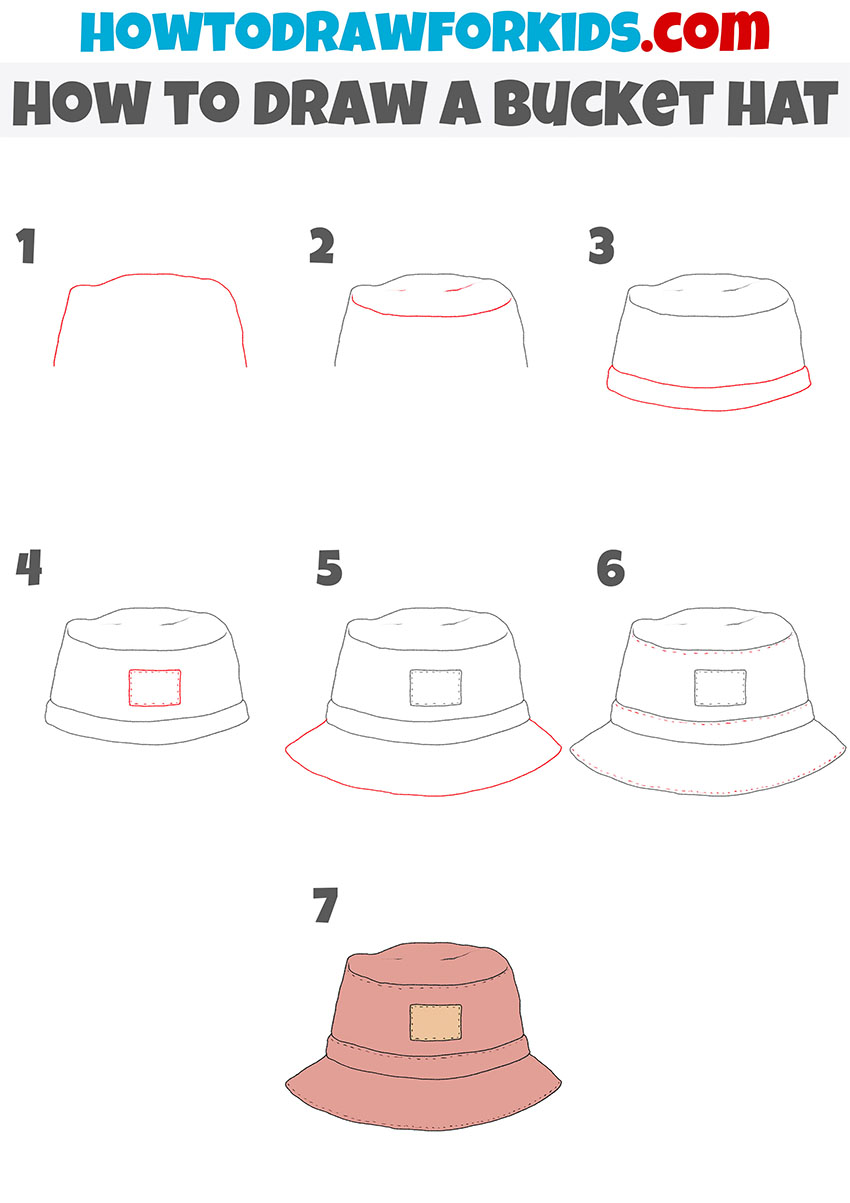
The first part of this collection ends with a bucket hat. This type of hat is recognizable by its soft form and smooth transition between the crown and the brim.
Begin the drawing with a top oval, then add the brim angled slightly downward. After refining the lines, erase any construction marks and color the bucket hat using simple and flat tones.
Hood
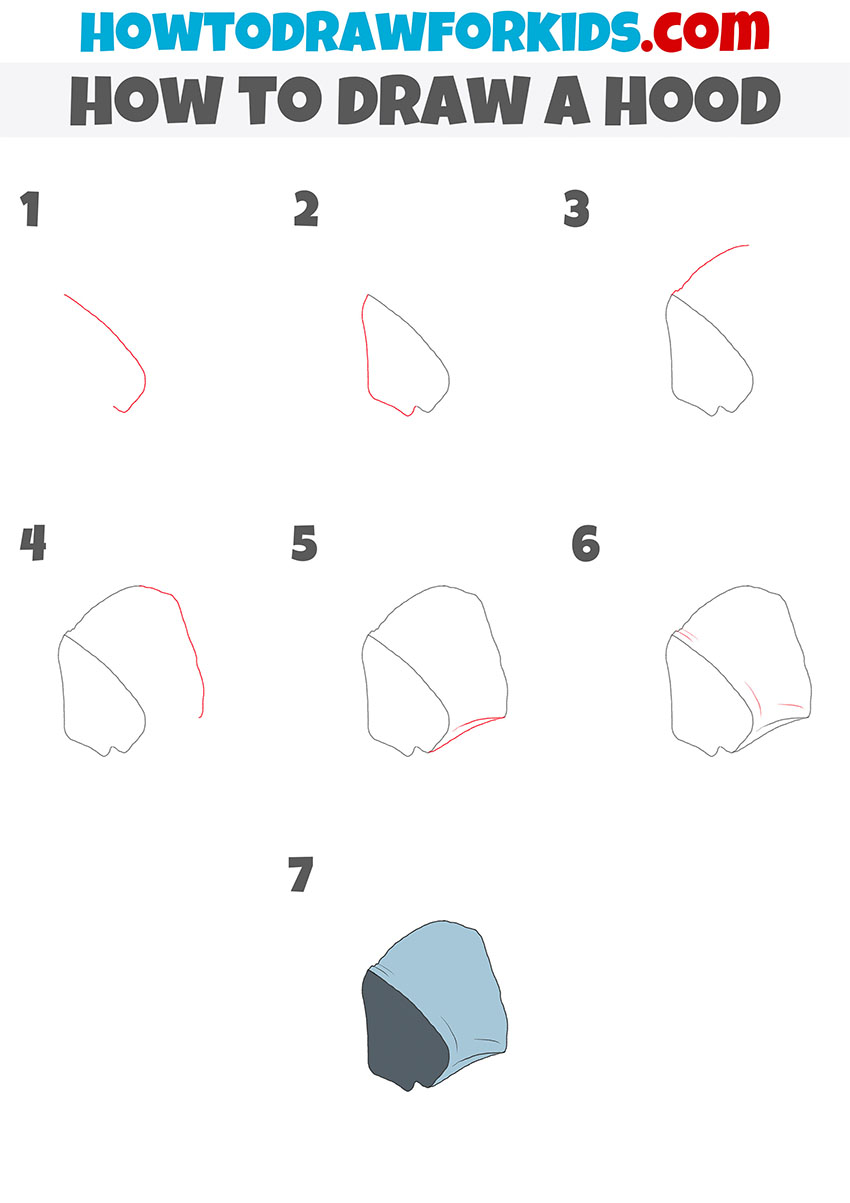
The next lesson of the list of headwear drawing ideas features a hood, shown as a simple fabric shape resting around the head area.
The form is smooth and slightly loose, which helps practice drawing soft folds and curved outlines.
Start by outlining the outer contour of the hood, paying attention to its rounded top and open front. Then add the inner edge around the face opening.
After refining the lines, keep the surface mostly clean and finish the drawing with a single, even color.
Pirate Hat
This simple lesson shows a pirate hat with a recognizable curved shape and raised sides. Even though this type of headwear looks more complex, it is still built from a few simple lines.
Begin by sketching the main outline of the hat using wide curves. Then define the lifted edges and the central top area.
Once the shape feels nice and balanced, clean up the lines and add minimal details before coloring.

Beret
Now let’s draw a beret, a soft hat with a flattened, rounded form. This lesson is useful for practicing asymmetry and slight shifts in shape.
Draw an oval that tilts gently to one side. Then add the lower edge that sits closer to the head.
After adjusting the proportions, you can include a small detail on top and complete the hat drawing with a simple color fill.

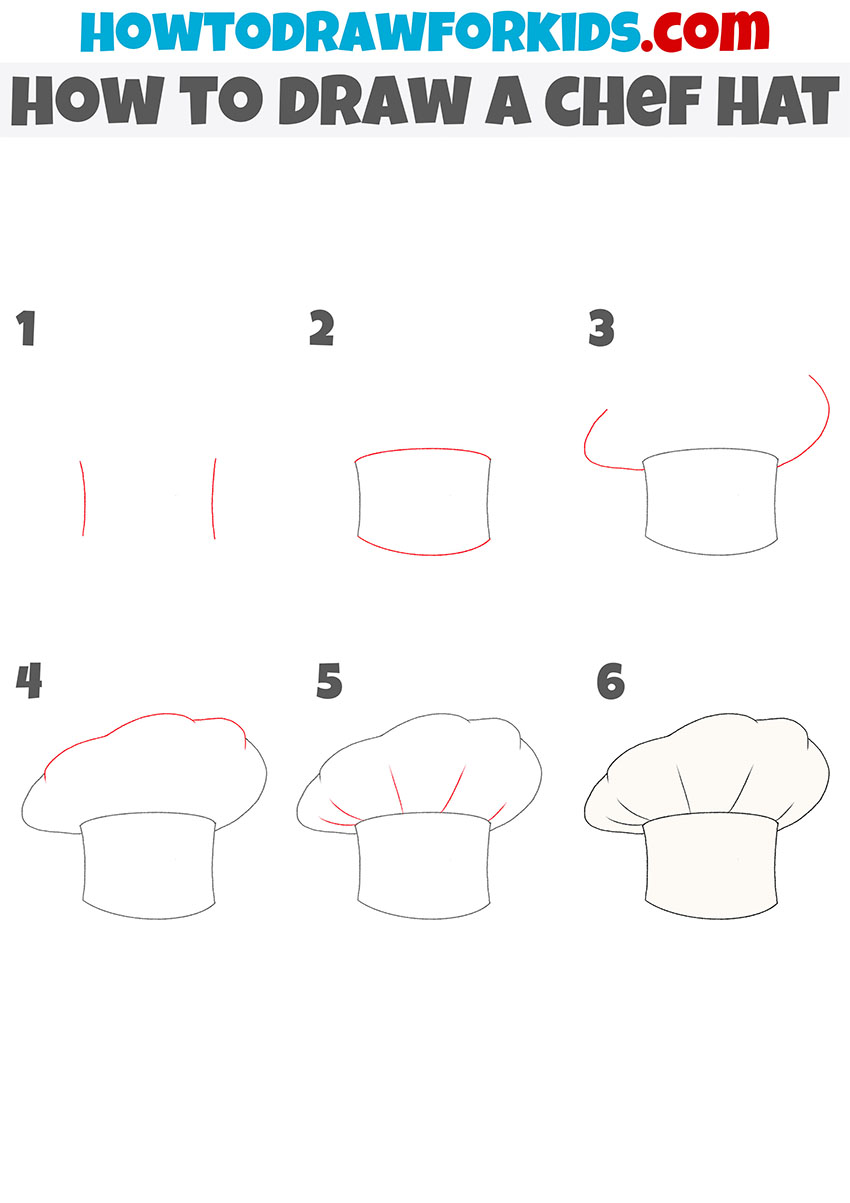
Chef Hat
This headwear drawing tutorial shows how to sketch a chef hat with its tall, puffed top and straight lower band. The contrast between soft and rigid shapes makes this lesson especially interesting.
Begin by outlining the rectangular lower band, then build the upper part using rounded, cloud-like curves. Once the overall silhouette is set, smooth the lines and keep the details minimal before adding color.
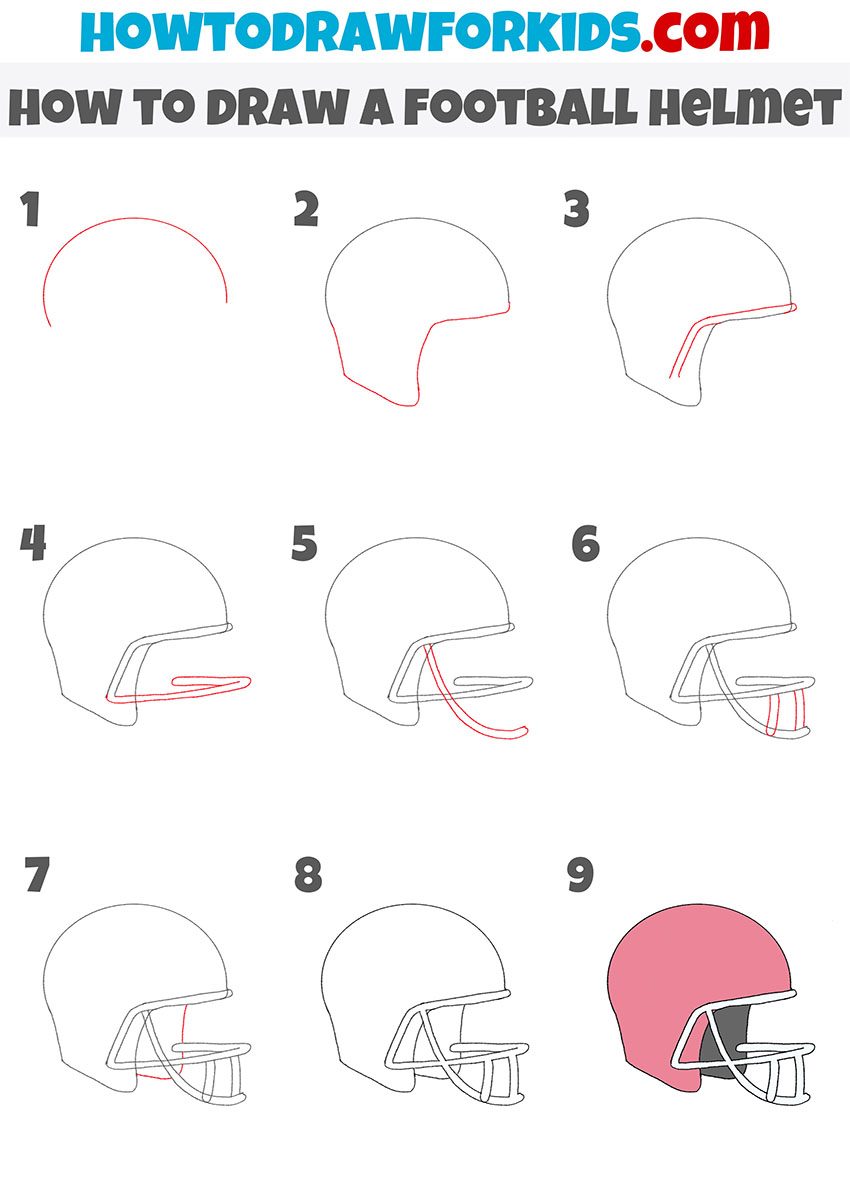
Football Helmet
The last lesson in this collection of headwear drawing ideas is a football helmet, which introduces a more solid and strong form.
Unlike fabric headwear, this object is drawn with firmer lines and clearer edges.
Outline the main helmet shape as a rounded shell. Then add the face opening and protective elements. After refining the proportions, erase the construction lines and color the helmet in a bold, uniform tone.
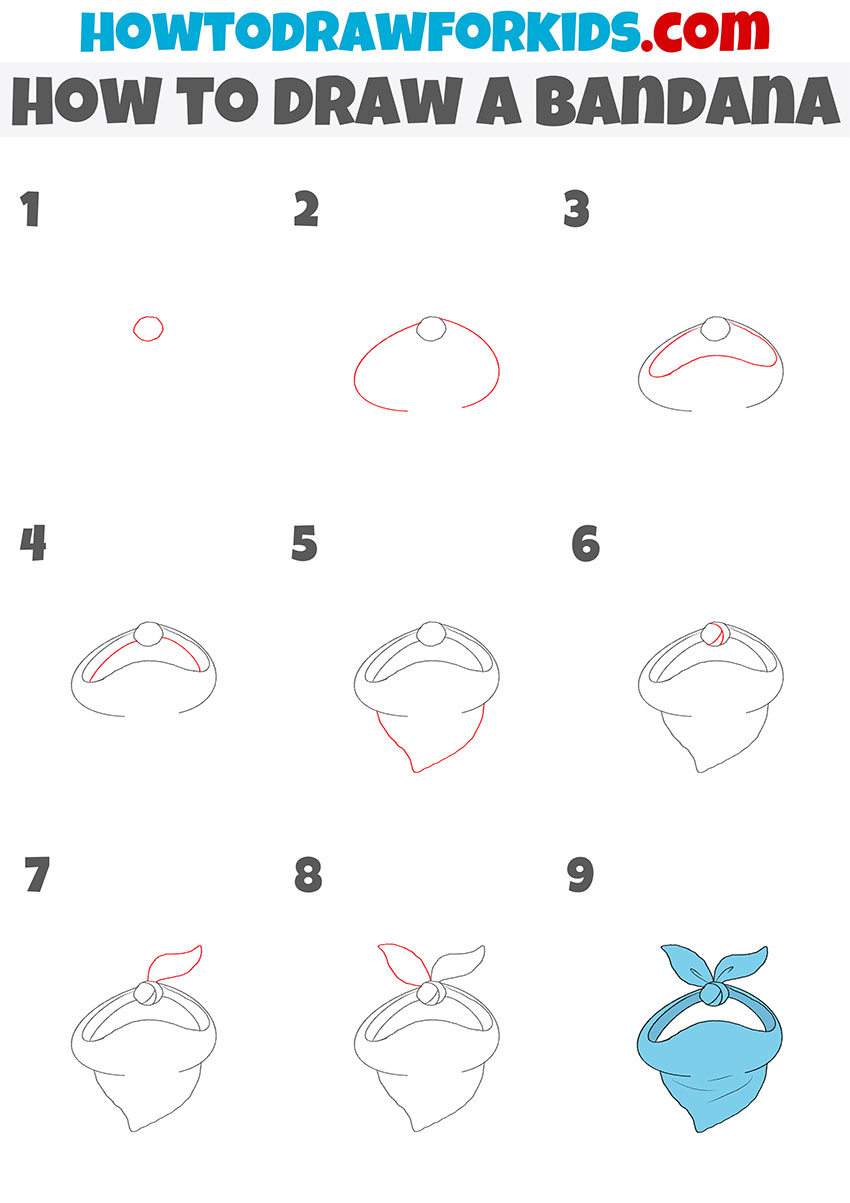
Bandana
This drawing lesson shows how to draw a bandana in a simple, tied form. The shape is flat and flexible, so it is a good example within hat drawing ideas that helps to train creating fabric and folds.
Mark the main triangular shape, then add the tied ends extending to the sides or back. After that, refine the edges, keep the folds minimal, and finish the drawing with a flat, even color.
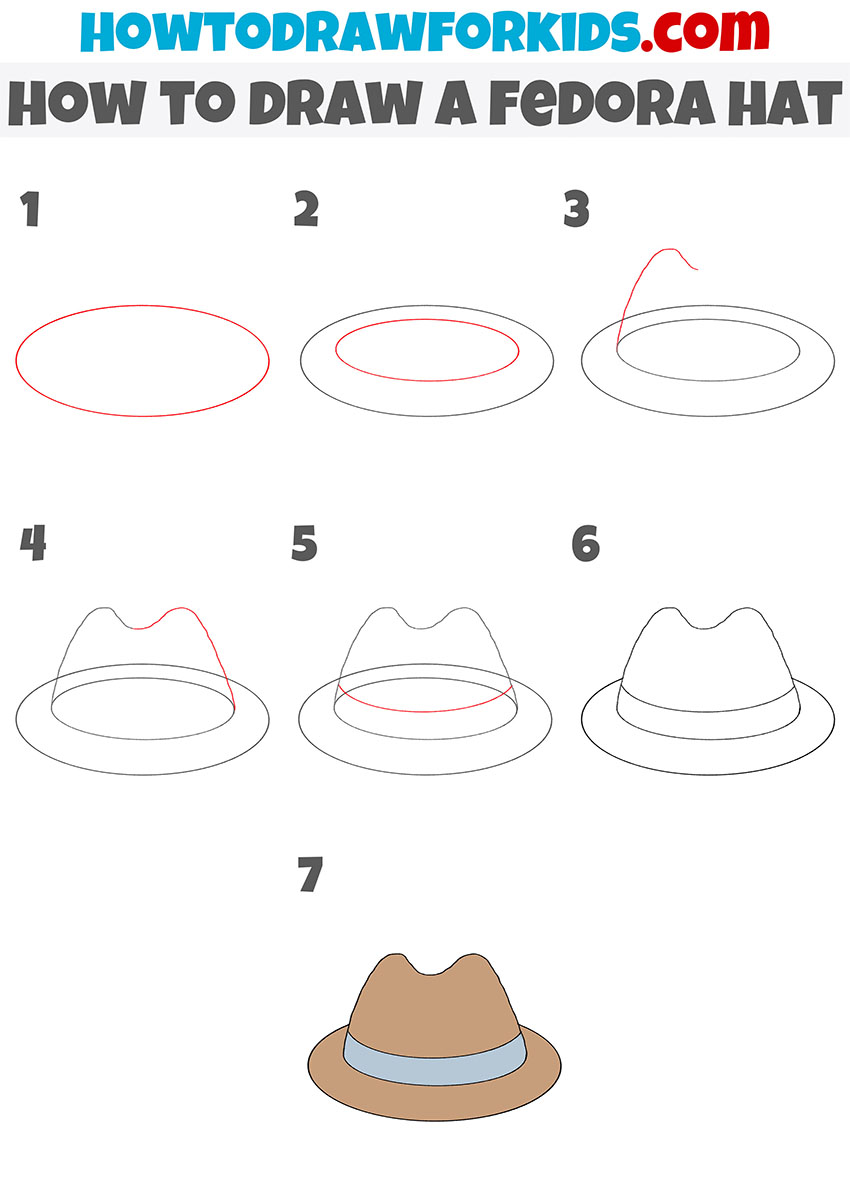
Fedora Hat
Now let’s draw a fedora hat, a classic headwear shape with a recognizable crown and round brim.
First, sketch the crown of the hat as a slightly indented form, then add the brim with smooth horizontal curves. Once the proportions are set, clean up the outline and color the hat in muted, neutral tones.
Cowboy Hat
This tutorial shows how to illustrate cowboy hat with a wide brim and raised central crown. Even though the shape is distinctive and looks too complicated, it is still built from very simple curves.
Start by outlining the brim, keeping it wide and symmetrical. Then add the crown with its characteristic bends. After refining the silhouette, erase extra lines and complete the drawing with a solid color.

Graduation Cap
The next lesson shows how to draw a graduation cap, which introduces straight lines and flat surfaces. Among headwater drawing ideas, this one stands out because of its geometric structure.
Begin with a flat diamond shape for the top, then add the lower band beneath it. After that, draw the tassel hanging from one corner, refine the lines, and apply simple, dark coloring.

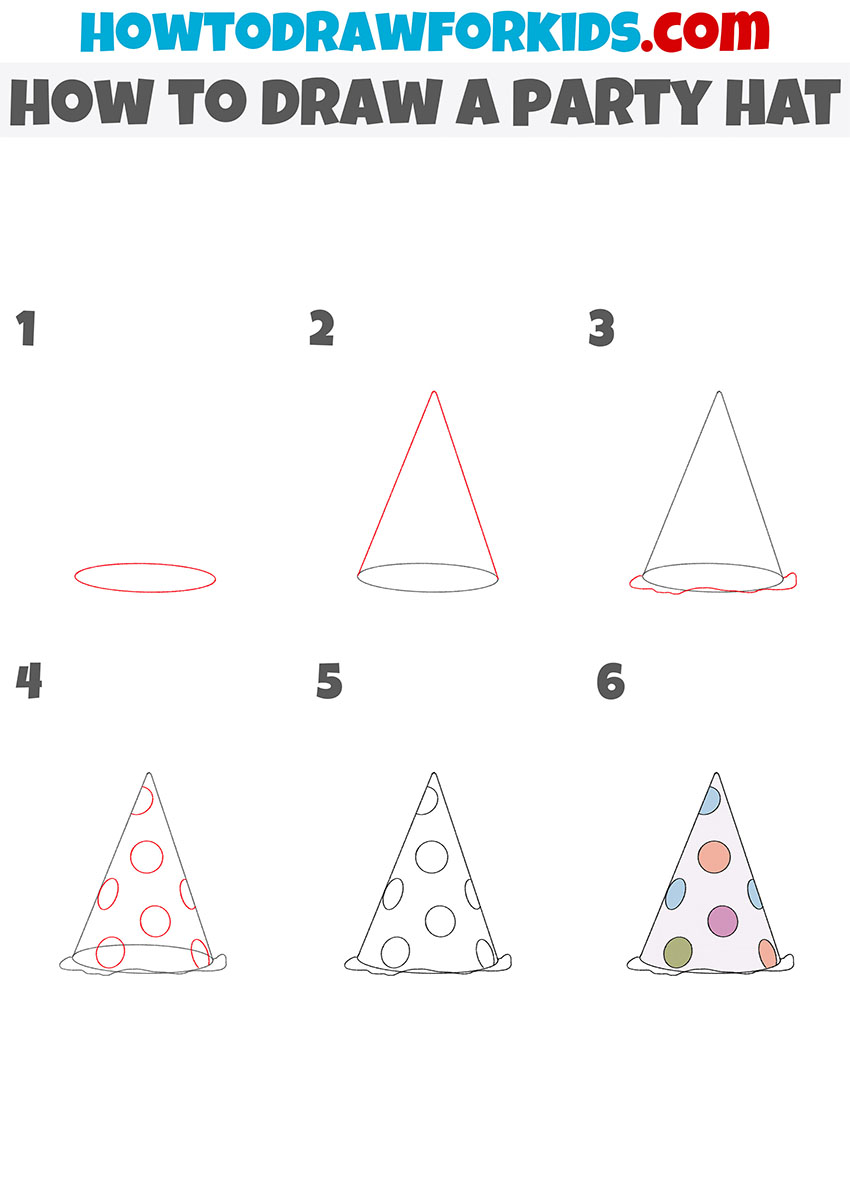
Party Hat
This lesson explains how to draw a party hat in a very basic, cone-shaped form. It is one of the simplest examples in this group and works well for quick practice.
Mark a tall triangle with a rounded base. Then add a small pom-pom at the top if desired. After smoothing the lines, finish the drawing with bright, solid colors.
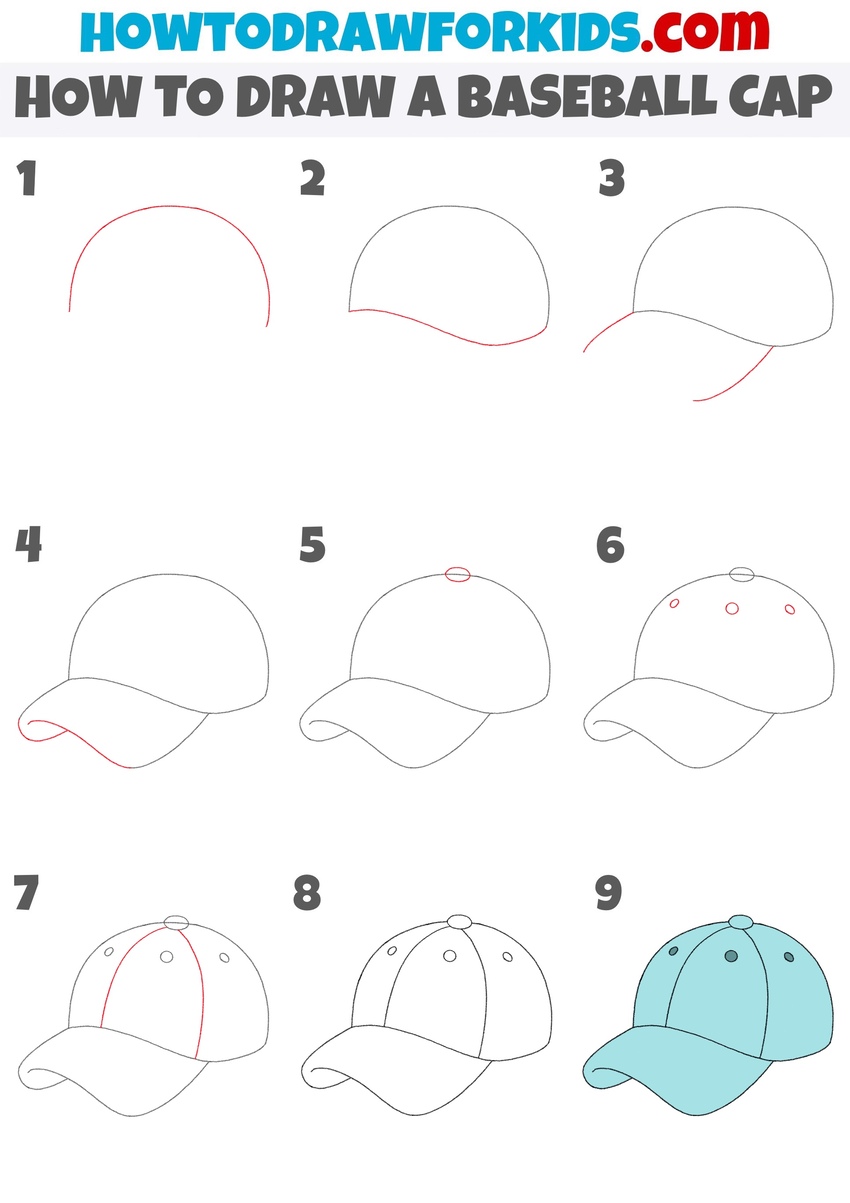
Baseball Cap
This drawing guide shows a baseball cap drawn in a simple, basic style. The cap is also illustrated with a rounded top and a classic visor, using very simplified shapes.
First, mark the main shape of the cap, then add the visor extending forward. After that, erase the construction lines and color the baseball cap in simple tones.
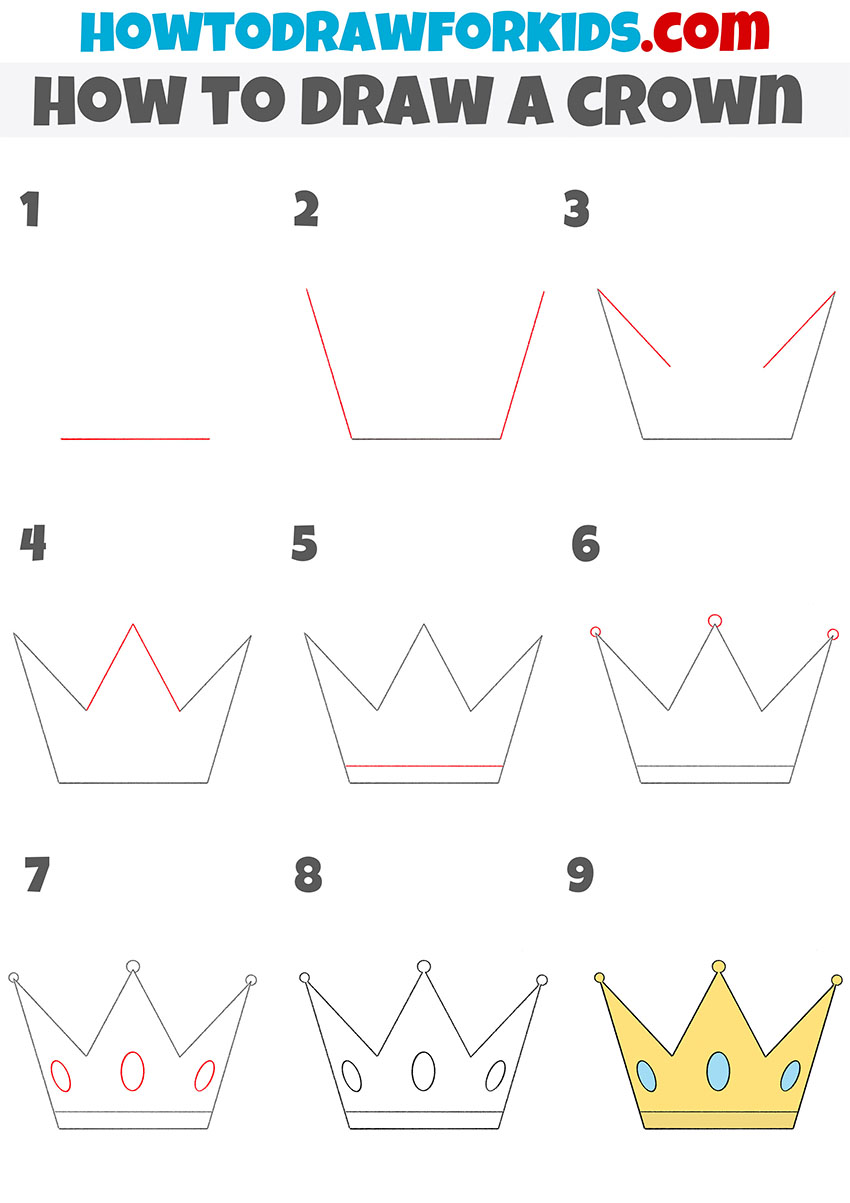
Crown
Now let’s draw a crown using a very simple schematic illustration. This drawing is built from straight lines and basic shapes and is easy to complete step by step.
Begin by outlining the base of the crown, then add the pointed upper parts. After that, refine the shape, erase unnecessary lines, and color the crown in yellow tones.
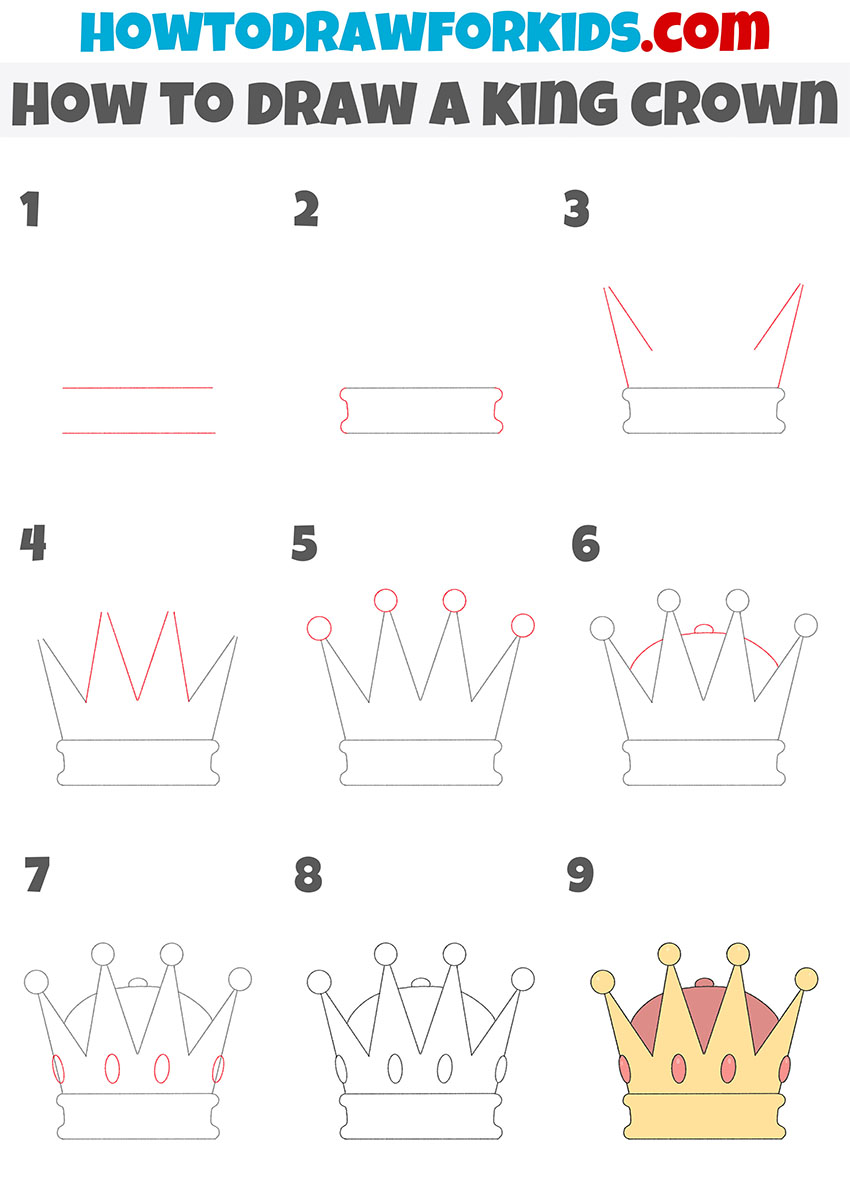
King Crown
This lesson shows how to draw a king crown with a slightly more detailed shape. The form remains simple, but includes additional elements along the top edge.
Outline the base, then draw the upper shapes one by one. After setting the main form, erase the construction lines and finish the drawing with clean coloring.
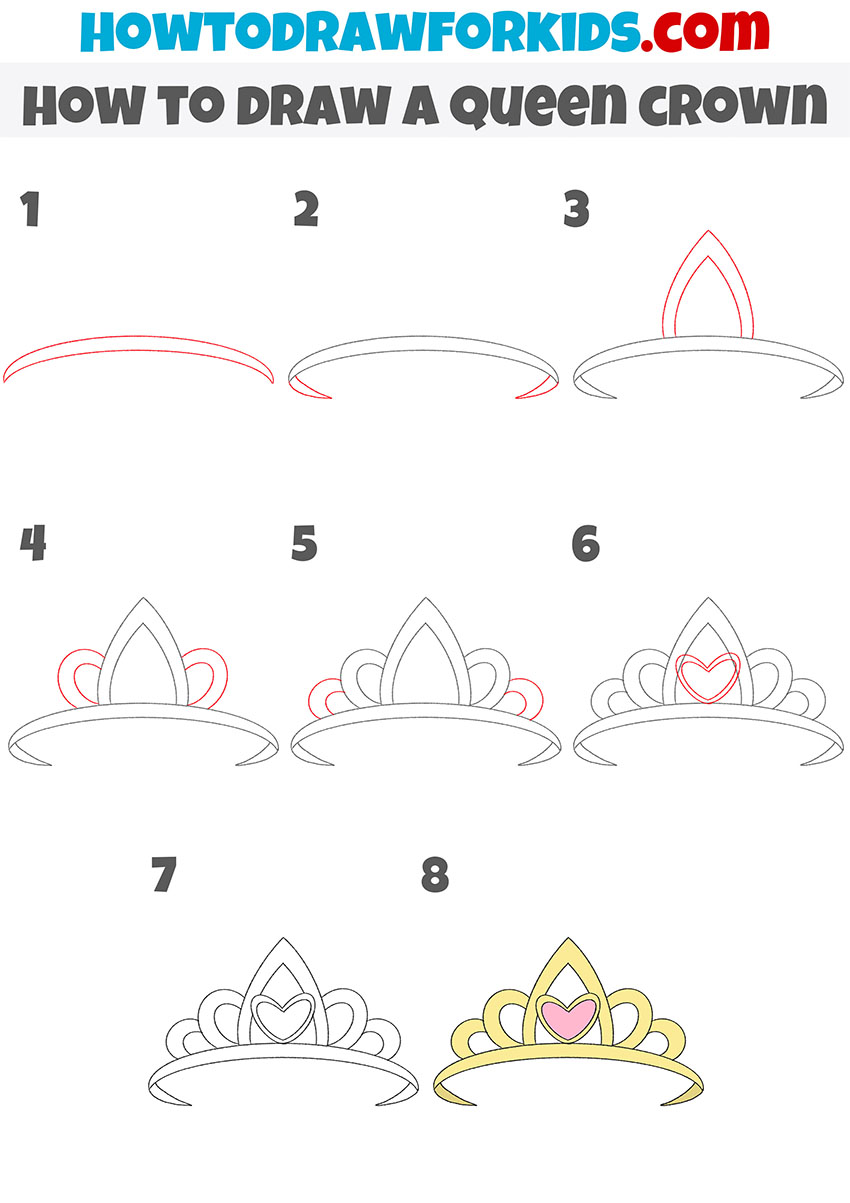
Queen Crown
Here in the collection of headwear drawing ideas you can see a queen crown drawn in a simplified style with smooth lines and clear symmetry.
The drawing process is also very similar to other crown lessons.
Begin by outlining the lower part, then add the upper shapes in a balanced arrangement. Once the shape is complete, remove extra lines and color the crown.
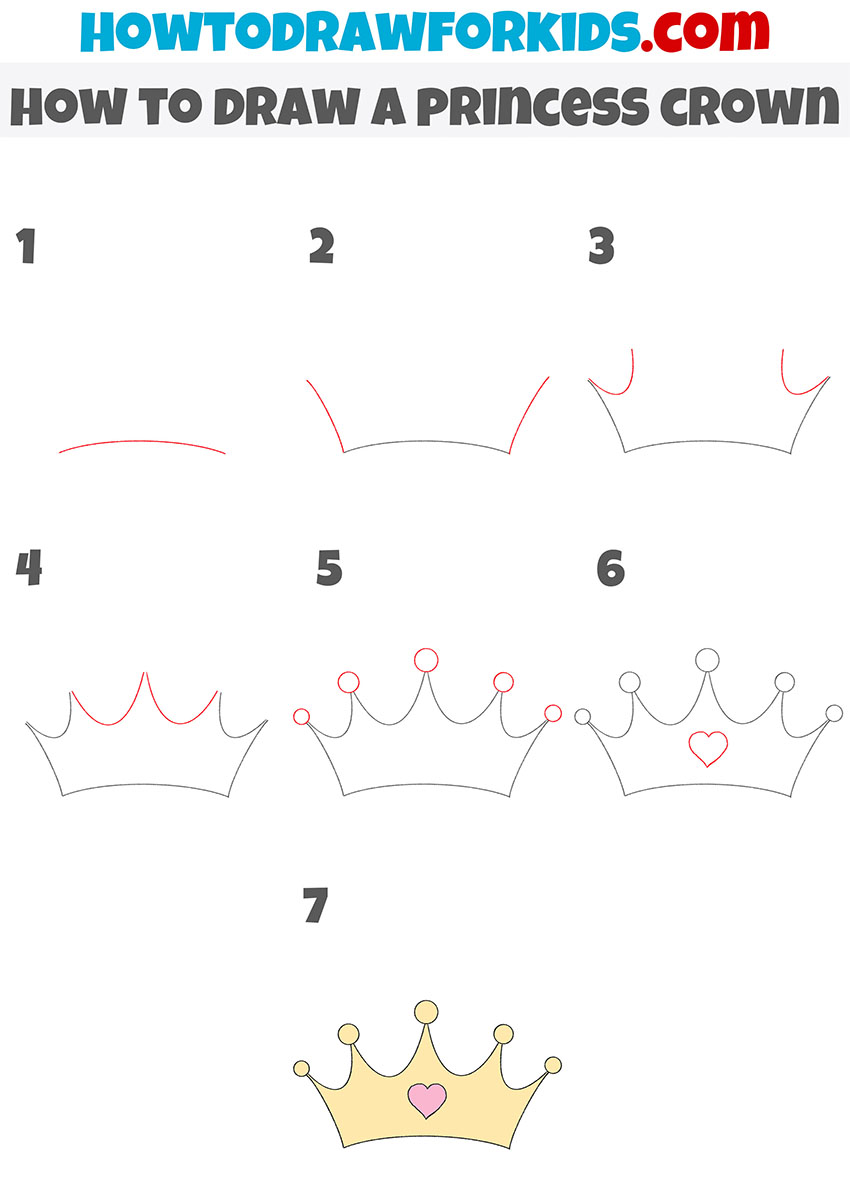
Princess Crown
This lesson explains how to draw a princess crown also using really simple shapes and minimal details. The crown is shown in a basic form that is easy to follow.
First, illustrate the base line, then add the upper decorative shapes. After that, erase the construction lines and fill the drawing with light colors.
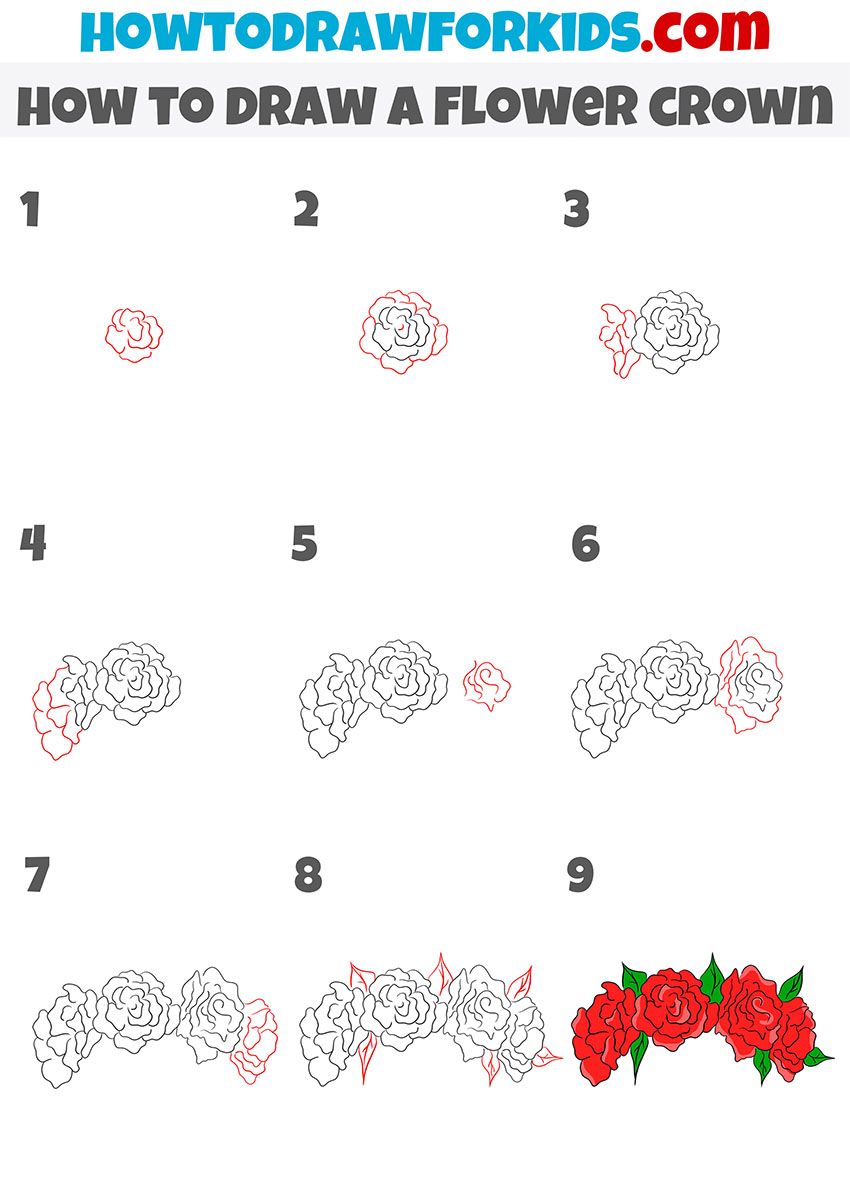
Flower Crown
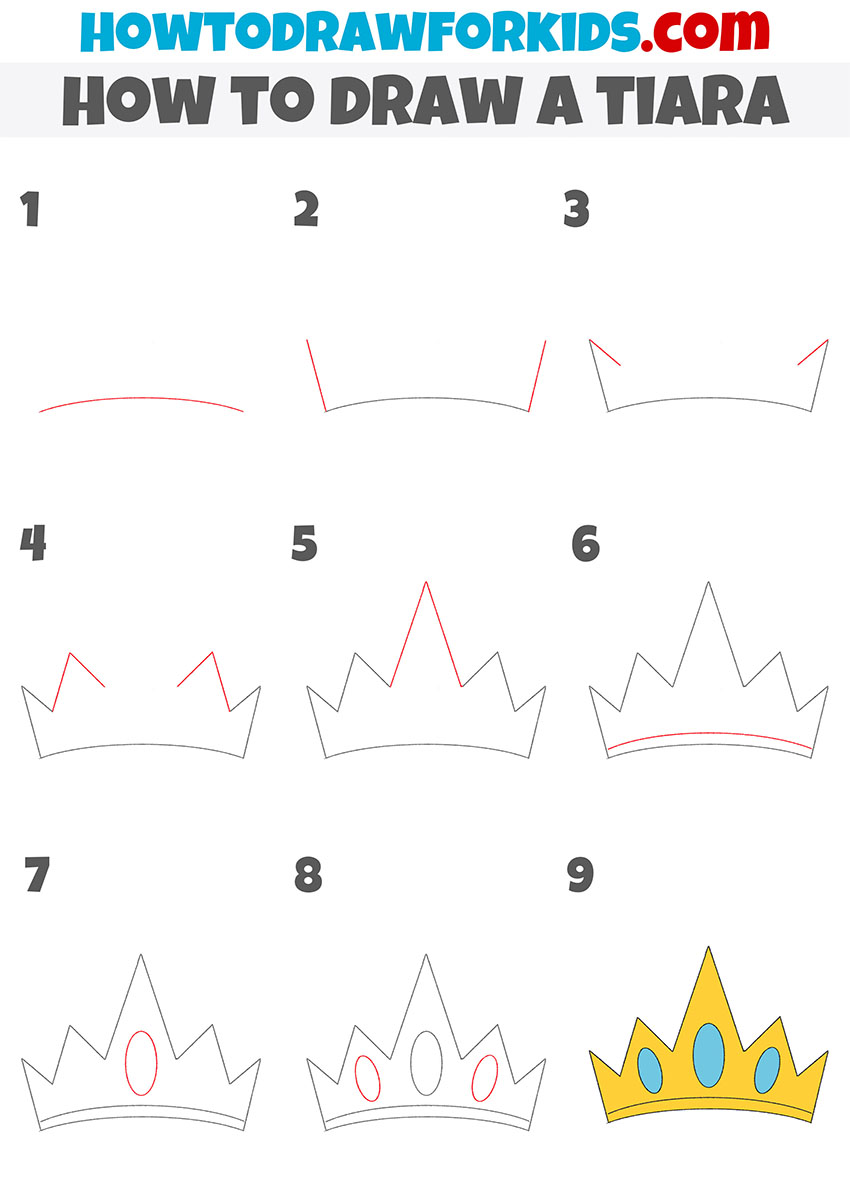
Tiara
This drawing lesson shows how to draw a tiara in a simple, basic style. The shape is light and open, built from smooth lines and minimal details.
Sketch the base of the tiara, then add the upper shapes using small curved lines. After that, erase the construction lines and color the tiara in light tones.
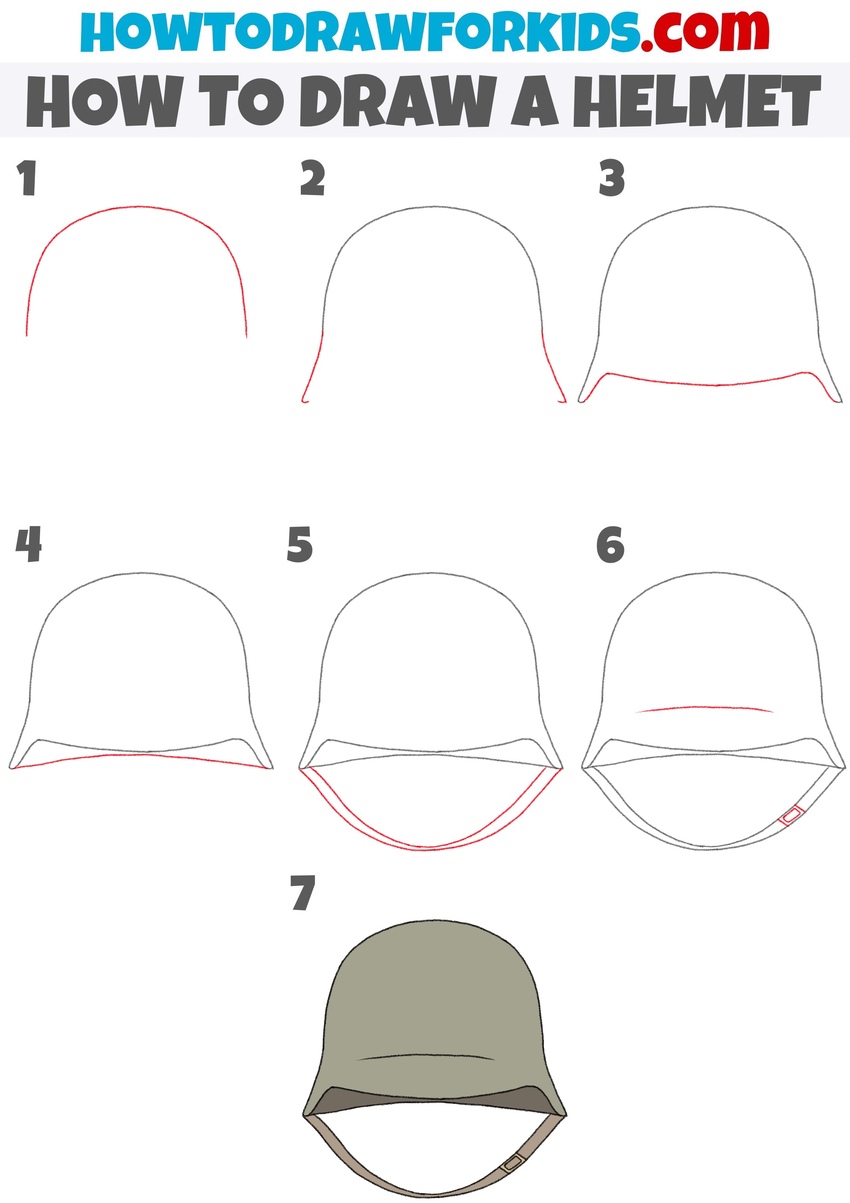
Helmet
Now let’s look at the next tutorial of this collection of hat drawing ideas and learn how to sketch a helmet. Unlike fabric headwear, this object has a more defined shape and strong edges.
Begin by outlining the main shape of the helmet, then add the face opening. After refining the lines, erase unnecessary parts and color the helmet in simple, uniform tones.
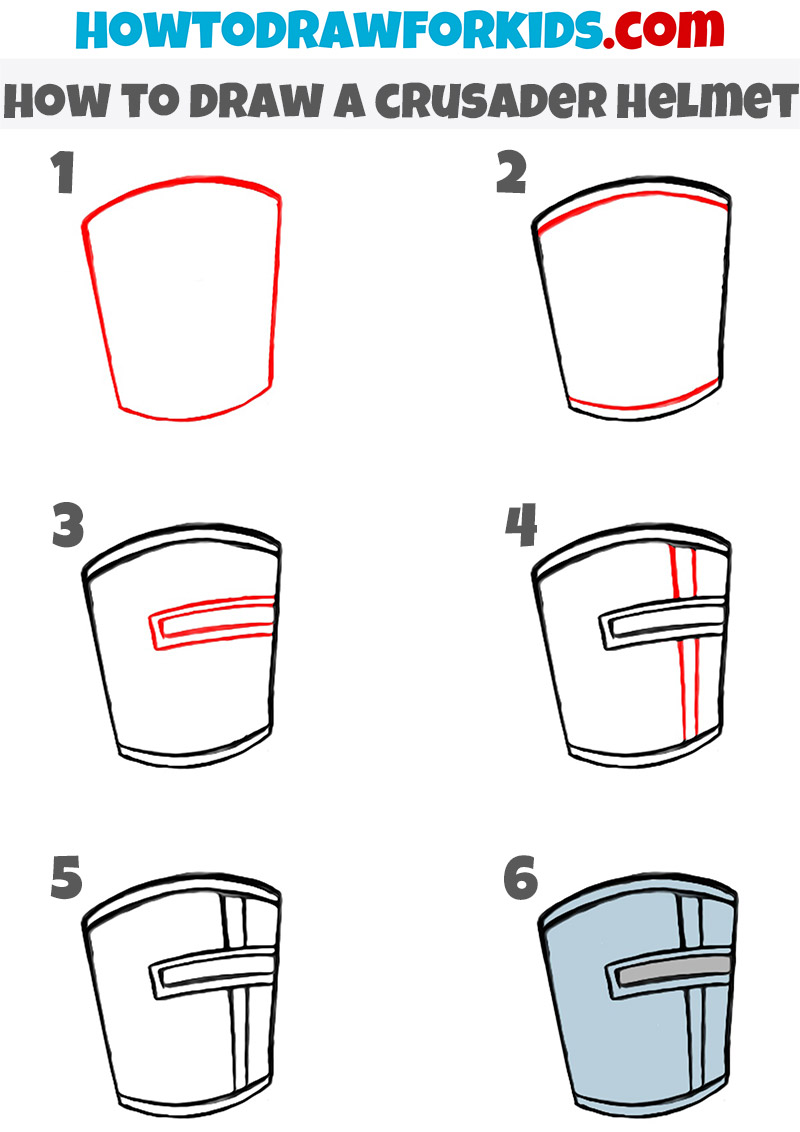
Crusader Helmet
Now let’s move on to headwear connected with knights and try to draw a crusader helmet, which is essentially a metal cone-shaped helmet.
Begin by outlining the main cone-like shape, keeping the sides smooth and symmetrical. Then add the front opening using straight, vertical lines.
After that, refine the edges, erase the construction lines, and color the helmet in gray tones.
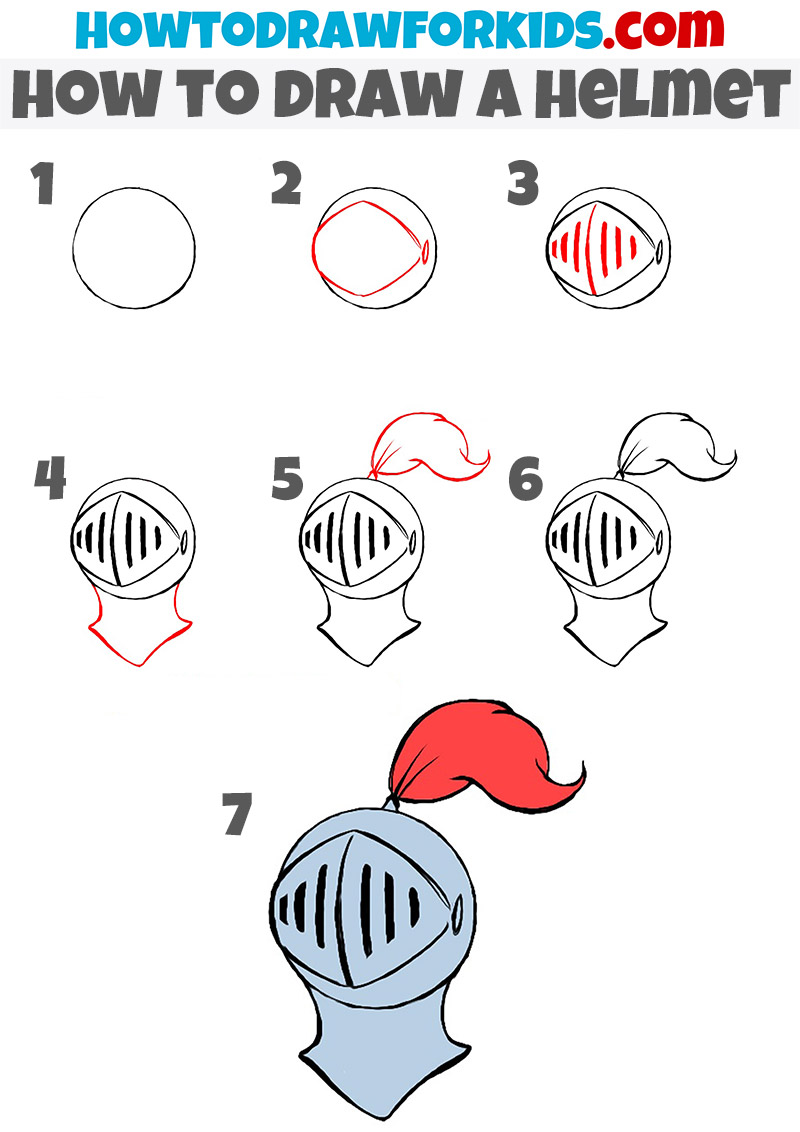
Knight Helmet
Knight helmets come in many different forms, and over time their shapes and level of detail changed throughout history.
In this lesson, I show how to draw a later type of knight helmet that is commonly associated with the late Middle Ages.
To draw this helmet, first outline a rounded base shape. After that, add the elements on the top and bottom, as well as the visor. Once all construction lines are in place, erase the unnecessary ones and color the helmet using gray-blue and red tones.
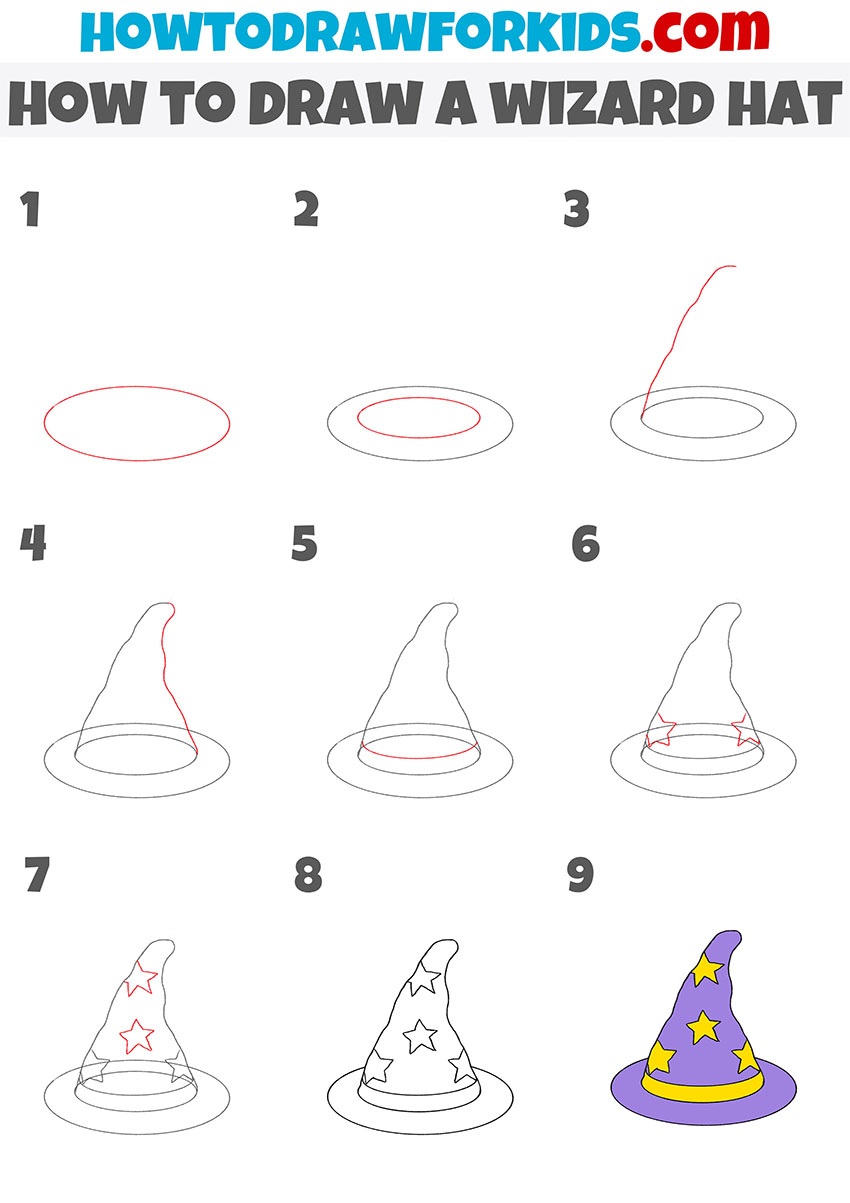
Wizard Hat
Now let’s move on to headwear that is more closely associated with magical characters or Halloween themes.
We’ll start with a wizard hat, which has a very recognizable shape.
First, draw the rounded brim of the hat. Then add the cone-shaped upper part, making sure it does not look too even or perfectly straight. After that, erase the construction lines, add a few simple details, and color the hat using purple and gold tones.
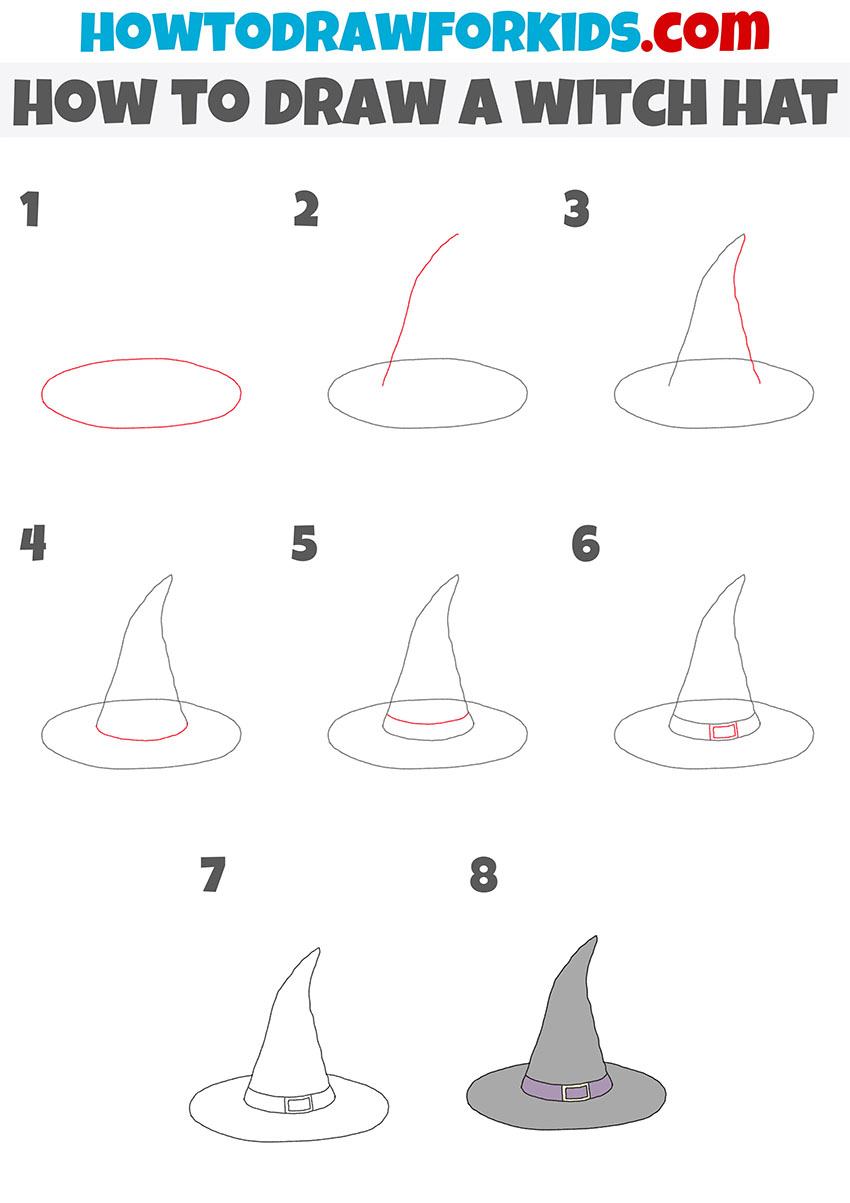
Witch Hat
A witch hat does not differ much in appearance from a wizard hat, but there are some small distinctions.
For example, a witch hat often includes a narrow strap that separates the upper part from the brim.
As with the wizard hat, start by drawing the brim first, then add the cone-shaped upper part. After that, check the proportions, erase the construction lines, and add color to finish the drawing.
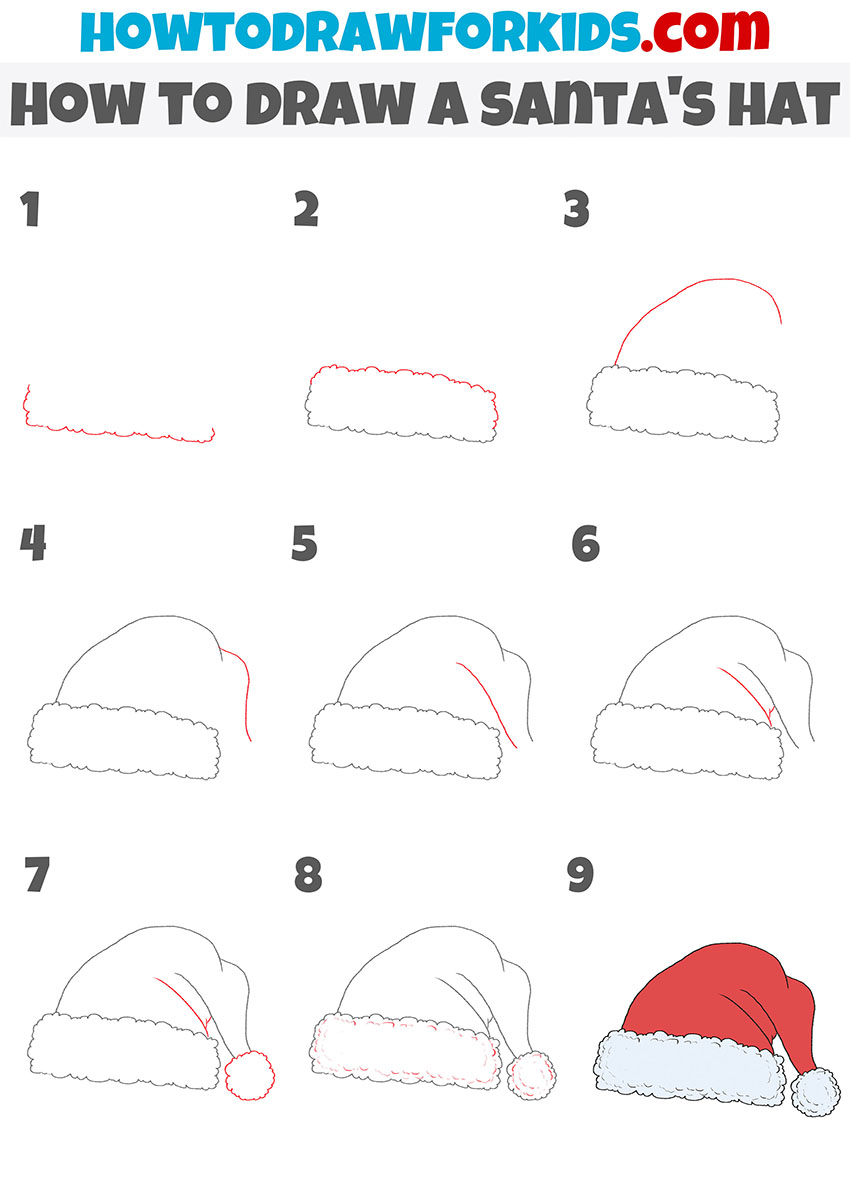
Santa Hat
Now let’s move on to more festive characters and draw one of the most recognizable types of headwear – a Santa Claus hat.
The approach here is slightly different.
Start with the soft fur trim at the bottom, using many short, rounded lines to show its texture. Then draw the upper part of the hat and add the pom-pom at the tip. After that, erase any construction lines if they were used and color the Santa hat in its familiar red and white tones.
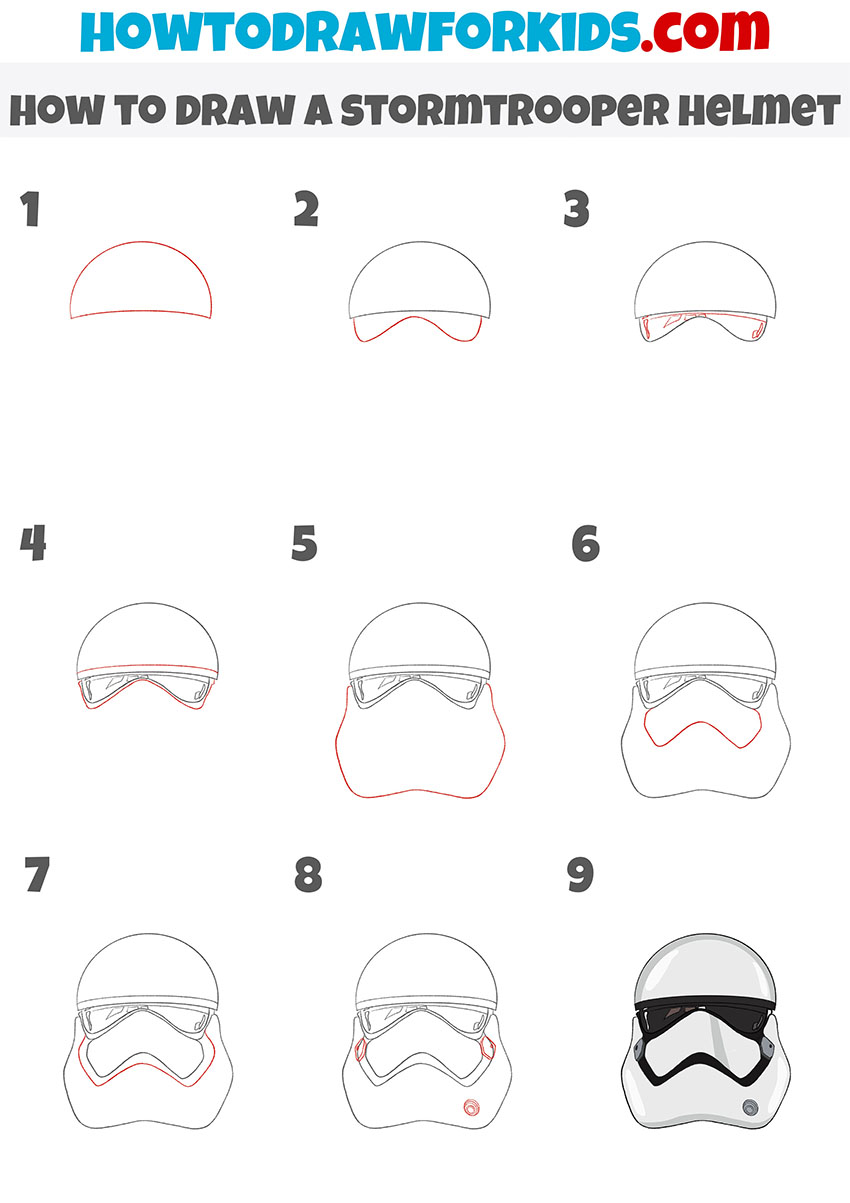
Stormtrooper Helmet
Now let’s move from fairy-tale characters to movie characters and draw a pair of helmets from the legendary Star Wars films.
In this lesson, a slightly different approach is used, starting from the top and moving downward.
First, outline the rounded upper part of the helmet. Then draw the eye area and move on to the lower section that covers the face and jaw. After that, add all the necessary details and color the helmet using light gray and dark gray tones.
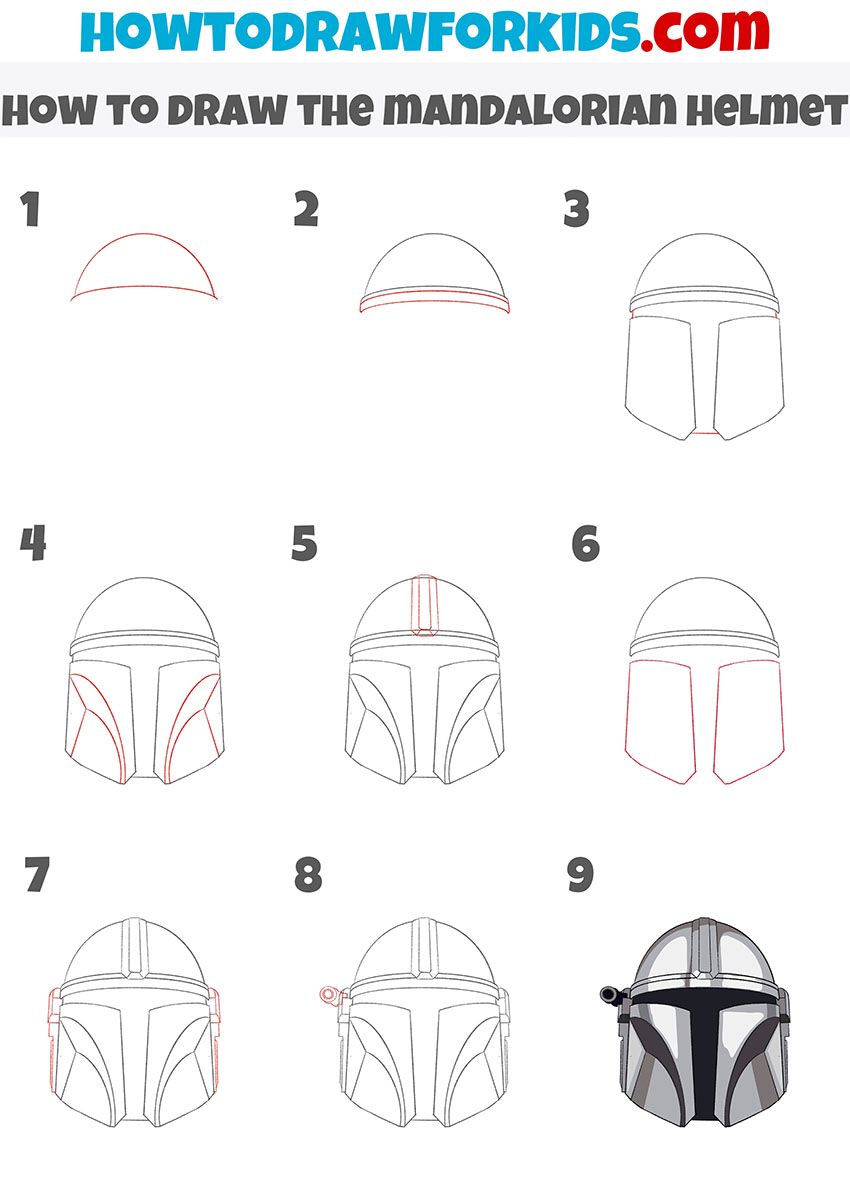
Mandalorian Helmet
The Mandalorian helmet is slightly different from a Stormtrooper helmet, but it follows a similar drawing principle.
As in the previous example, start with the upper part shaped like a half-circle. Then add the lenses and continue by drawing the lower section of the helmet.
After that, include all remaining characteristic details and small elements. Erase any unnecessary lines and color the helmet using its recognizable color scheme associated with The Mandalorian and Star Wars.
Conclusion
This was a fairly large collection of drawing lessons covering many types of headwear from different forms and time periods, and I hope you were able to complete all of them.
None of the headwear shown in these lessons should be considered final in the exact form presented here.
Many of the drawing lessons in this collection allow for multiple variations that you can change in your own drawings. In each lesson, you can add your own elements or remove details you would like to replace.
The colors used in these drawing lessons also depend primarily on your personal choice. So keep experimenting and continue practicing and improving your drawing skills.