How to Draw a Pine Tree
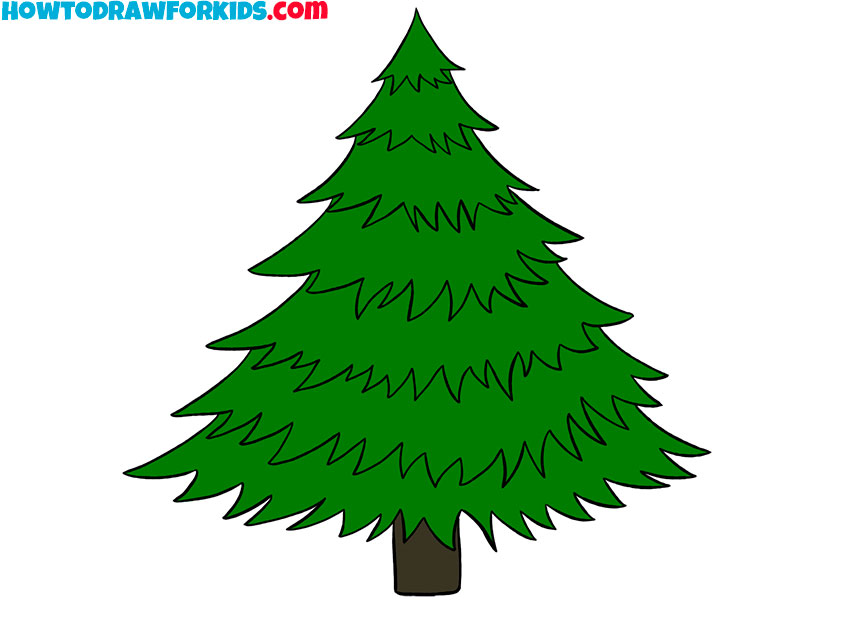
Immerse yourself in nature’s canvas, as I unfold the steps on how to draw a pine tree, transforming simple strokes into the regal silhouette of this evergreen emblem. This tutorial will guide your hand to express the pine’s rugged grace, showing that a few easy lines can manifest the stature of a tree that’s cherished in landscapes.
How to Draw a Pine Tree: Basic Information
Welcome to a sketching journey through the tranquil forest with my guide on how to draw a pine tree. Here, we’ll transform a simple shape into the majestic sentinel of the woods, ensuring that each stroke captures the essence of these towering giants. With every line, we’ll be drawing not just a tree, but the spirit of the wilderness itself.
In this drawing, each tier of branches tells a story, spreading wider as we move down, much like the pine tree itself reaches out to the world. My method breaks down this complex form into manageable steps, inviting artists of all ages to create their own verdant evergreen with just a few easy strokes.
As we conclude, you’ll have learned to draw a pine tree that stands tall on your paper, a testament to the enduring beauty of nature. This lesson isn’t simply about creating an image; it’s about understanding the harmony of natural forms and bringing them to life with pencil and paper.
Pine Tree Drawing Tutorial
Materials
- Pencil
- Paper
- Eraser
- Coloring supplies
Time needed: 30 minutes
How to Draw a Pine Tree
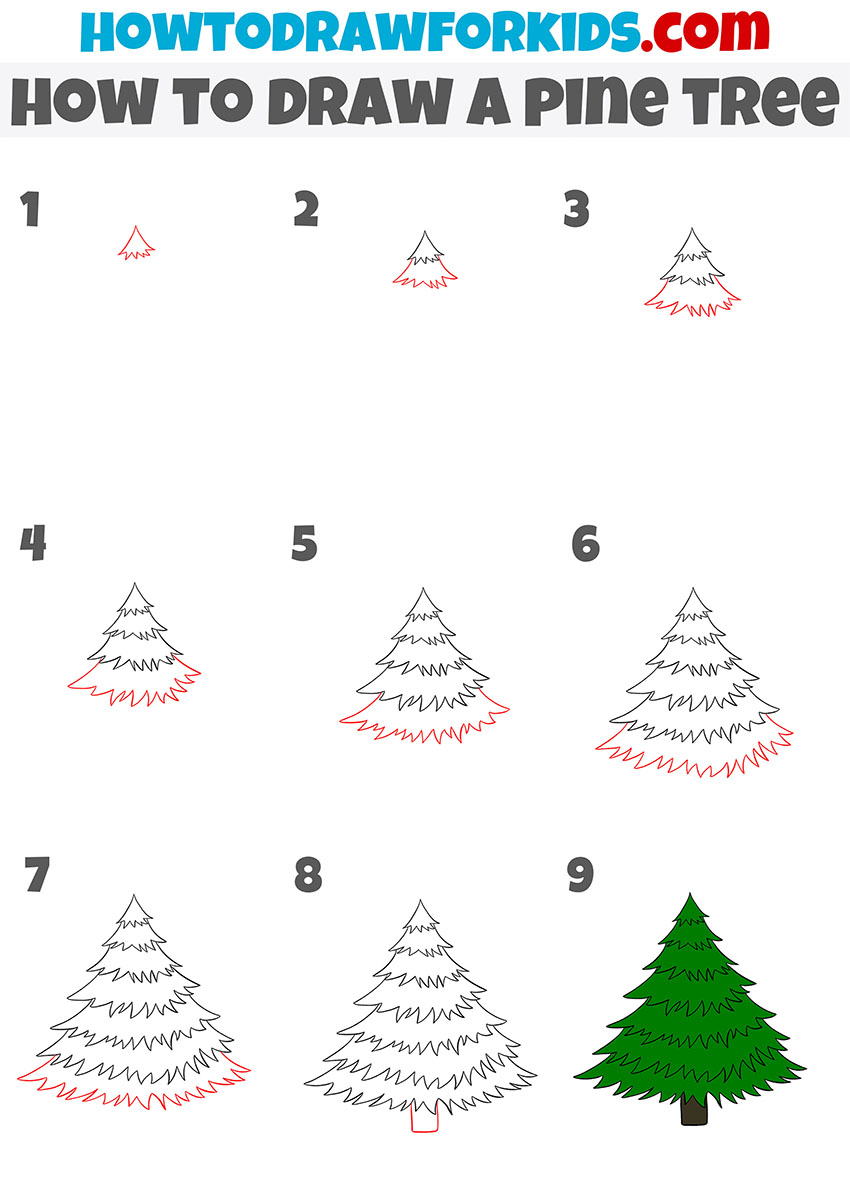
- Draw the top of the pine tree.
Depict two curved lines, and then connect their lower ends with a zigzag.

- Add the second tier of the pine tree.
Below the top of the pine, add two more curved lines and connect their ends with a zigzag.

- Sketch out the third tier of pine tree.
This tier of pine tree is similar to the previous one, but the zigzag lines are slightly longer.

- Depict the fourth tier of the pine tree.
Use curved lines of different lengths, as shown in the example.
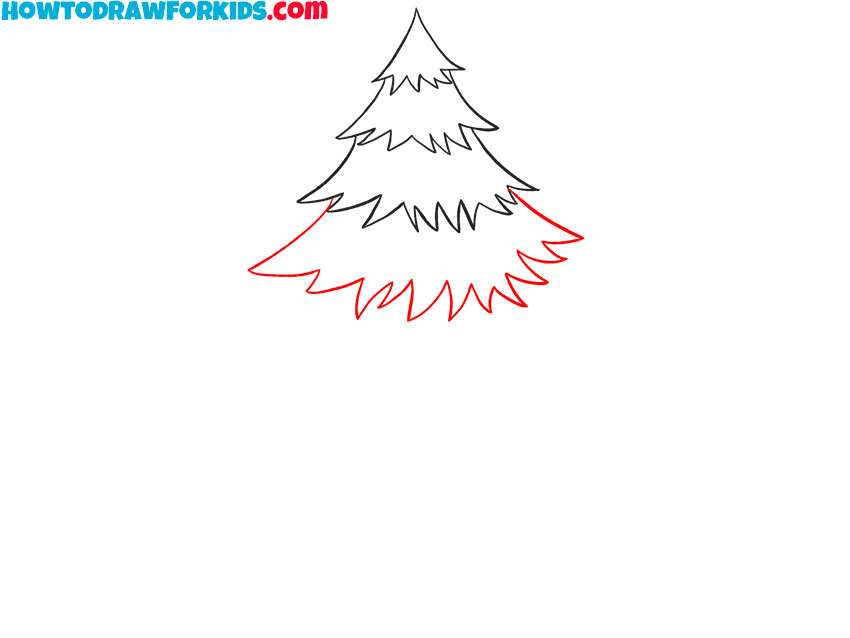
- Draw the fifth tier of the pine tree.
Continue drawing the tiers of the pine tree in the same way as in the previous steps.
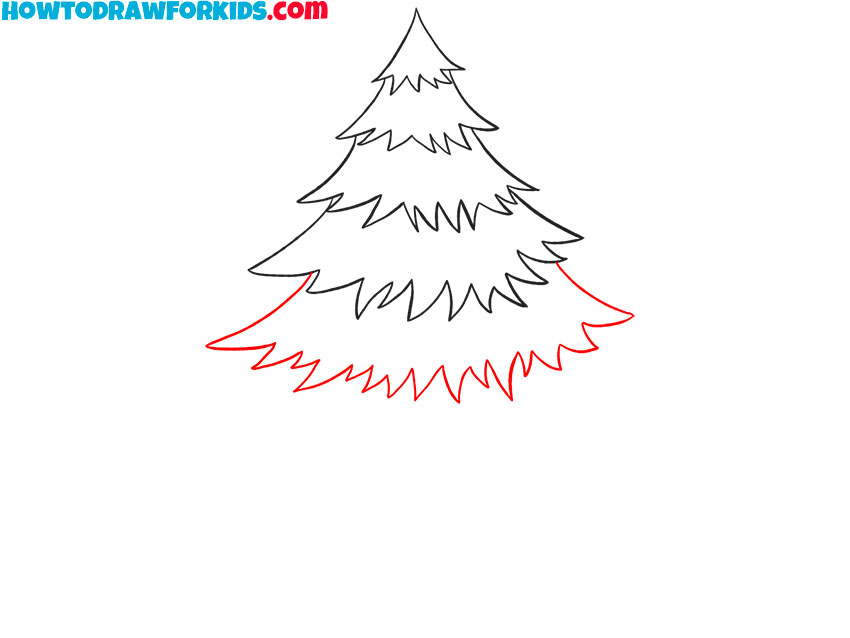
- Add the sixth tier of the pine tree.
To complete this step, use curved lines of varying lengths as shown.
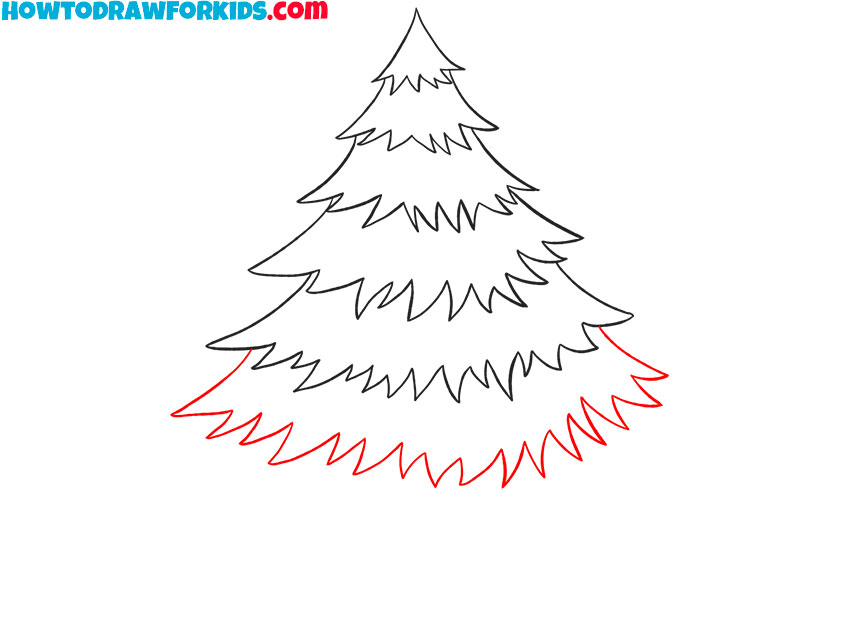
- Draw the last layer of the pine tree.
Below the previous tier, add many curved lines of varying lengths.
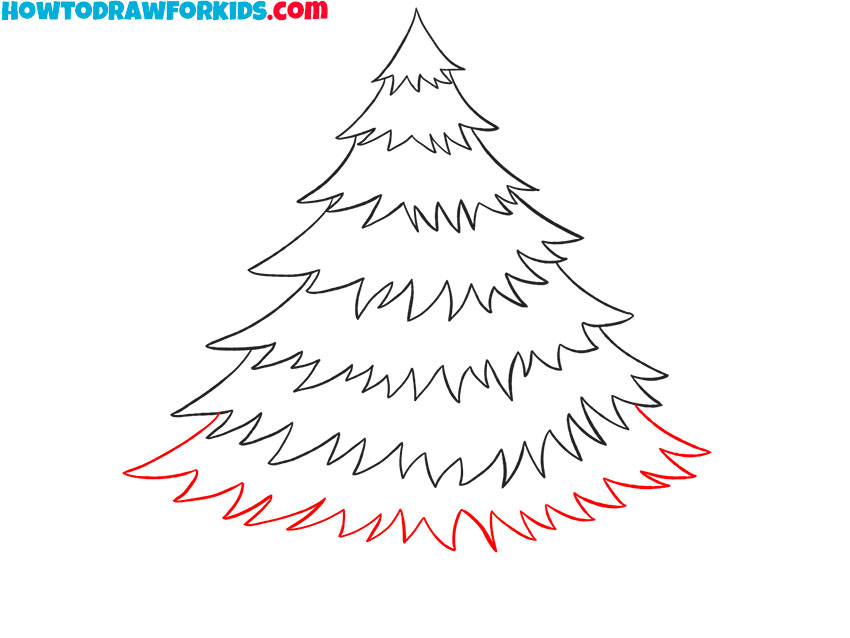
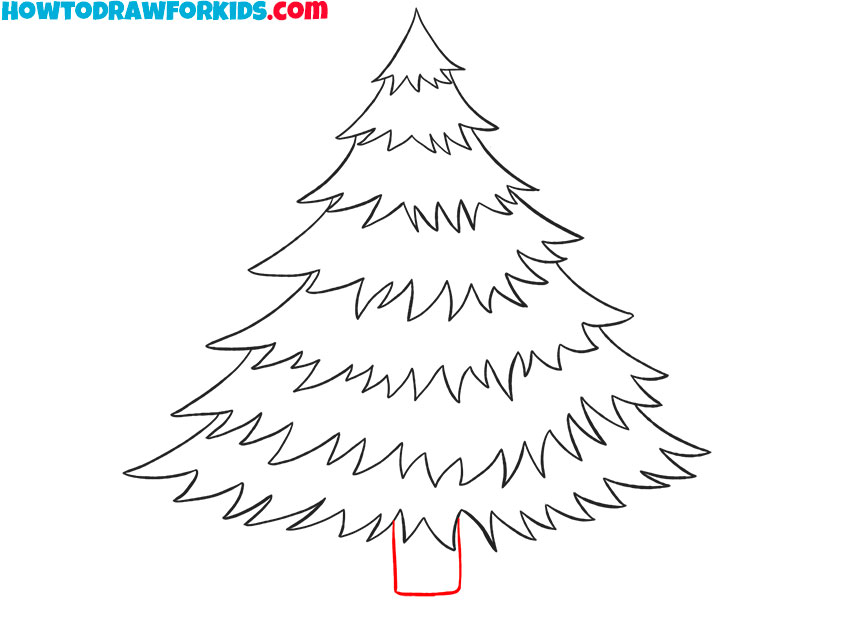
- Sketch out the tree trunk.
Below the previously drawn tier, add three straight lines.
- Color the drawing.
To color the pine tree, you need to use green and brown.

Additional Content
To complement your learning experience, I’ve assembled a free PDF file that accompanies this pine tree drawing lesson. It’s a compact version you can download, offering the freedom to practice wherever you may be, with or without internet connectivity.
This PDF isn’t just a repeat of our lesson; it’s brimming with additional materials aimed at enhancing your drawing skills post-lesson. You’ll find exercises inside that build on the techniques we’ve covered, designed to solidify your understanding and improve your drawing finesse.
Think of this PDF as a portable art studio, a place where you can refine your skills at your own pace. It’s there to help you transition smoothly from the basics we’ve tackled to more advanced drawing challenges. So, after you’ve mastered the basics, turn to this PDF to keep your artistic journey thriving.
Alternative Drawing Method
In the pursuit of artistic versatility, I’ve also developed an alternative drawing technique for the pine tree, designed to enhance practice and refine skills. This new method streamlines the process, making it even more accessible for beginners and a fun exercise for those looking to perfect their style.
Embracing the beauty of simplicity, this fresh technique distills the essence of the pine tree into even fewer strokes and shapes. It’s perfect for quickly sketching a forest scene or for young artists honing their craft. This approach focuses on the joy of creating and the satisfaction found in each simplified line.
As you try out this new method, you’ll notice how it encourages a deeper understanding of form and structure in a more relaxed way. It’s a stepping stone toward more detailed work, laying the groundwork for intricate drawings while keeping the process light and enjoyable. This is your invitation to grow as an artist at your own delightful pace.
How to Draw a Pine Tree for Kindergarten
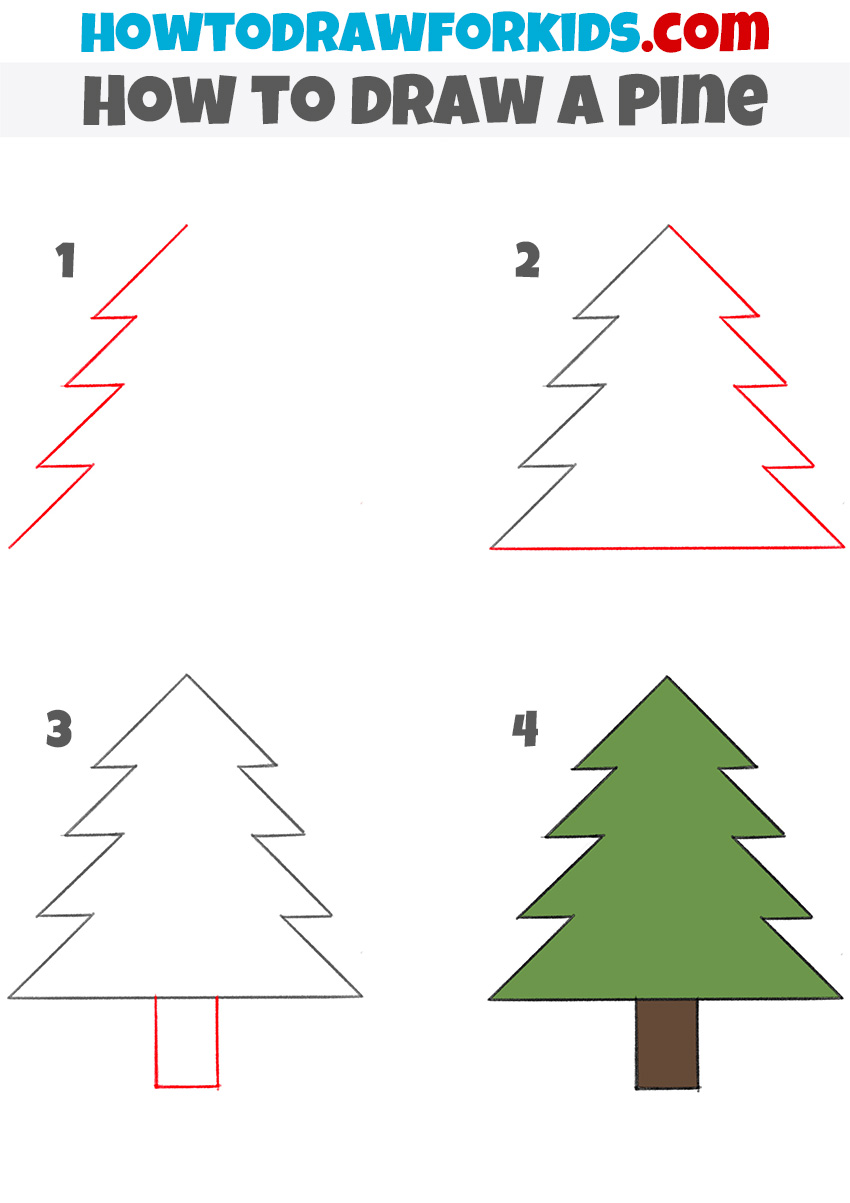
Let’s make drawing as fun as playtime with this super simple four-step method for sketching a pine tree. Our adventure begins with a zigzag line, reminiscent of a crown or a distant mountain peak, setting the stage for our pine tree’s outline.
Moving to step two, we transform this zigzag into a series of connected lines that form a familiar triangle, creating the basic shape of our pine tree. This triangle stands like a tent under the stars, ready for the details that will bring our tree to life.
For our third act, we draw a sturdy rectangle at the base – our tree’s trunk, solid and strong, anchoring the airy triangle above. In the final flourish, we fill our shape with the vibrant green of pine needles, turning a simple diagram into a tree that’s bursting with life and ready to decorate any scene, from a winter wonderland to a storybook forest.
Pro Tips for Crafting Simple Pine Trees
Drawing is a delightful journey, and with our pine tree lesson, it’s one filled with simple joys. Let’s look at some tips and tricks to ensure that this journey is as smooth and enjoyable as possible:
- Maintain Proportions: Keep an eye on the size of the triangle in relation to the trunk to ensure your pine tree is well balanced.
- Use Guiding Dots: Place small dots at each point where the zigzag changes direction to serve as guides for consistent angles.
- Vary the Pressure: Press harder with your pencil for the trunk to differentiate its texture from the softer needles.
- Embrace Imperfections: If your lines aren’t perfectly straight or evenly spaced, that’s okay. Nature itself isn’t perfect, and it’s these little imperfections that add character to your drawing.
- Experiment with Colors: Don’t be afraid to use different shades of green to give your tree more dimension and life.
- Practice Shading: Try adding a bit of shadow at the base and along one side of the tree to give it a three-dimensional look.
- Add Details Gradually: If you’re feeling confident, introduce more details like branches or texture to the trunk as you practice more.
To wrap up, remember that these tips are stepping stones to developing your own unique style. With every pine tree you draw, you’re not just creating a picture; you’re growing your skills and nurturing your artistic voice. Keep these tricks in your artist’s toolbox, and watch your forest of drawings flourish!
The Pine Tree’s Tale: Weaving Stories in Your Nature Sketches
Embarking on a drawing journey means more than just capturing a single subject; it’s about weaving a narrative into your art. Let’s explore how to expand the world around your pine tree and turn a simple sketch into a full scene with character and context. Here’s how you can add depth and interest to your pine tree drawings:
- Nestle a Cabin: Add a cozy cabin beside your pine tree. Start with a simple rectangle for the base, then a triangle for the roof, and small squares for windows to invite warmth into the scene.
- Sketch a Forest Path: Lead the viewer into your drawing with a winding path. Begin with two curving lines that come closer together in the distance to create depth.
- Introduce Wildlife: Perhaps a curious squirrel or a serene deer could grace the base of your tree. Use ovals and circles to form their bodies and add small details for features.
- Draw a Camping Scene: Place a tent with a triangular top and a rectangular base near your tree, and add a circle for a campfire with some logs around it for a touch of outdoor adventure.
- Incorporate Weather Elements: Show your tree braving the elements by adding falling snowflakes with tiny asterisks, or rain with simple diagonal lines.
- Scatter Wildflowers: Tiny strokes around the tree’s base can represent wildflowers, adding splashes of color and life at the foot of your pine.
- Include Bird Friends: A few ‘V’ shapes in the sky can become birds flying or perching on the branches, turning the tree into a lively habitat.
- Add Texture to the Ground: Give your scene grounding with textured ground – short, horizontal lines for grass or uneven wavy lines to suggest fallen leaves.
Use my tutorials to create these scenes. As we conclude this lesson, let’s remember that each new element we add to our drawing not only enhances the main subject but also contributes to the storytelling of our artwork. Keep these tips in your artist’s toolkit, and watch your drawings evolve into dynamic works of art.
Conclusion
Our journey through the forest has just begun, and already your pine tree stands tall on the paper before you. If you’re eager to explore further, countless other lessons await on my website – imagine the inky intrigue of drawing a squid or the gothic charm of sketching a vampire.
Connect with me on social media to catch the wave of new content, and never miss out on our next artistic escapade. Your comments and suggestions fuel our future tutorials, so share your thoughts below! What do you want to create next? Together, we’ll bring your ideas to life, one line at a time.

